Quick Start
Hardware preparation
- A Windows computer, recommended for the 'Win10' system
- A set of EC200UEUAA QuecPython standard development board (including LTE antenna, Type-C data cable, etc.)
- One GNSS antenna
- A pin and jumper cap
- A functional Nano SIM card
Environment construction
- Download and install EC200U series module driver: QuecPython_USB_Driver_Win10_U_G
- Download and install VSCode
- Download and unzip QPYcom Tool to the appropriate location on the computer
- Use QPYcom to burn firmware package
- Download Experimental Source Code
Hardware connection
Connect the hardware according to the following diagram:
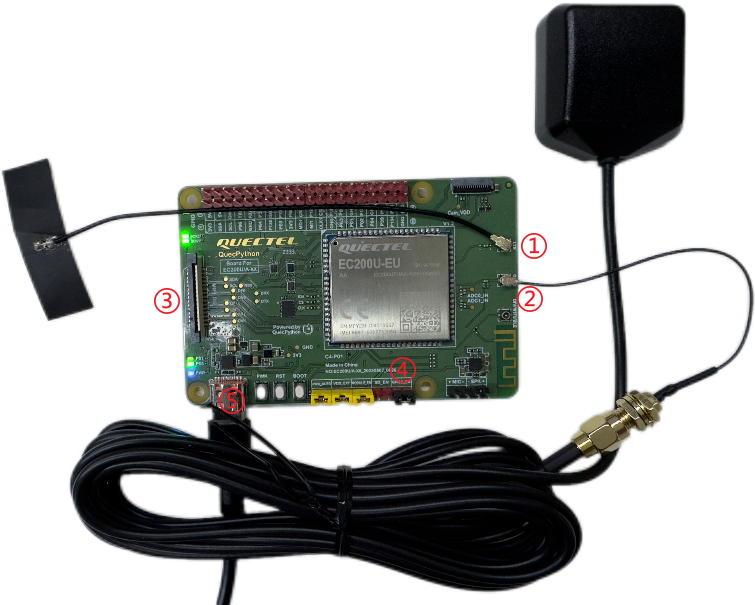
- Connect the LTE antenna to the antenna connector labeled with the word 'LTE'
- Connect the GNSS antenna to the antenna connector marked with the word 'GNSS'
- Insert a usable Nano SIM card into the back of the development board at the position shown in the diagram
- Use jumper caps to short-circuit the two pins marked with the words 'GNSS-EN' to enable the development board's built-in GNSS function
- Connect the development board and computer using a Type-C data cable
Cloud Service Platform
Follow these steps to create, configure, and connect to the Alibaba Cloud IoT platform:
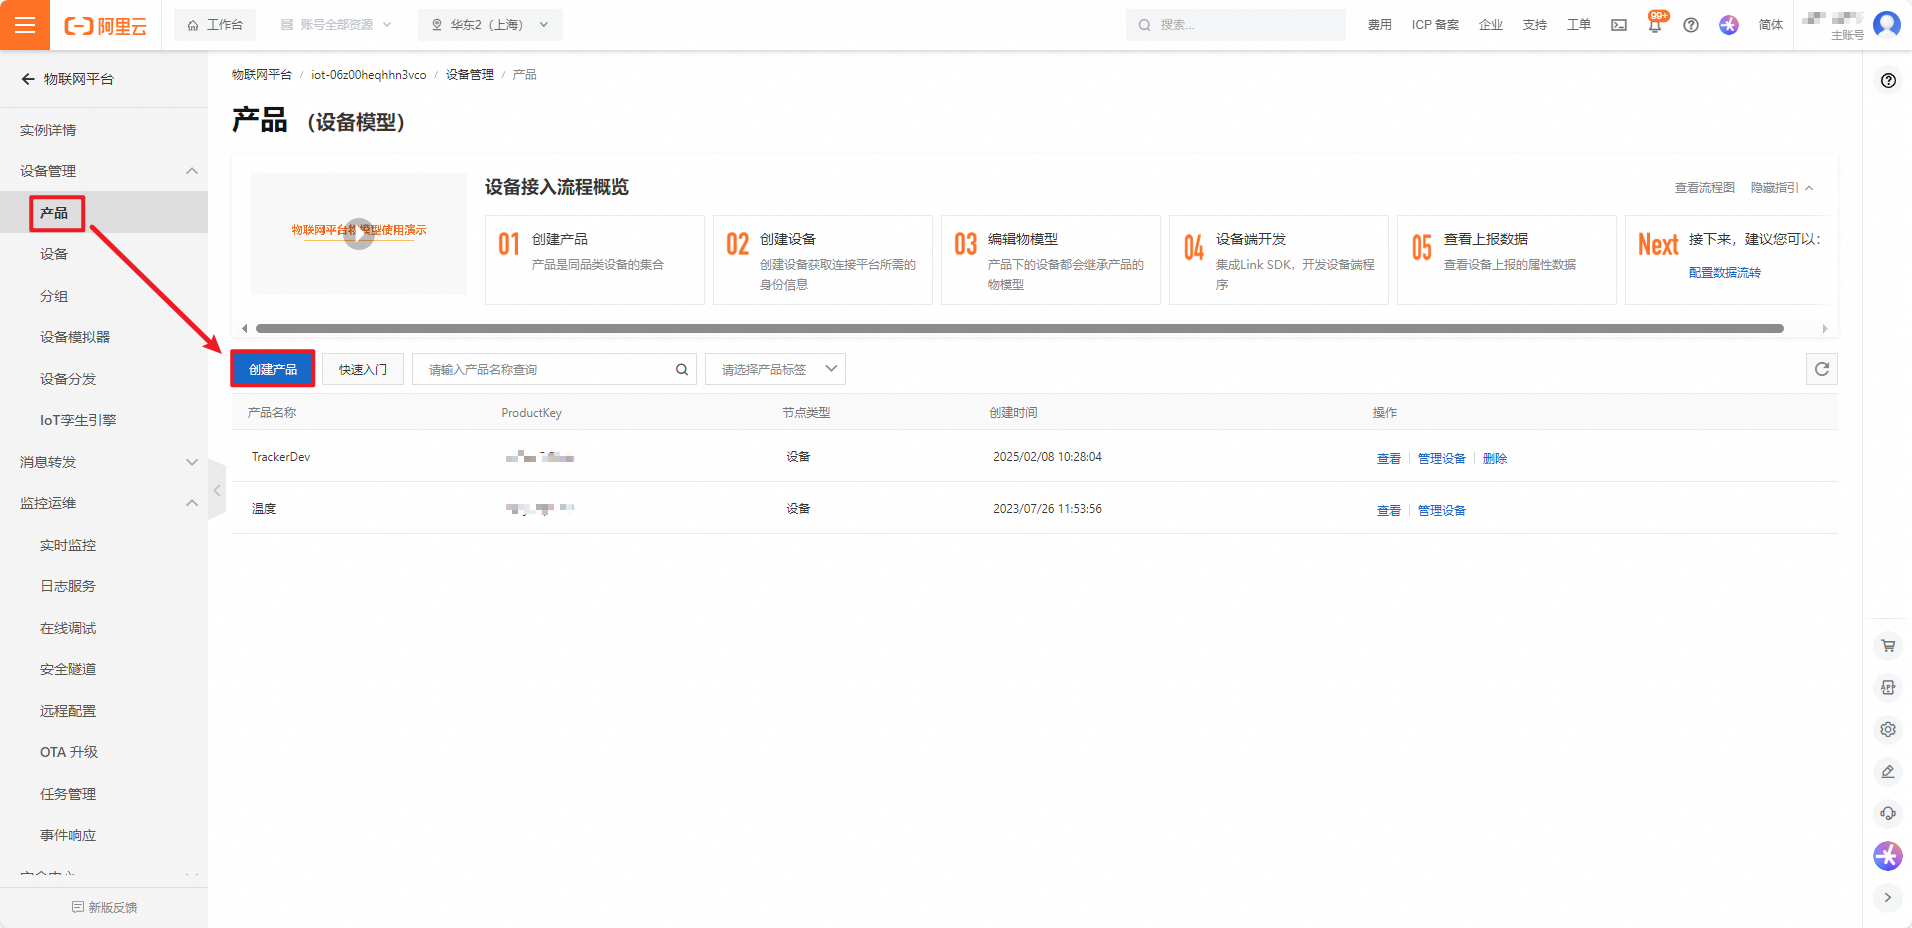
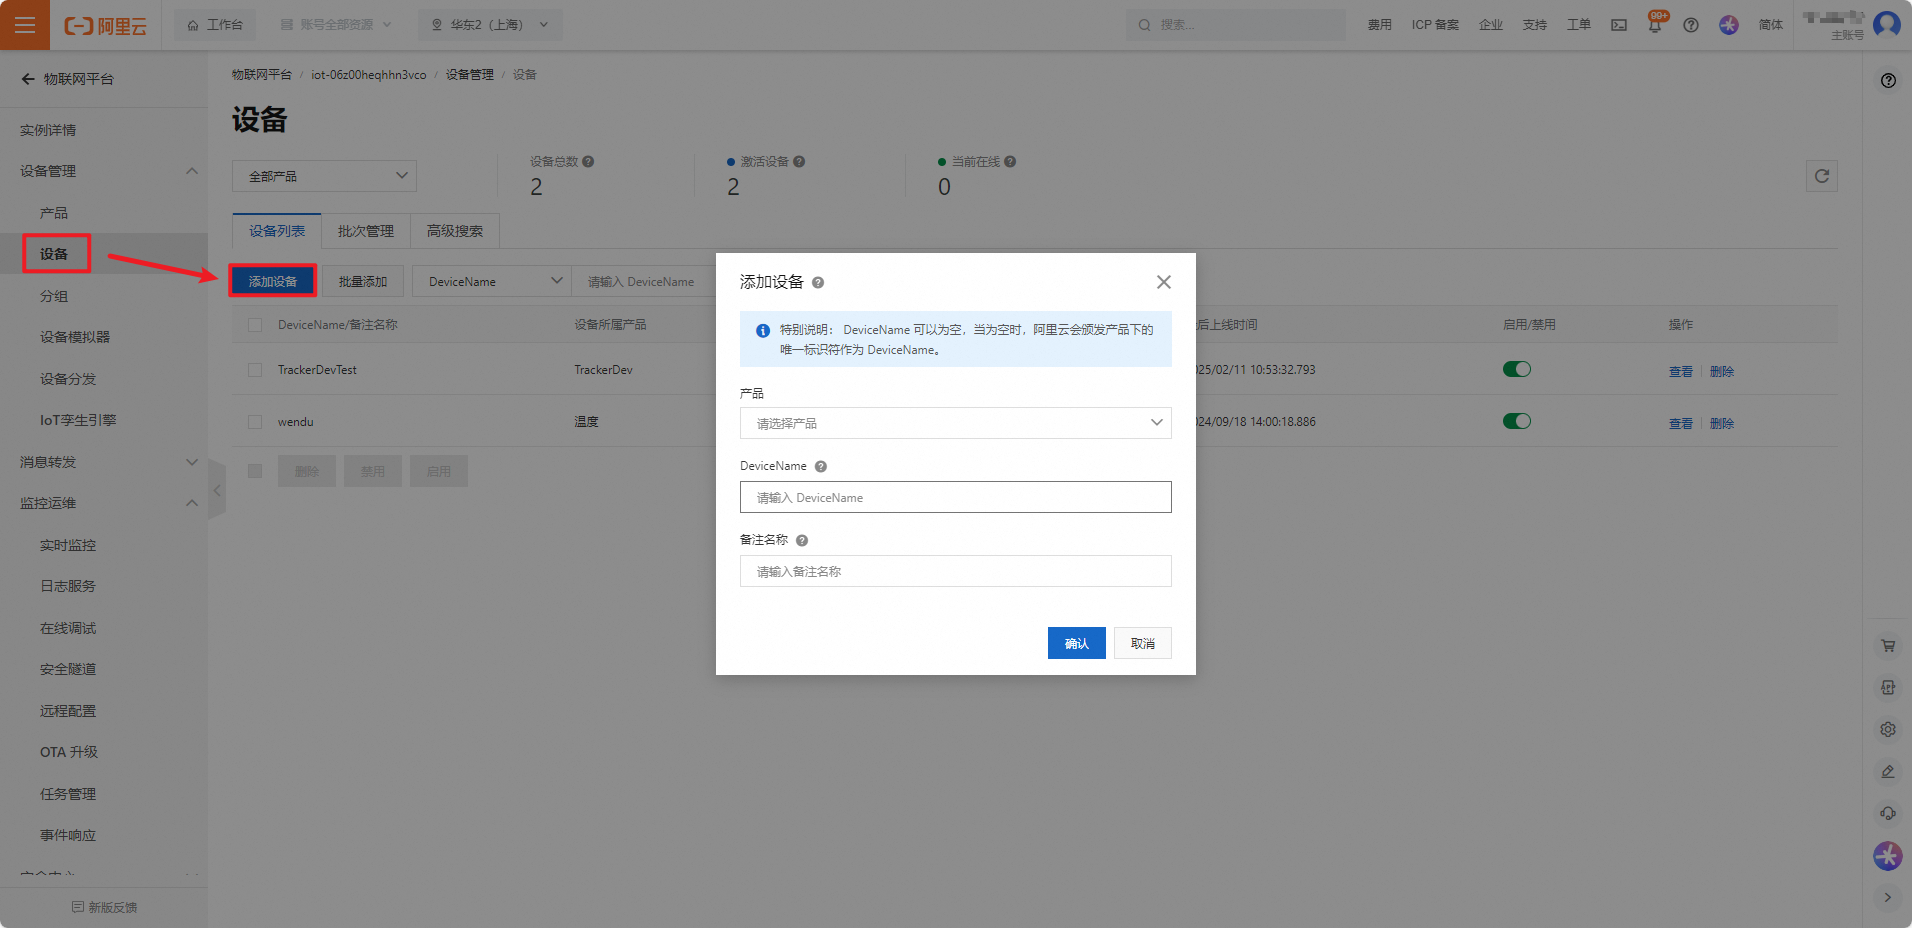
Create products and devices
For details, please refer to the Alibaba Cloud documentation: Creating Products and Devices.
create product
create device
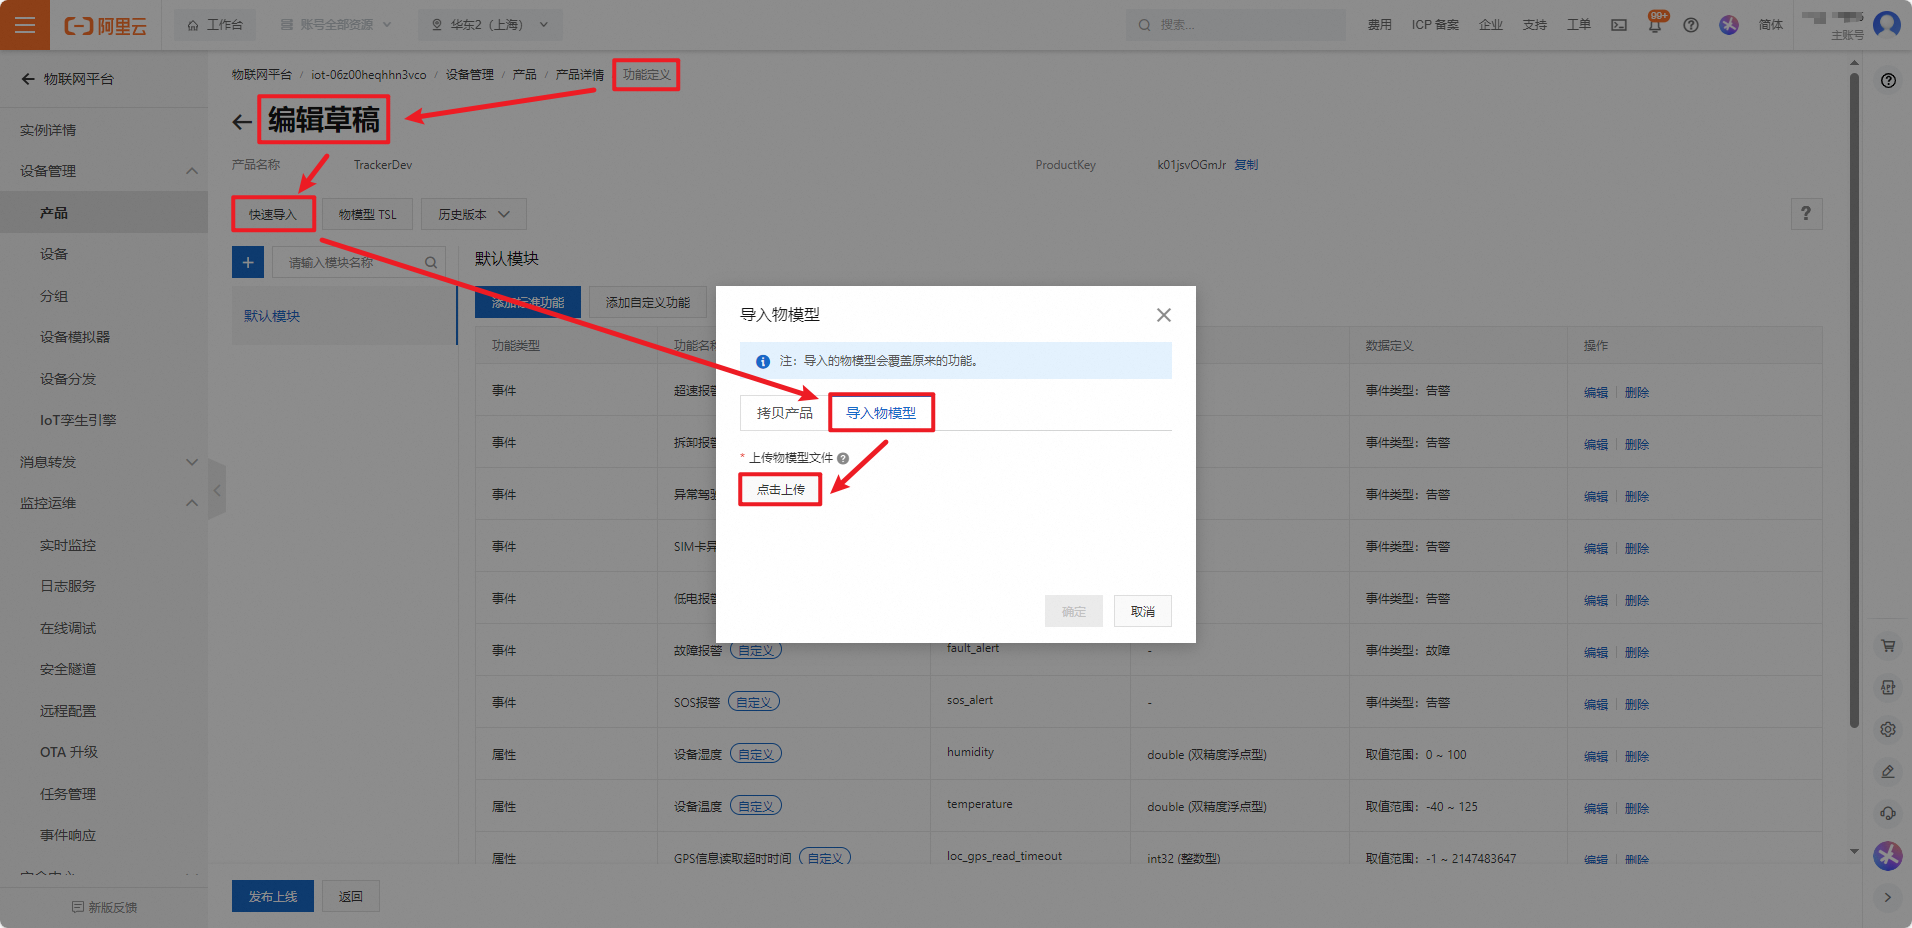
Define object model
For details, please refer to the Alibaba Cloud documentation: Defining Product Models.
The object model can provide a more intuitive view of the uploaded data values. This solution provides a demo of the object model, which can be directly imported into the object_model_demo/ai_cloud_object_model.json file in the engineering project for automatic generation, without the need for manual creation.
Device development
This section focuses on how to modify the configurations or code that users need to pay attention to in their business, so that they can quickly get started.
Before starting, use VSCode to open the project source code and locate the configuration file starting with settings _ in the code for configuration.
This solution supports two optional platforms: Alibaba IoT and Thingsboard. This mainly introduces the configuration and connection of using Alibaba IoT.
IoT Platform Connection Information
settings_server.py is used to configure IoT platform connection information.
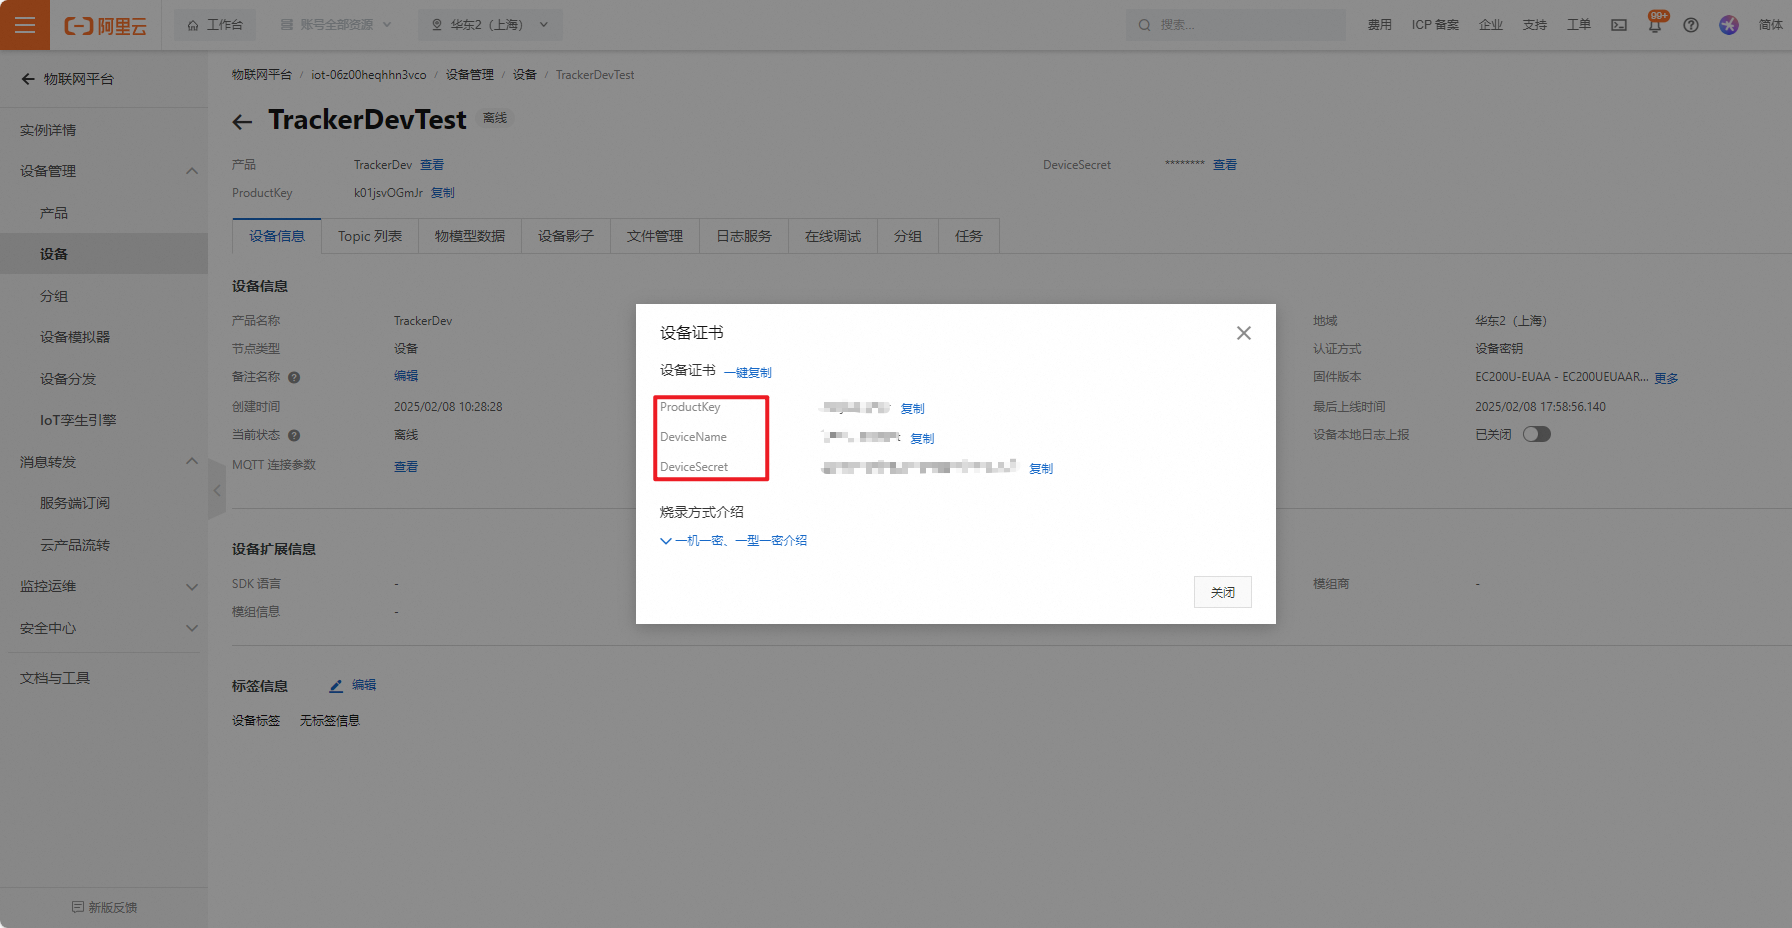
class AliIotConfig:
    product_key = ""
    product_secret = None
    device_name = ""
    device_secret = ""
    server = "iot-as-mqtt.cn-shanghai.aliyuncs.com"
    qos = 1

class ThingsBoardConfig:
    host = ""
    port = 1883
    username = ""
    qos = 0
    client_id = ""
Positioning module configuration information
settings_loc.py is used to configure the configuration information of the positioning module (built-in GNSS/external GNSS serial port, authentication information for base station/WiFi positioning)
This solution is based on the built-in GNSS function implementation of the EC200UEUAA QuecPython standard development board.
# GNSS
gps_cfg = {
    "gps_mode": _gps_mode.internal,		# builtin GNSS
    "UARTn": UART.UART2,
    "buadrate": 115200,
    "databits": 8,
    "parity": 0,
    "stopbits": 1,
    "flowctl": 0,
    "PowerPin": None,
    "StandbyPin": None,
    "BackupPin": None,
}

# Cell
cell_cfg = {
    "serverAddr": "www.queclocator.com",
    "port": 80,
    "token": "xxxxxxxxxx",
    "timeout": 3,
    "profileIdx": profile_idx,
}

# Wifi
wifi_cfg = {
    "token": "xxxxxxxxxx"
}
User business configuration information
settings_user.py is used to configure relevant configuration parameters for user business functions (such as alarm switches, low power thresholds, etc.)
class _server:
    none = 0x0
    AliIot = 0x1
    ThingsBoard = 0x2

class _drive_behavior_code:
    none = 0x0
    sharply_start = 0x1
    sharply_stop = 0x2
    sharply_turn_left = 0x3
    sharply_turn_right = 0x4

class _ota_upgrade_module:
    none = 0x0
    sys = 0x1
    app = 0x2

debug = 1
log_level = "DEBUG"
checknet_timeout = 60
server = _server.AliIot
phone_num = ""
low_power_alert_threshold = 20
low_power_shutdown_threshold = 5
over_speed_threshold = 50
sw_ota = 1
sw_ota_auto_upgrade = 1
sw_voice_listen = 0
sw_voice_record = 0
sw_fault_alert = 1
sw_low_power_alert = 1
sw_over_speed_alert = 1
sw_sim_abnormal_alert = 1
sw_disassemble_alert = 1
sw_drive_behavior_alert = 1
drive_behavior_code = _drive_behavior_code.none
loc_method = _loc_method.all
loc_gps_read_timeout = 300
work_mode = _work_mode.cycle
work_mode_timeline = 3600
work_cycle_period = 30
user_ota_action = -1
ota_status = {
    "sys_current_version": "",
    "sys_target_version": "--",
    "app_current_version": "",
    "app_target_version": "--",
    "upgrade_module": _ota_upgrade_module.none,
    "upgrade_status": _ota_upgrade_status.none,
}
Power on
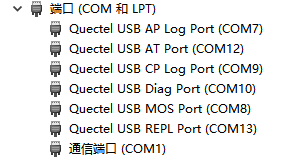
After completing the hardware connection work, the development board will automatically power on and check if there are any COM ports containing the words' Quectel USB 'in the port list of the computer device manager.
Download firmware
Refer to this chapter, burn firmware package QPy_OCPU_SETA0001_EC200U_SUAA_FW To the development board.
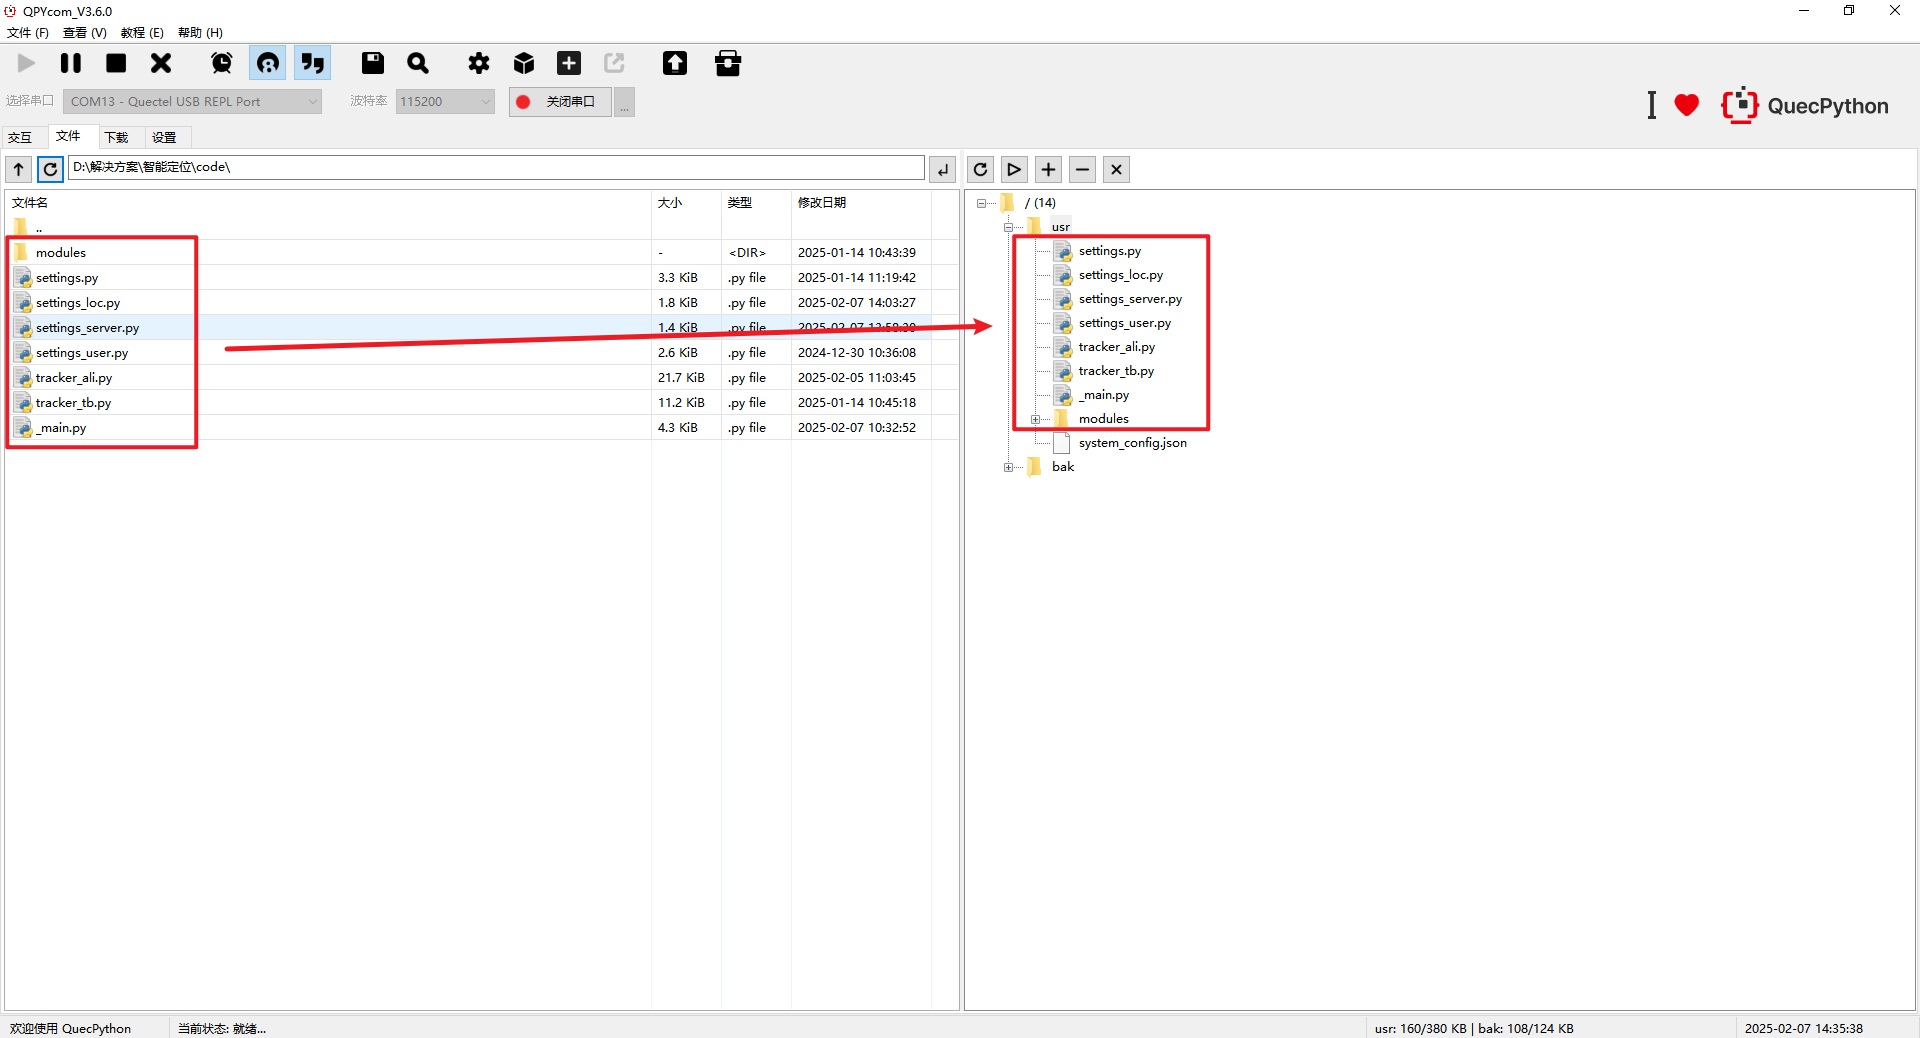
Script import and execution
Refer to this chapter To transfer files between modules, import all files from the 'code' folder in the source code directory into the module file system, as shown in the following figure:
Refer to this chapter, Execute the script file and execute the main program file
_main. py.Refer to this chapter, stop program running.
Debugging
Program startup
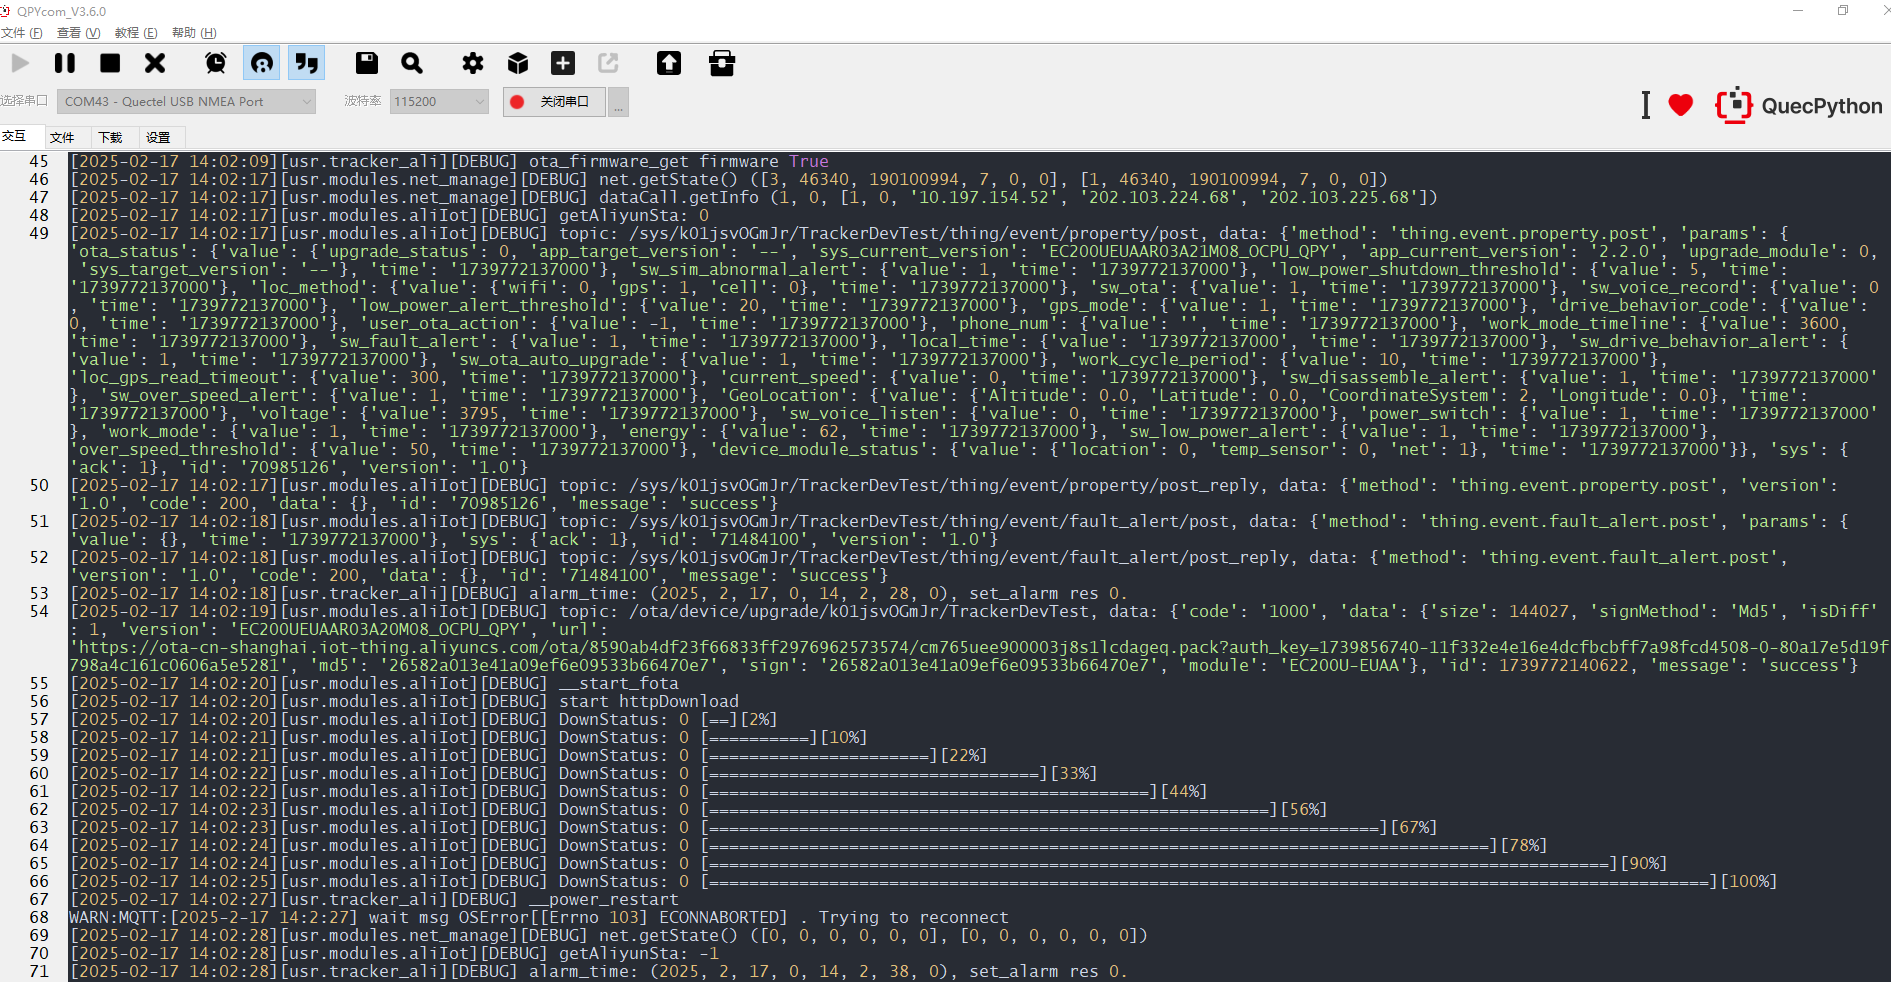
After executing the _main.py script, the program starts running and the project running status can be viewed on the interactive page:
The program needs to run for a period of time to obtain GNSS positioning information, please refer to the relevant document for details.
![]()
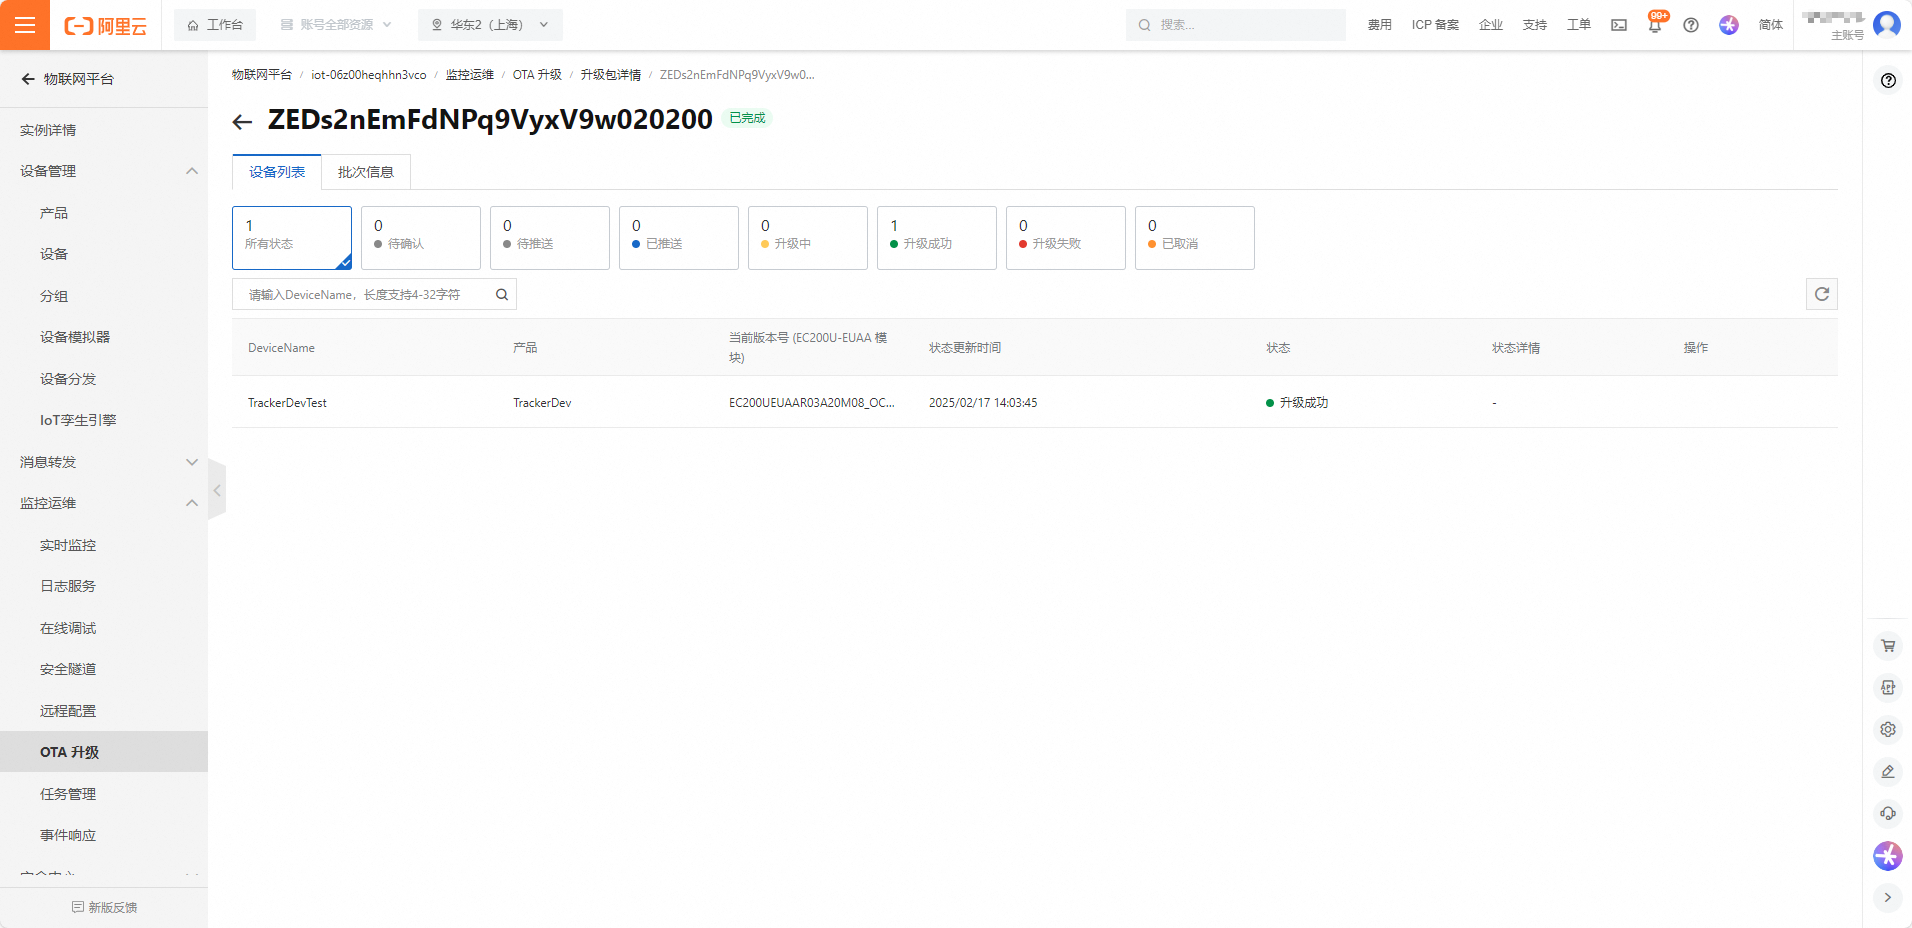
On the Alibaba Cloud IoT platform, device status information can be viewed.
![]()
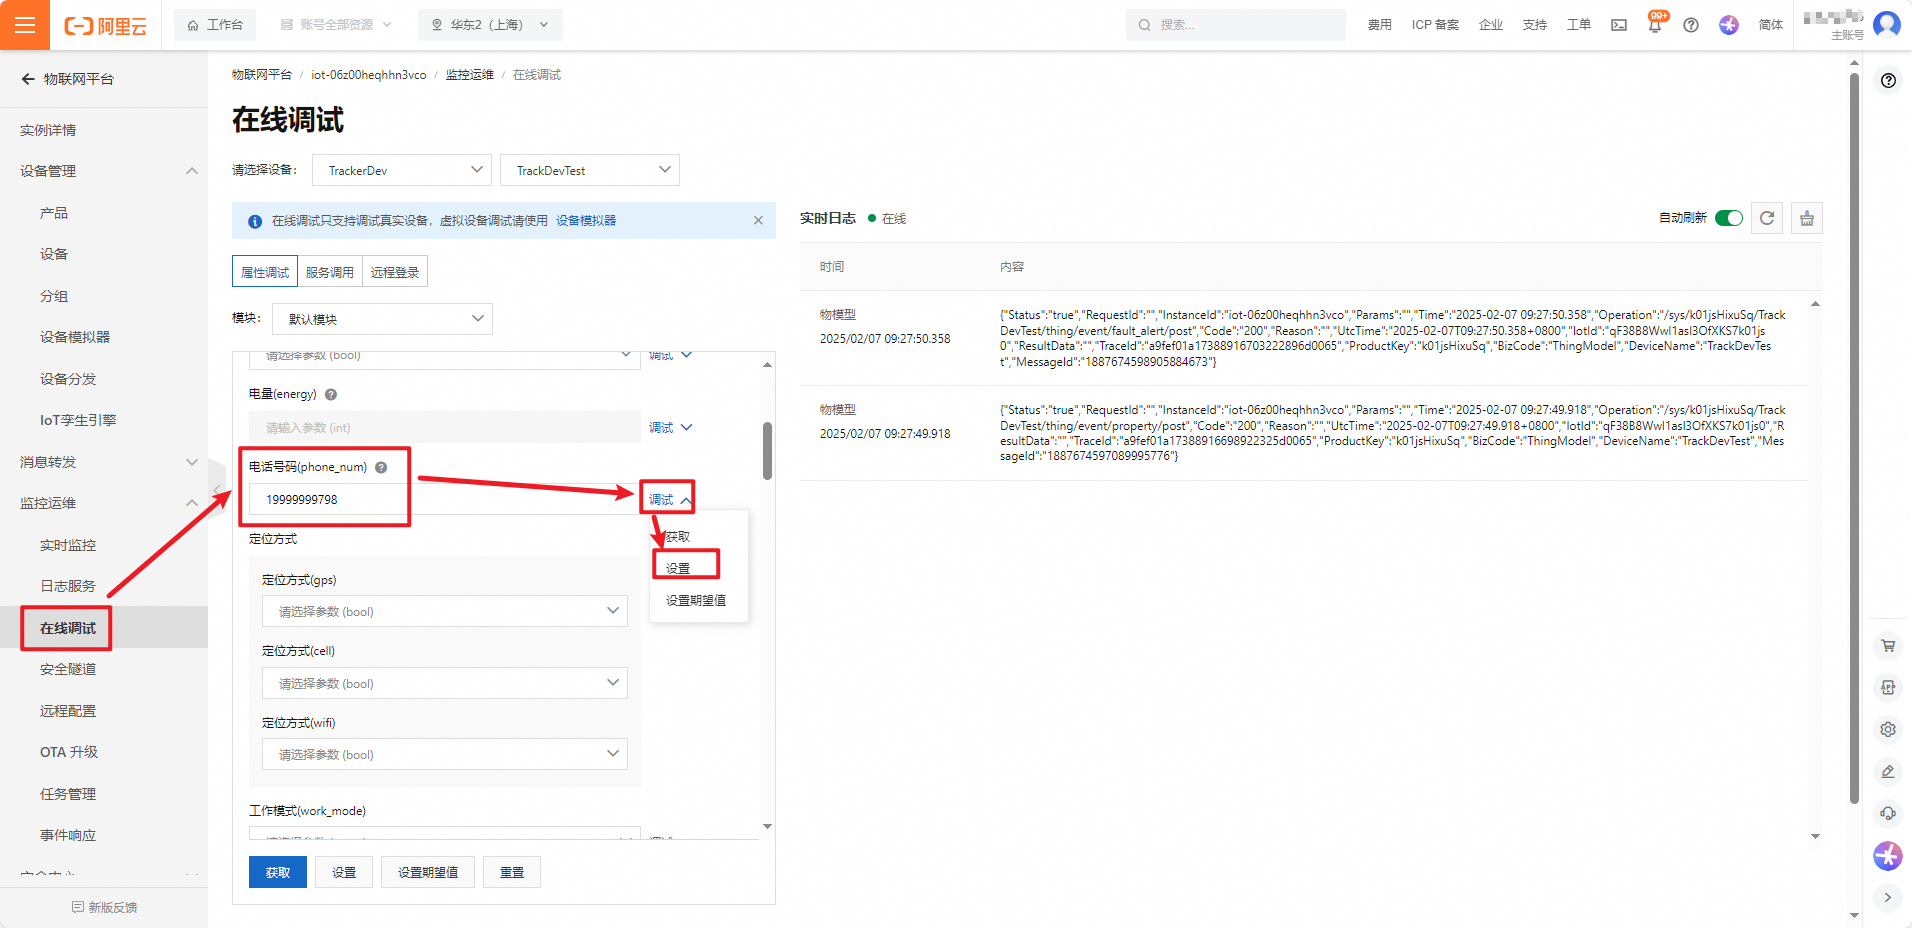
Cloud control
Send instructions to the device end for device control and data exchange through online debugging.
OTA
Firmware upgrade only supports differential upgrade, not full package upgrade ;
Project file upgrade package, made by modifying the project code file extension to '. bin', uploaded to the cloud, can upload multiple files .
Firmware Upgrade
- Create firmware upgrade differential package (contact firmware developers);
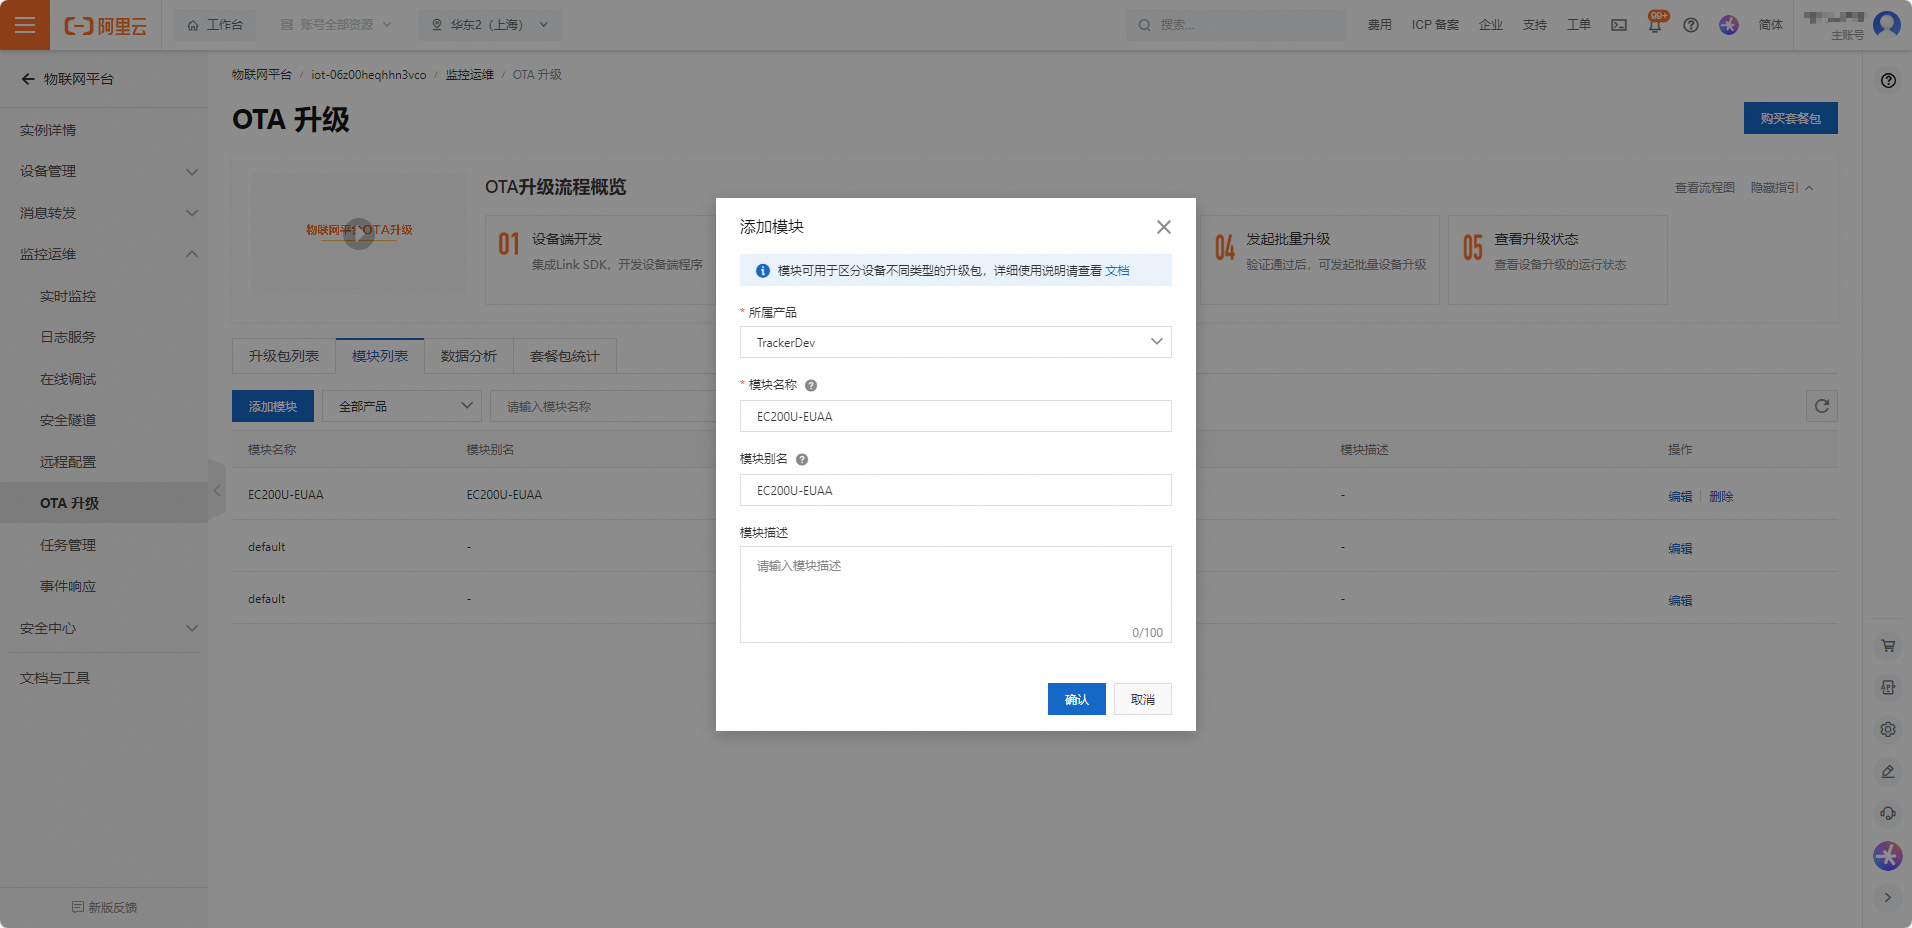
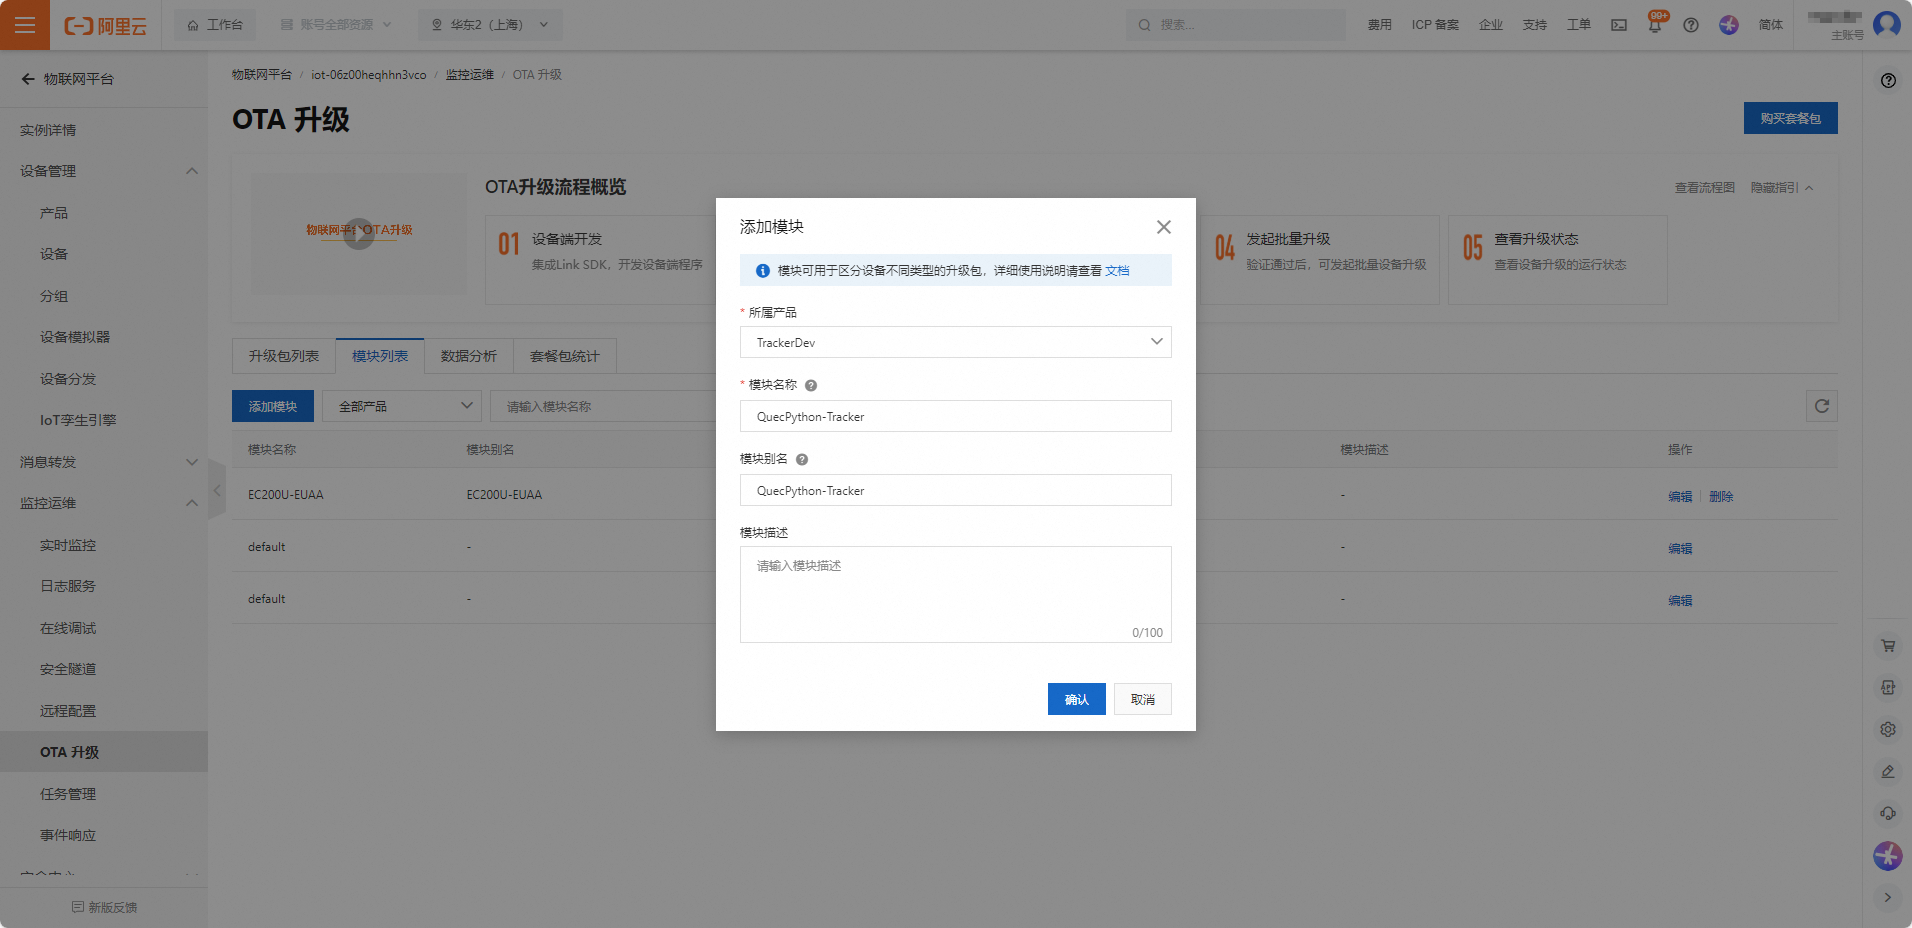
- Create an OTA module and name it after the device platform, such as:
EC200U-EUAA。
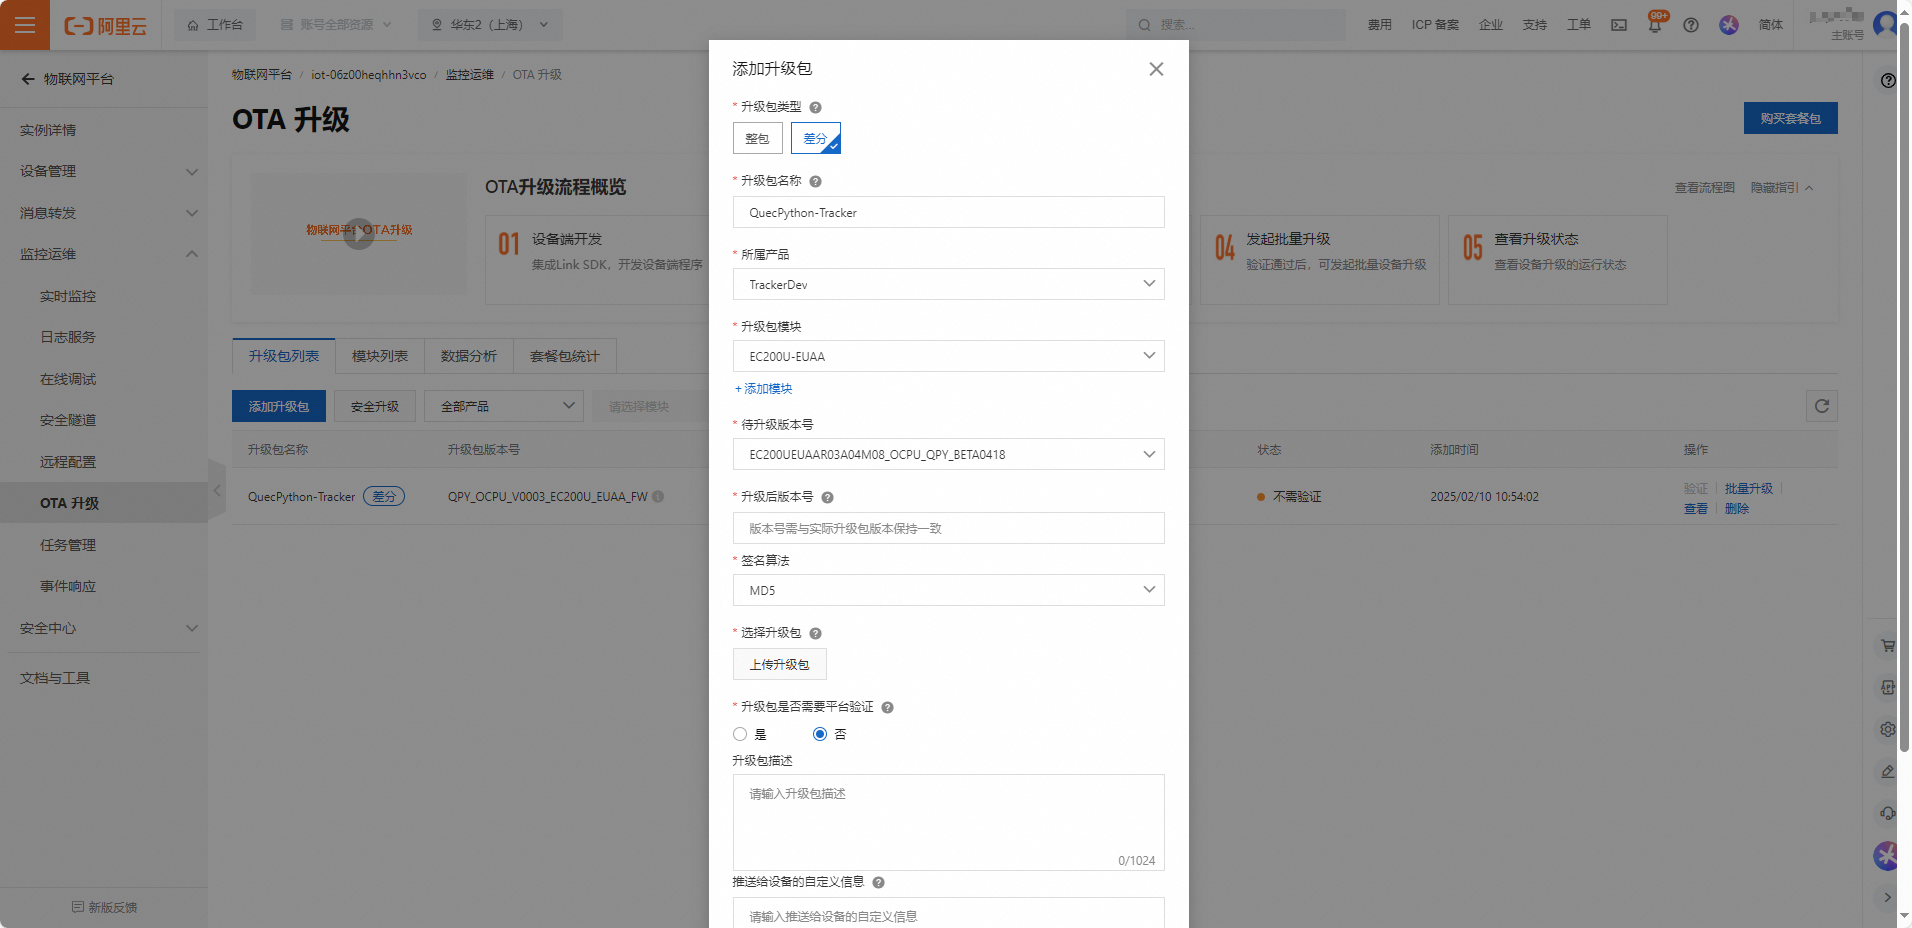
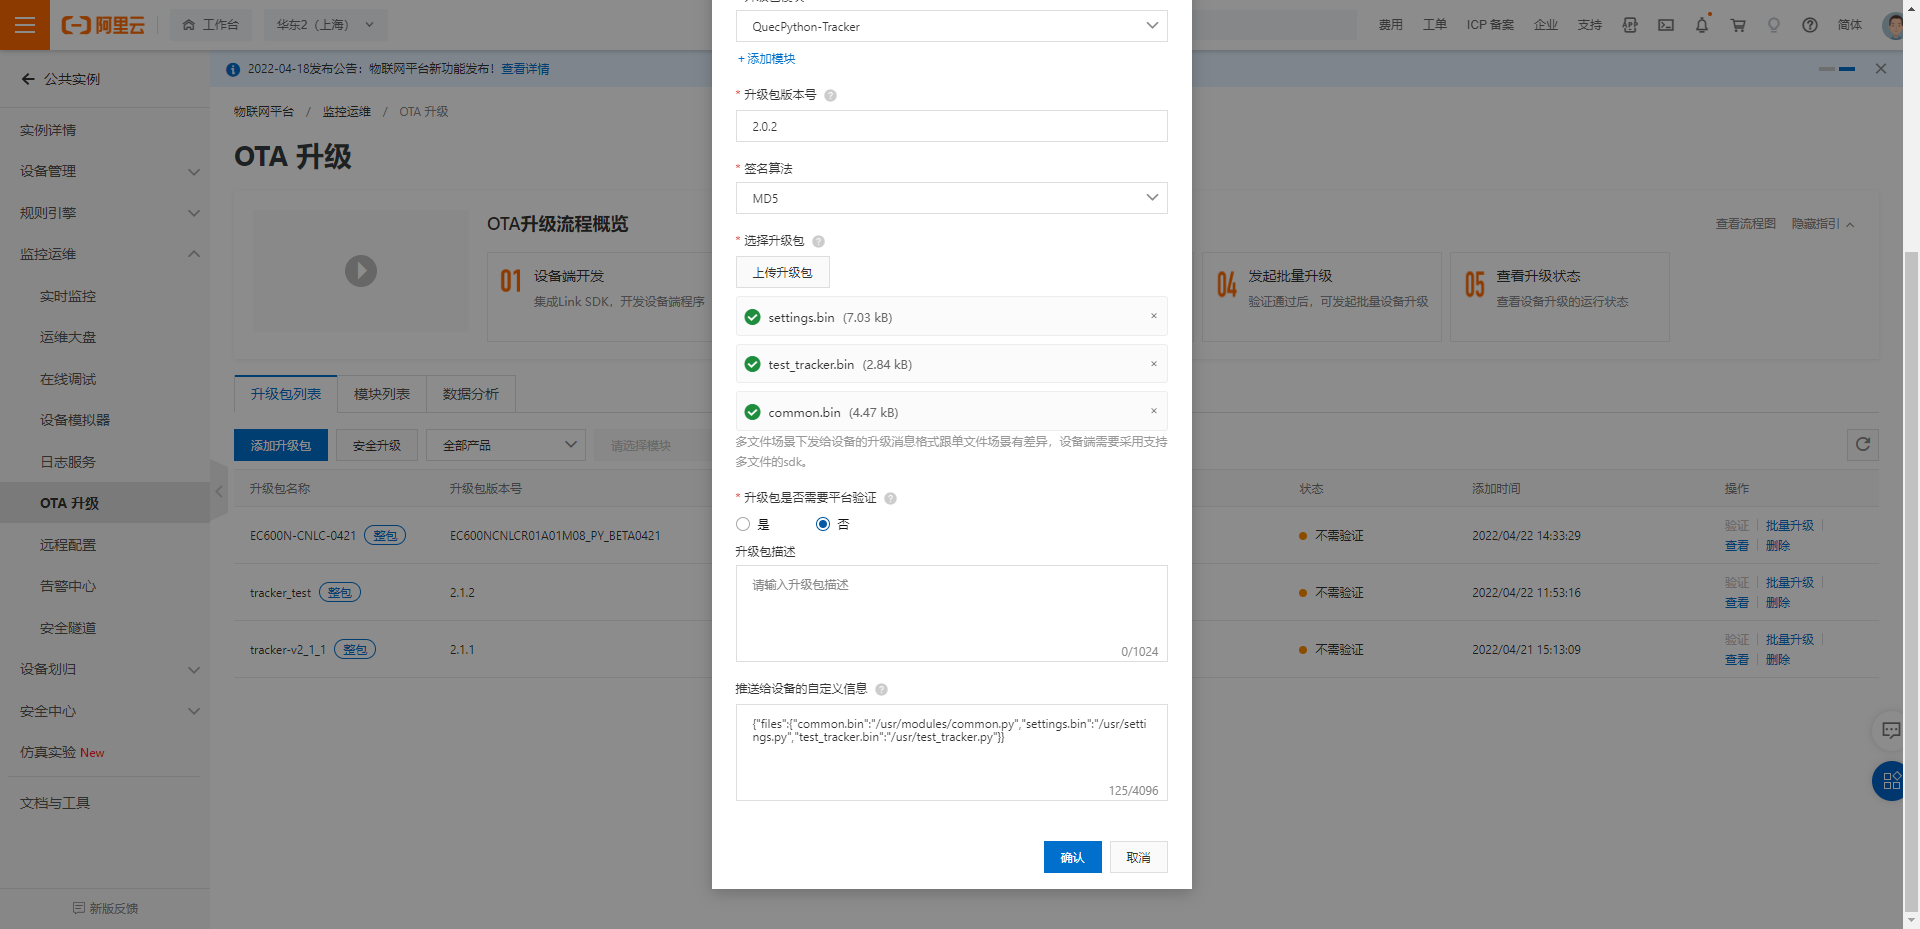
Create OTA upgrade package
The upgrade package name is named after
PROJECT-NAMEinsettings.py, for example:QuecPython-Tracker
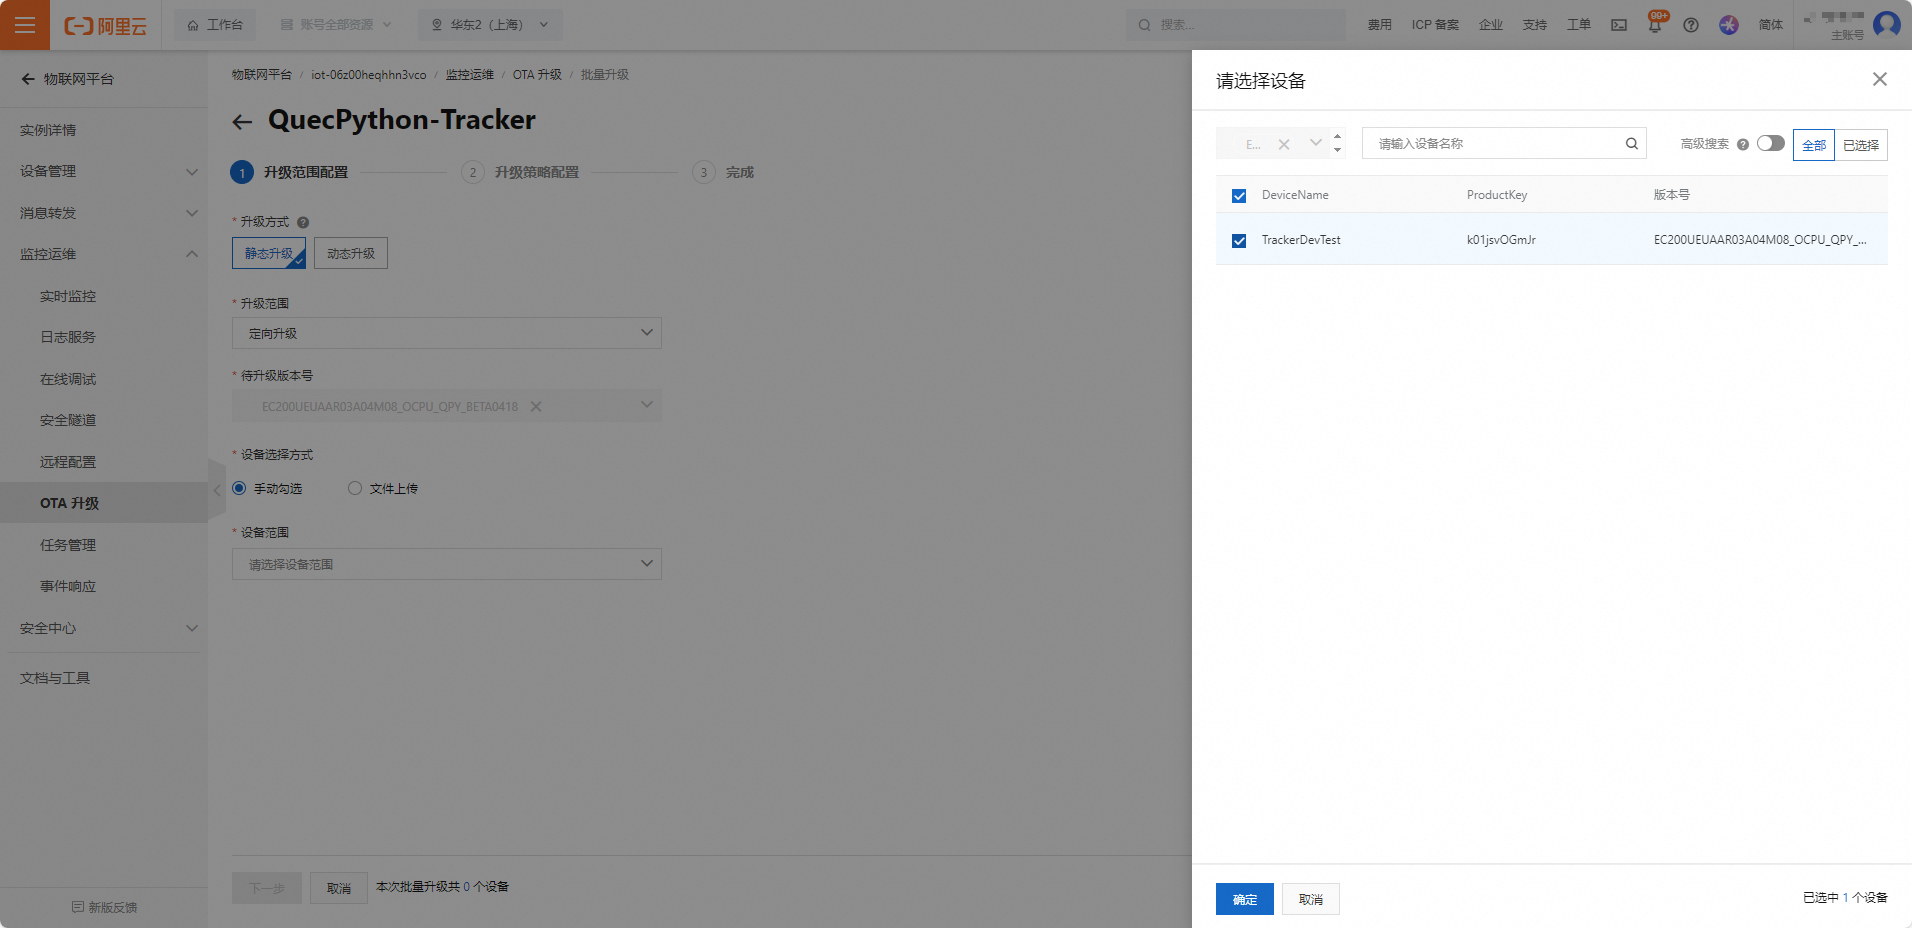
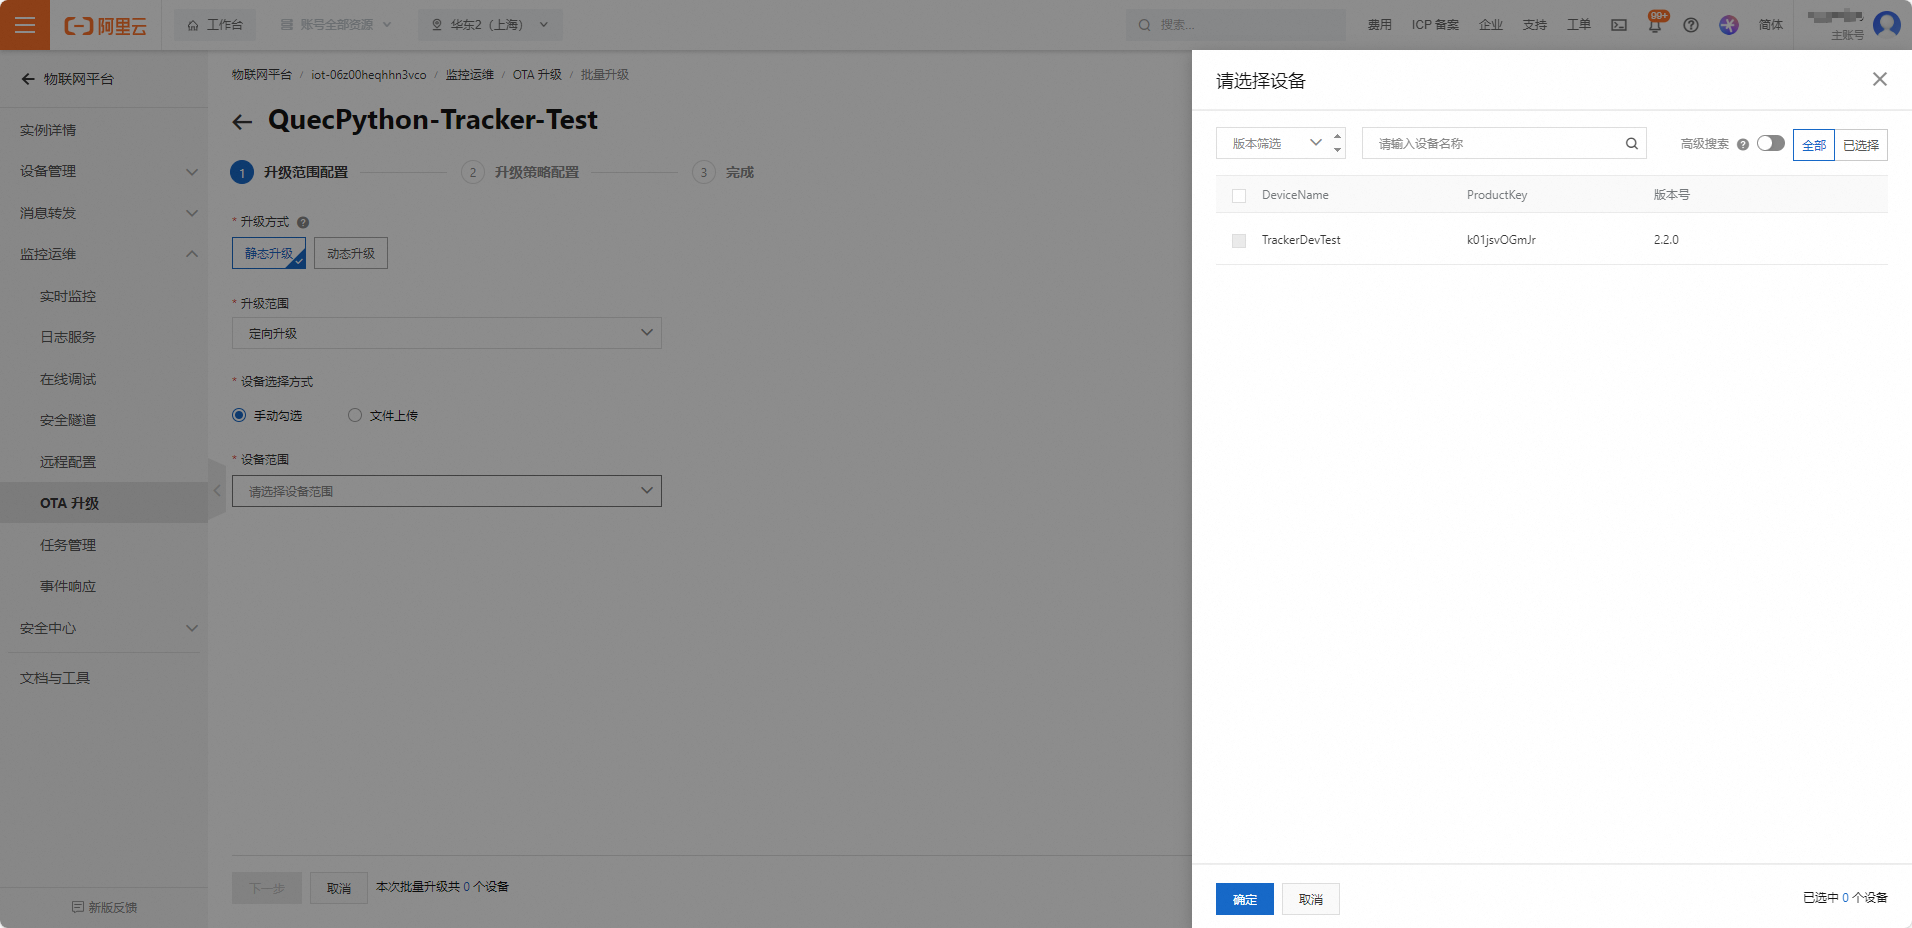
- Select batch upgrade and create upgrade plan
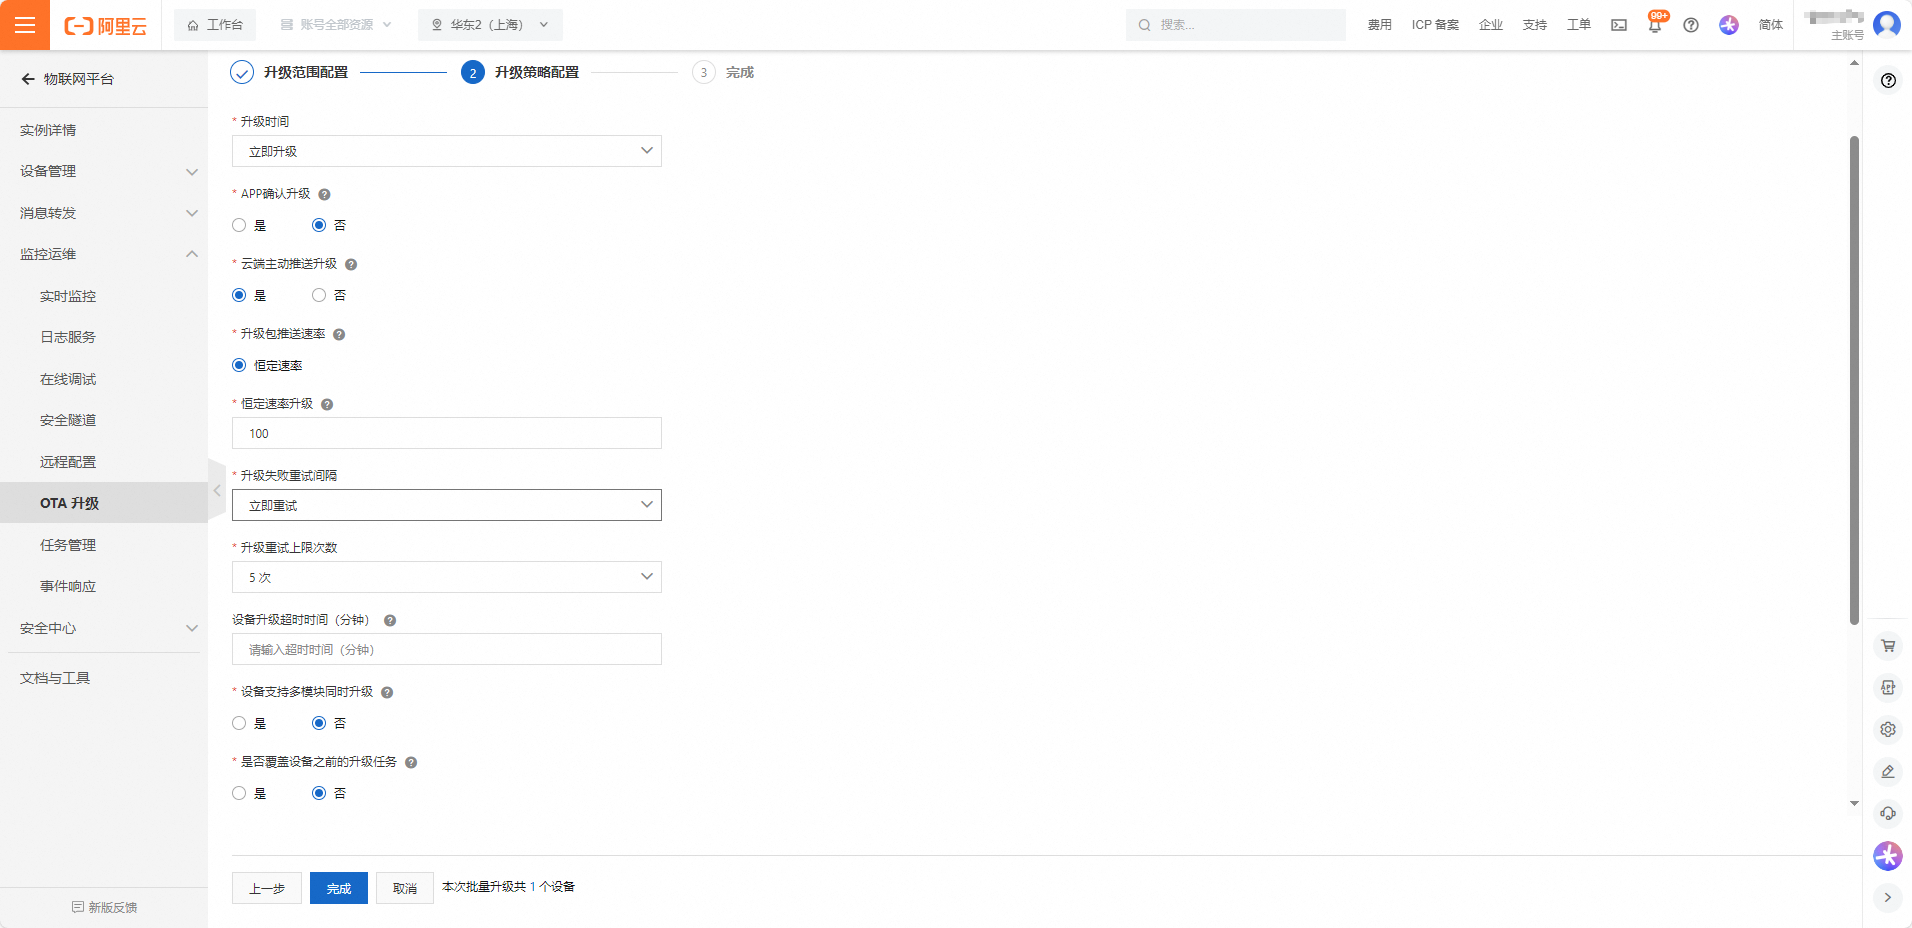
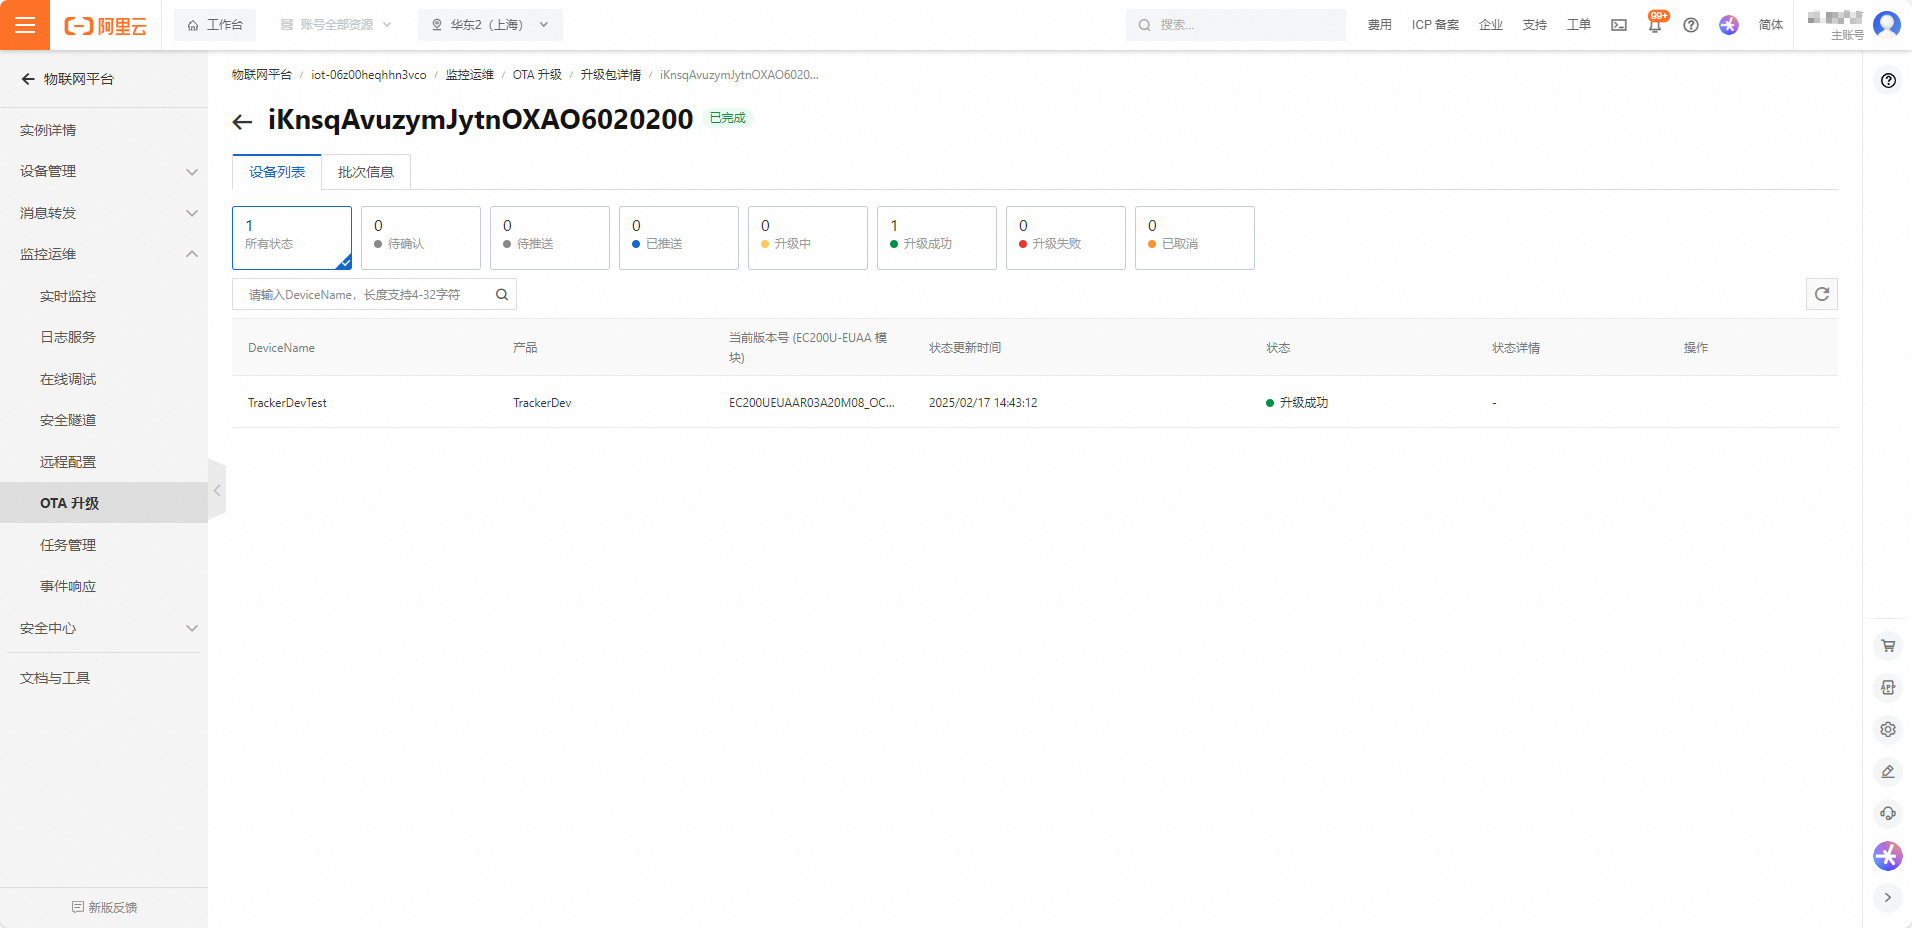
Wait for device upgrade and view upgrade results
When the device enables OTA upgrade and OTA automatic upgrade, wait for the device upgrade to complete and view the upgrade results;
When the device enables OTA upgrade but does not enable automatic upgrade, the OTA upgrade can be performed by issuing the object model setting command
user_ota.action=1through the online debugging module.
Project Upgrade
- Create an OTA module named
PROJECT-NAMEinsettings.py, for example:QuecPython-Tracker。
- Change the file extension of the project that needs to be upgraded to
.bin - Create OTA upgrade package
- Here, it is necessary to write the device full path file name corresponding to the upgrade file name in the custom information pushed to the device, such as:
{"files":{"common.bin":"/usr/modules/common.py","settings.bin":"/usr/settings.py","test_tracker.bin":"/usr/test_tracker.py"}}
- Here, it is necessary to write the device full path file name corresponding to the upgrade file name in the custom information pushed to the device, such as:
Select batch upgrade and create upgrade plan
Wait for device upgrade and view upgrade results
- When the device enables OTA upgrade and OTA automatic upgrade, wait for the device upgrade to complete and view the upgrade results;
- When the device enables OTA upgrade but does not enable automatic upgrade, the OTA upgrade can be performed by issuing the object model setting command
user_ota.action=1through the online debugging module.