
Device development based on TCP protocol
Modify configuration file
configuration file path: code/dtu_config.json。
Based on TCP private server data transparent transmission, configure as follows:
The default
systemconfig.cloudconfiguration item is defined asTCP, which means TCP transparent mode. The system will automatically read thesocket_private_cloud_configconfiguration item.{ "system_config": { "cloud": "tcp" } }This experiment adopts TCP transparent transmission mode, and users need to set the TCP server domain name (domain) and port (port) in the
socket_pivate_cloud_configconfiguration item according to the actual situation.{ "socket_private_cloud_config": { "domain": "112.31.84.164", "port": 8305, "timeout": 5, "keep_alive": 5 } }The
uart_configconfiguration item is a serial port configuration parameter, which defaults to the configuration made based on the current experimental development board and cannot be changed. If users use other development boards, they need to configure according to the actual hardware.
{
    "uart_config": {
        "port": 2,
        "baudrate": 115200,
        "bytesize": 8,
        "parity": 0,
        "stopbits": 1,
        "flowctl": 0,
        "rs485_config": {
        	"gpio_num": 28,
            "direction": 0
        }
    }
}
The complete configuration file template is as follows:
{
    "system_config": {
        "cloud": "tcp"
    },
    "mqtt_private_cloud_config": {
        "server": "mq.tongxinmao.com",
        "port": 18830,
        "client_id": "txm_1682300809",
        "user": "",
        "password": "",
        "clean_session": true,
        "qos": 0,
        "keepalive": 60,
        "subscribe": {"down": "/public/TEST/down"},
        "publish": {"up":  "/public/TEST/up"}
    },
    "socket_private_cloud_config": {
        "domain": "112.31.84.164",
        "port": 8305,
        "timeout": 5,
        "keep_alive": 5
    },
    "uart_config": {
        "port": 2,
        "baudrate": 115200,
        "bytesize": 8,
        "parity": 0,
        "stopbits": 1,
        "flowctl": 0,
        "rs485_config": {
        	"gpio_num": 28,
            "direction": 0
        }
    }
}
Parameter description:
systemconfig. config: Specify the type of private cloud currently in use. Currently supports TCP and MQTT.mqtt_private_cloud_config: MQTT private cloud configuration.socket_private_cloud_config: TCP private cloud configuration.uart_config: Serial port parameter configuration.
Script import and run
After downloading and installing the QPYCom tool, use the tool to download the script to the QuecPython module.
💡 Tips
QPYCom Installation and Usage Tutorial: https://python.quectel.com/doc/Application_guide/en/dev-tools/QPYcom/index.html
Debugging
After the program runs, the log output can be seen on the REPL interaction page as shown in the following figure.
In the diagram on the left, we use QCOM to simulate MCU opening the module serial port for transparent transmission (i.e. the COM port corresponding to the USB to TTL module).
The diagram on the right shows the module log output from the REPL interaction port.
Use the serial port tool QCOM to simulate MCU serial port upstream data, transmit it transparently to the TCP echo server through DTU, and then the echo server transmits the same data transparently downstream to QCOM through DTU.
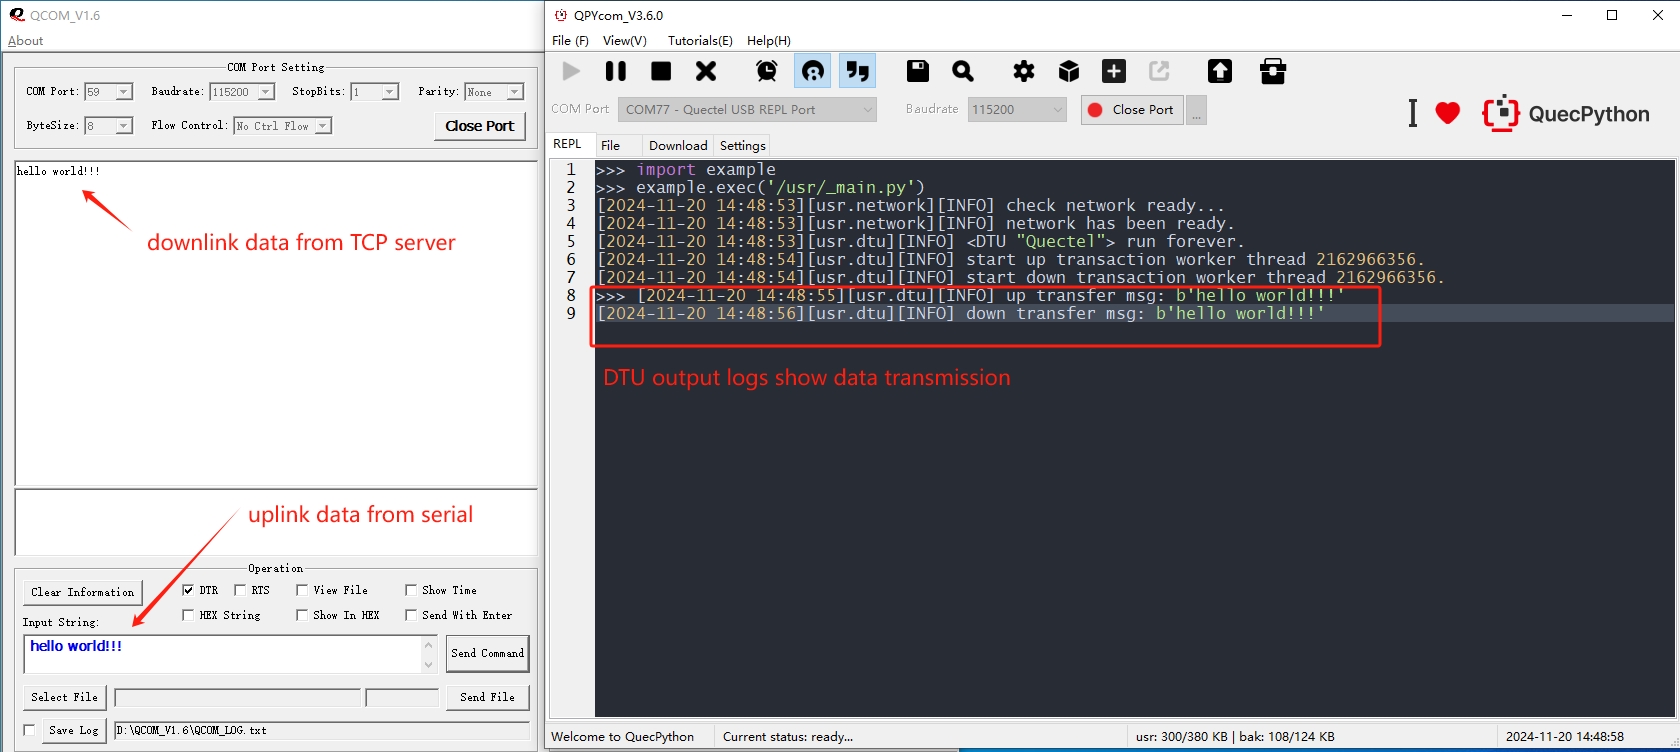
In this case, a TCP echo server is used, so QCOM upstream data will be transmitted through DTU to the TCP server and immediately downstream along the original path upon receipt.