
USB Application Guide
USB (Universal Serial Bus) is a universal bus standard used to connect hosts and peripheral devices. The USB host can connect to USB devices through the USB interface to achieve functions such as data transfer and power supply.
USB IF (USB Implementers Forum) is the maker of the USB standard. It defines USB standards, including USB 1.1, USB 2.0 and USB 3.0, protocols for the physical layer, data link layer, transport layer, session layer and presentation layer, as well as USB device class, including HID (Human Interface Device), MSC (Mass Storage Class), CDC (Communication Device Class), Audio, and Video.
Overview
Cellular communication modules are equipped with USB interfaces for the connection to host devices such as micro-controllers or processors. A USB interface can not only be used for data communication but also supply power to the module.
The USB interface of cellular communication modules is usually used for the following purposes:
- Data communication: The host device communicates with the module through the USB interface.
- Module control: AT commands are sent to the module through the USB interface to perform network communication, file operations, hardware control, etc.
- Firmware download: Firmware can be downloaded to the module through the USB interface.
- USB NIC: Some cellular communication modules support USB NIC mode. In this mode, the device can take the USB interface as a network interface, just like an Ethernet interface, to communicate with other devices directly over the network, the same as over a wired network. Usually, USB NIC mode requires the installation of specified drivers on the device.
- Diagnosis and debugging: The USB interface can also be used to diagnose and debug the cellular communication module. For example, the device can obtain the status information of the module through the USB interface or send special commands to test the functionality of the module.
- Power supply: The USB interface is also commonly used for the power supply of the cellular communication module.
The support for QuecPython series modules is as follows:
| Module | USB Host | USB Device | USB OTG |
|---|---|---|---|
| EC200U | * | √ | * |
| EC600U | * | √ | * |
| EG912U | * | √ | * |
| EG915U | * | √ | * |
| EC600G | √ | √ | √ |
| EC800G | √ | √ | √ |
| EG912N | × | √ | × |
| EG915N | × | √ | × |
| EC600N | × | √ | × |
| EC600S | × | √ | × |
| EC800N | × | √ | × |
| EC600M | × | √ | × |
| EC800M | × | √ | × |
| EG810M | × | √ | × |
| EC200A | × | √ | × |
| UC200A | × | √ | × |
| BG95_XX | × | √ | × |
| BG600L | × | √ | × |
Note:
- √: Supported
- ×: Not supported
- *: Under development
QuecPython supports various USB applications, including USB multimedia applications.
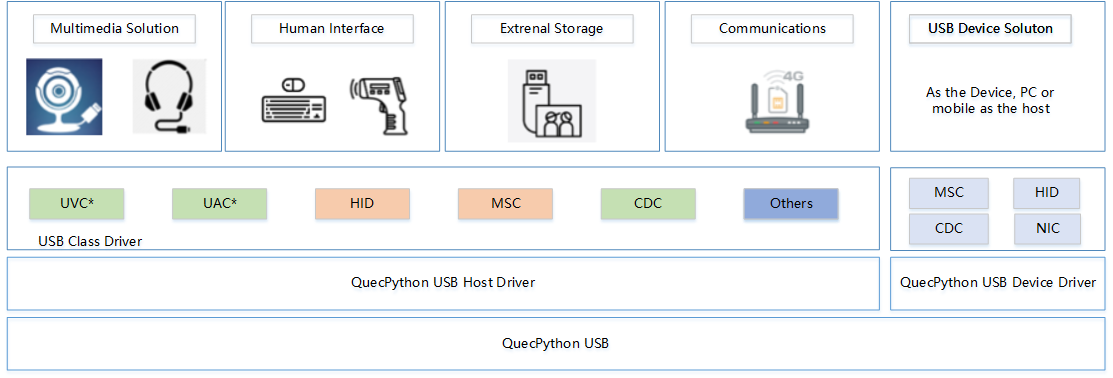
USB Transmission Speed
Currently, the USB protocol supported by QuecPython modules with USB interfaces is USB 2.0.
The USB 2.0 standard includes three data transmission rates:
- Low-Speed: The maximum transmission rate of low-speed mode is 1.5 Mbps (Megabits per second). This mode is mainly used for low-bandwidth devices such as mice and keyboards.
- Full-Speed: The maximum transmission rate of full-speed mode is 12 Mbps, which is the highest rate of USB 1.1. For many regular devices (such as USB cameras and printers), the transmission speed of full-speed mode is sufficient.
- High-Speed: High-speed mode is the new feature of USB 2.0, with a maximum transmission rate of 480 Mbps, which allows USB 2.0 to support devices with high data transmission requirements, such as external hard drives, high-resolution cameras and network adapters.
The maximum rates mentioned above are theoretical values. In practical applications, the actual transmission rate may be lower due to various reasons (including but not limited to the performance of the USB controller, the performance of the device, the quality of the cable, and the system load).
USB Electrical Properties
The USB electrical properties for the Type-A interface are as follows:
| Pin | Name | Cable color | Description |
|---|---|---|---|
| 1 | VBUS | Red | +5 V |
| 2 | D- | White | Data- (0 or 3.3 V) |
| 3 | D+ | Green | Data+ (0 or 3.3 V) |
| 4 | GND | Black | Ground |
- For self-powered devices, an additional IO is required to detect the VBUS voltage to detect if the device is unplugged.
- Reversing the D- and D+ connections will not damage the hardware, but the host will not be able to recognize the device.
Driver Installation
A device driver is a special program that enables communication between a computer and a device. The operating system can only control the operation of hardware devices through this interface.
For detailed installation instructions, please refer to the Quick Start Guide.
Currently, QuecPython generates the following types of serial ports and device types (taking the EC600M series module as an example).

- AT Port: Used for AT command interaction
- DIAG: Used for USB debug output
- REPL: Used for QuecPython interaction
- RNDIS: Network interface card
The specific support for each platform is as follows:
UNISOC8910 Platform(EC200U、EC600U、EG912U、EG915U)
- Quectel Modem: this port is mainly used for ppp dialing and can also be used to send AT. However, it is generally not used to send AT, but a dedicated AT port is used instead.
- Quectel USB AP Log Port: this port is used to grab AP Log.
- Quectel USB AT Port: this port is used to send AT instructions and is a dedicated AT port.
- Quectel USB CP Log Port: this port is used to grab CP Log.
- Quectel USB Diag Port: this port is reserved.
- Quectel USB MOS Port: this port is reserved.
- Quectel USB REPL Port: for QuecPython firmware, this port is the REPL port of python, through which users can execute some python code.
UNISOC8850 Platform(EC600G、EC800G)
- Quectel USB AT Port: this port is used to send AT instructions.
- Quectel USB CP Port: this port is used to grab CP Log.
- Quectel USB Debug Port: under the USB connection, the port is reserved and can be ignored by the user.
- Quectel USB DIAG Port: this port is used to grab AP Log.
- Quectel USB REPL Port: for QuecPython firmware, this port is the REPL port of python, through which users can execute some python code.
Qualcomm Platform(BG95_XX、BG600L)
- Quectel USB DM Port: this port is the output port of AP and CP log.
- Quectel USB Modem: this port can be used to send AT instructions.
- Quectel USB REPL Port: for QuecPython firmware, this port is the REPL port of python, through which users can execute some python code.
EIGEN Platform(EC600E、EC600E)
- Quectel USB AT Port: this port is used to send AT instructions and is a dedicated AT port.
- Quectel USB Diag Port: this port is used for crawling AP/CP log and exporting dump files.
- USB serial device: for QuecPython firmware, this port is the REPL port of python, through which users can execute some python code. It is important to note that the REPL port names of python may vary from platform to platform. If you don't know which port is the REPL port of python, you can consult our FAE to confirm it.
AT
USB-AT communication of cellular communication modules is based on the USB Communication Device Class (CDC) specification. Typically, a cellular communication module provides one or more virtual serial interfaces on the USB interface, which can be recognized by the host system as standard COM ports, allowing interaction with the module through AT commands.
In practice, when the host system is connected to the cellular communication module via a USB cable, the module's driver creates one or more virtual COM ports in the host system. These virtual COM ports can be used by applications in the host system like real serial interfaces to send and receive AT commands.
Note: To learn about the AT command set supported by cellular communication modules, please contact the QuecPython technical support team.
DIAG
USB-DIAG is a communication protocol used for diagnostics and debugging. DIAG, also known as the diagnostic interface, is used to access and control the internal status and functions of cellular communication modules. The following is a detailed explanation of the basic principles and applications of USB-simulated DIAG for cellular communication modules.
Principles:
The USB-simulated DIAG of cellular communication modules is implemented through the USB interface. When a host device (such as a computer or embedded system) is connected to a cellular communication module via the USB interface, the module can recognize specific commands sent by the host device and return corresponding diagnostic information. This diagnostic information may include hardware status, network status, firmware version, system logs, etc.
Diagnostic commands usually include obtaining status information, setting parameters, and performing specific operations. The specific command set and returned information depend on the module's firmware and hardware design.
Applications:
- Hardware and network status diagnostics: Through the DIAG interface, you can get the hardware status (such as power, temperature and voltage) and network status (such as signal strength and data rate) of the module.
- Firmware upgrade and configuration: The DIAG interface can also be used to download new firmware to the module or change the module's configuration parameters.
- Troubleshooting and debugging: You can get detailed system logs and error information through the DIAG interface to troubleshoot and resolve problems if any problem occurs with the module.
- Performance testing and optimization: After getting detailed status information on the module, you can test or optimize the module's performance. For example, you can adjust the network parameters to optimize data transmission rates.
In summary, the USB-simulated DIAG function of cellular communication modules is powerful and can be used for device status monitoring, troubleshooting and debugging, performance testing and optimization, and other applications.
REPL
REPL, short for Read-Eval-Print Loop, is a simple interactive programming environment. It allows you to input code (or commands) and immediately see the execution results. Python is one of the well-known languages that support the REPL environment.
In cellular communication modules, the principle of USB-REPL is to provide an interactive programming and debugging environment through the USB interface. In this environment, you can input commands (or code) and immediately see the execution results, facilitating real-time interactive programming and debugging.
Applications:
- Real-time programming and testing: You can input commands or code through the REPL environment and immediately see the execution results, which is useful for rapid prototyping or real-time testing by developers.
- Device configuration and management: You can input commands to query and change the configuration of the module for device configuration and management.
- Troubleshooting and debugging: When a problem occurs with the module, you can enter commands or code in the REPL environment to view the execution results, and thus help troubleshoot and resolve the problem.
In general, the principle of USB-simulated REPL is to provide a real-time interactive programming and debugging environment through the USB interface. Its main applications are real-time programming and testing, device configuration and management, and troubleshooting and debugging.
Note: For some QuecPython modules, the REPL port can also be used as a regular serial port by initializing UART3 through machine.UART() in machine.UART. When UART3 is enabled, the REPL port functions as a regular serial port, and when UART3 is disabled, the port automatically reverts to REPL.
Modem
"Modem" is short for Modulator and Demodulator, originally referring to a device that converts digital signals into analog signals that can be transmitted over telephone lines. However, in the computer field, "Modem mode" usually means that the USB device simulates a virtual serial port (COM port) so that the computer can communicate with the USB device through this virtual serial port.
In cellular communication modules, the principle of a USB-simulated Modem is to simulate the module as a virtual Modem device through the USB interface. By simulating a Modem, the cellular communication module can communicate with the host (such as a computer or embedded device) for data communication.
Applications:
- Data communication: The host can communicate with the cellular communication module through the virtual Modem port, such as sending AT commands for control, or sending and receiving network data.
- Network connection: The cellular communication module can dial up to connect to the network through the simulated Modem, commonly referred to as a "3G Modem" or "4G Modem," which is a device that provides network connectivity through cellular networks.
- Device management: The host can manage devices through the Modem port, such as querying device status and updating firmware.
Therefore, USB-simulated Modem in cellular communication modules can provide functions such as data communication, network connection, and device management.
ECM/RNDIS
The USB interface of cellular communication modules can simulate ECM (Ethernet Control Model) and RNDIS (Remote Network Driver Interface Specification) interfaces, both of which are used for USB Ethernet communication.
ECM is a working mode of the USB interface used to implement USB networking. The working principle of USB ECM mode is to simulate the USB interface as an Ethernet interface, enabling Ethernet communication via the USB interface. The USB ECM interface can support network protocols such as TCP/IP and can be used for network communication between USB devices and hosts.
RNDIS is a network interface standard for USB devices proposed by Microsoft. It is a way to implement USB Ethernet. RNDIS simulates the USB device as a virtual Ethernet device to enable network communication between the USB device and the host.
Applications:
- Network sharing: The cellular network can be shared to devices connected via USB interface through ECM or RNDIS interface, thus enabling network access of USB devices.
- Remote management: The host can remotely manage and control a cellular communication module via network through ECM or RNDIS interface, such as querying device status, changing configurations and upgrading firmware.
- Data communication: High-speed data communication can be achieved between a cellular communication module and the host through ECM or RNDIS interface, such as file transfer and data synchronization.
In summary, the USB-simulated ECM/RNDIS interfaces of cellular communication modules provide an efficient way to achieve network communication between devices and remote management of devices.
Please refer to [Network Application Guide - USB NIC](TODO 链接) for specific usage.
Firmware Download
For firmware download examples, please refer to [QPYcom Instructions](QuecPython (quectel.com)) or Quick Start Guide.
The USB firmware download for modules includes the following steps:
Driver Installation: Please refer to [Driver Installation](#Driver Installation). Skip this step if the driver is already installed.
Module Recognition: Connect the module to the computer's USB interface. Your operating system will recognize and successfully load the driver. In Windows, you can view the module status in "Device Manager". In Linux, you can execute the dmesg command to view system logs and confirm the module has been recognized by the system.
Enter Download Mode: You need to set the module in firmware download mode, which usually requires specific AT commands or some special operation. Please refer to [User Manual/Development Guide](TODO 待快速入门添加) of the module for details.
Firmware Download: After the module enters firmware download mode, you can send the new firmware data to the module via the USB interface. In some cases, you may need special download tools or protocols. After the download is complete, you usually need to reboot the module to apply the new firmware.
Common Applications
Plug-in/out Detection
For the USB plug-in/out detection interface, please refer to misc.USB.
As a USB device (also known as a slave device), the cellular communication module can be connected to the host (such as a PC or embedded control panel) via the USB interface. In this case, plug-in/out detection is usually performed by the host, but the module itself should also be able to identify these connection and disconnection events.
For the hardware, most USB host controllers can generate an interrupt when a USB device is plugged in or out, which is achieved by the USB device pulling up or down the voltage on the USB cable in connection. The voltage change on the USB cable can be detected by the USB host controller, thus generating an interrupt. At the same time, the module uses an additional IO interface to detect the VBUS voltage to determine whether the device is plugged out.
For the software, the USB device needs to use a USB device controller driver to manage the device connection and disconnection events. When the device is connected to the host, the device controller driver needs to identify this event and respond to the host's initialization requests, such as providing the device descriptor, which is a data structure describing the characteristics of the device (such as device type, manufacturer ID and product ID). When the device is disconnected from the host, the device controller driver needs to identify this event and stop all communication with the host.
Applications:
Power saving mode:
In low-power applications, the module may be powered off or disconnected to save power when communication is not required. When communication is required again, reconnect the module to the host. The plug-in/out detection allows the host to automatically respond to these changes without manual intervention.
Charging detection:
When the module is connected to a power supply (such as a USB port on a computer or a USB charger) via the USB interface, the USB VBUS cable (power line) will have a voltage, and the module can detect this voltage to know whether it is being charged. This method is commonly used to determine whether the module is being charged by the USB port.
Note: Although the module can detect the charging status via the USB interface, it cannot directly control the charging process. The charging process usually needs to be managed by a dedicated charge controller, which may be part of the module or a separate external chip.
Example:
from misc import USB
usb = USB()

def usb_callback(conn_status):
    status = conn_status
    if status == 0:
        print('USB disconnected, charging ended.')
    elif status == 1:
        print('USB connected, charging enabled.')

usb.setCallback(usb_callback)
Common Issues
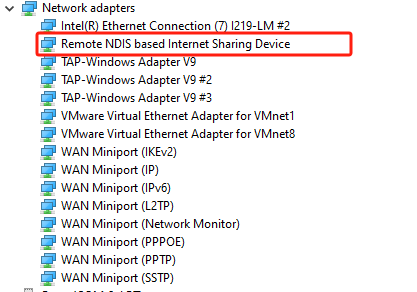
RNDIS Driver Installation
When the RNDIS driver is not installed, the figure below will be displayed.

The steps to install the RNDIS driver on Windows:
Connect your device to the computer's USB port. In "Device Manager", you may see an unrecognized device named "Other device" or a device named "RNDIS".
Right-click this device and select "Update Driver Software".
In the pop-up, select "Browse my computer for driver software".
Then select "Let me pick from a list of device drivers on my computer".
In the pop-up list, select "Network adapters", then click "Next".
In the "Manufacturer" list, select "Microsoft", in the "Network Adapter" list, select "Remote NDIS Compatible Device", then click "Next" to complete the driver installation.
Note: The above steps may vary slightly with your device model, Windows version, and system settings. When installing drivers, it is recommended to follow the specific instructions provided by your device manufacturer.
On Linux system or macOS, the system will automatically load RNDIS drivers in most cases without manual installation. If you encounter problems, you may need to manually load the driver or get a driver suitable for your system version from the device manufacturer.
No REPL Port
REPL stands for Read-Eval-Print-Loop (interactive interpreter). REPL can be used to debug QuecPython programs.

No REPL port means the device in the red box does not exist. Different modules may have different REPL port names. Please refer to the [QuecPython USB COM Port](TODO 待添加) for details.
If you find no REPL port in the PC port manager when using QuecPython series modules, please follow these steps to determine the problem.
Install driver: When connecting the device through the USB interface, check if there is a corresponding device for the module in "Device Manager". If the device exists and has corresponding AT and other serial ports, it means the driver is installed successfully. If the device is under the "Other devices" directory with a yellow exclamation mark, it means the driver is not installed or installed incorrectly. In this case, refer to [Driver Installation](#Driver Installation) to install the driver corresponding to the module.
Update firmware: Make sure the module firmware is provided by QuecPython. For more information about firmware download, refer to [Firmware Download](#Firmware Download).
Driver Installation Error
When driver installation fails or is not installed, "Device Manager" is displayed as follows.

If you encounter errors when installing the module driver, here are some possible solutions:
Restart the computer: Restarting the computer can resolve some installation issues.
Check module compatibility: Make sure your module is compatible with your operating system in use. Check the technical specifications and requirements of the device manufacturer.
Download the latest driver: Go to the QuecPython official website to download the latest version of the driver. Old drivers may be incompatible with a new operating system.
Run as administrator: In Windows, right-click the driver installer and select "Run as administrator". This can resolve installation errors due to permission issues.
Turn off anti-virus software: Some anti-virus software may prevent drivers from being installed. Temporarily disable anti-virus software while installing drivers.
Manually install driver: In "Device Manager", you can manually install the driver. Right-click the device, select "Update driver", then "Browse my computer for driver software", and navigate to the driver location for installation.
Contact QuecPython technical support: If you still cannot resolve the issue after trying the above solutions, please contact QuecPython technical support for assistance.