
UDP/TCP Network Communication Application Note
Overview
IP Address and Domain Name
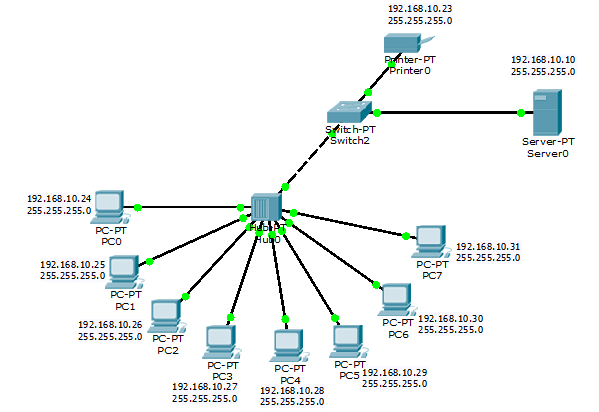
An IP address is the host address in a network, used for two network hosts to find each other, which is the basis for successful network communication. An IP address is generally represented as a dotted decimal string, such as 192.168.1.1.
The websites we visit daily are hosted on servers with unique IP addresses. It is difficult to distinguish different hosts by remembering IP addresses, and a website may have multiple IP addresses or the IP address may change for some reason.
Therefore, the use of domain names to represent website addresses has emerged. For example, the domain name www.baidu.com is easier to remember than an IP address. IP addresses are still used in the actual network communication packets, so a domain name resolution protocol is required to obtain the IP address corresponding to a domain name.
The following explanations are based on the IPv4 protocol.
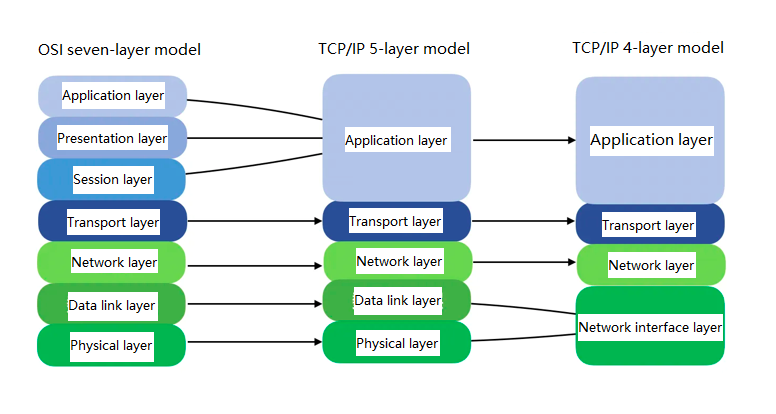
OSI Seven-Layer Model
The Open System Interconnection (OSI) model defined by the International Organization for Standardization (ISO) is a standard framework for computer or communication systems, generally known as the OSI seven-layer model. It provides a standard for implementing network communication protocols, where two parties use the same protocol at the same layer to communicate. For the same device, the lower-layer protocol provides calling interfaces for the upper-layer protocol to package the upper-layer protocol into an underlying-layer protocol, and finally sends it to the network for transmission.
The seven layers are "Application Layer", "Presentation Layer", "Session Layer", "Transport Layer", "Network Layer", "Data Link Layer", and "Physical Layer".

To simplify protocol implementation or facilitate understanding, the models of five layers or four layers have emerged. The four-layer model is generally mentioned more frequently, including "Application Layer", "Transport Layer", "Network Layer" and "Network Interface Layer".
The IP address mentioned earlier belongs to the network layer.
The network layer is used to forward all network data of the host to the NIC and send it to the network through the physical layer circuit.
To facilitate explanation, the following illustration is based on the four-layer model.
Transport Layer Protocol
IP addresses solve the problem of how two hosts in a network can find each other and then send and receive messages.
There may be multiple applications running on a host, performing different network tasks. When a host with a certain IP address receives a message from another host, which application should the message be passed to?
To solve this problem, transport layer protocols evolved based on network layer protocols, which allocate different ports to local network applications. After receiving a network-layer message, the data is delivered to different applications based on different port numbers.
To meet different needs, transport layer protocols are divided into UDP and TCP protocols.
UDP Protocol
The UDP protocol has the following characteristics:
- Connectionless
- Supports one-to-one, one-to-many, and many-to-many communication
- Irreliable delivery
- Full-duplex communication
- Message-oriented
Some application layer protocols have been derived from UDP to meet different needs, with different applications specifying a default port number by default. The port number can also be changed according to the actual situation.
Common UDP-based application protocols and their ports are as follows.
| Port | Protocol | Description |
|---|---|---|
| 0 | -- | Reserved |
| 7 | echo | Echo service |
| 53 | DNS | Domain Name System name resolver |
| 67 | bootps | Dynamic Host Configuration Protocol and its predecessor Bootstrap Protocol Server; server port |
| 68 | bootpc | Dynamic Host Configuration Protocol and its predecessor Bootstrap Protocol Server; client port |
| 69 | TFTP | Trivial File Transfer Protocol |
| 123 | NTP | Network Time Protocol |
| 161 | SNMP | Simple Network Management Protocol |
TCP Protocol
The TCP protocol has the following characteristics:
- Connection-oriented
- One-to-one communication
- Reliable data delivery
- Full-duplex communication
- Byte stream-oriented
Based on TCP, some application layer protocols have been derived to meet different needs. Different applications will default to a specific port number. The port number can also be changed according to the actual situation.
Common TCP-based application protocols and their ports are as follows:
| Port | Protocol | Description |
|---|---|---|
| 0 | -- | Reserved |
| 7 | echo | Echo service |
| 20 | FTP-DATA | File Transfer Protocol data transfer |
| 21 | FTP | File Transfer Protocol command control |
| 23 | Telnet | Telnet protocol |
| 25 | SMTP | Simple Mail Transfer Protocol |
| 53 | DNS | Domain Name System (DNS) |
| 80 | HTTP | Hypertext Transfer Protocol |
| 110 | POP3 | Post Office Protocol - Version 3 |
| 1080 | SOCKS | Socket Secure |
The five-tuple that determines a TCP connection: protocol type (TCP), local IP, local port, remote IP and remote port.
Socket Programming
QuecPython provides the usocket feature for socket programming for network communication. For the usage of the usocket , click here.
This section is divided into three parts: TCP network programming, UDP network programming, and multi-NIC network programming.
TCP Network Programming
Before starting TCP network programming, let's first understand the socket programming model for TCP servers and clients through the following diagram:

TCP Client Network Programming
The right side of the diagram displays the simplest interface calling process of the TCP client programming:
Call
socket()to create a socket object.Call
connect()to connect to the server.Call
send()to send data to the server.Call
recv()to receive data sent by the server.Loop steps 3 and 4 until certain conditions are met or the connection ends, then call
close()to close the socket and release resources.
The socket interfaces implemented in almost all programming languages are in blocking mode by default, which means that all interfaces involving network packet sending and receiving, such as connect(), send(), recv(), close(), etc., are blocking interfaces by default.
Before getting started, let's understand the usage of the 5 interfaces related to TCP client programming in the diagram:
usocket.socket(af=AF_INET, type=SOCK_STREAM, proto=IPPROTO_TCP): Create a socket object.af: Address family.usocket.AF_INET: IPv4 addressesusocket.AF_INET6: IPv6 addressestype: Socket type.usocket.SOCK_STREAM: Stream socketsusocket.SOCK_DGRAM: Datagram socketsusocket.SOCK_RAW: Raw socketsproto: Protocol type.usocket.IPPROTO_TCP: TCP protocolusocket.IPPROTO_UDP: UDP protocolIPPROTO_TCP_SER: TCP server
sock.connect(address): Connect to the server.address: A tuple or list containing the IP address string and port number.
sock.send(data): Send data to the server. The actual length of the sent data is returned.data: Data of bytes type.
sock.recv(size): Receive data sent by the server. The received data of bytes type is returned.size: The length of data to be read.
sock.close(): Close the socket.
IPPROTO_TCP_SERis non-standard and specific to QuecPython. When programming the TCP server in QuecPython, the third parameter ofsocket()must beIPPROTO_TCP_SER.
We can use these interfaces to implement a simple TCP client feature: connect to Baidu server, manually construct an HTTP message and send it to the server, and loop to receive the HTML content sent by the server until it is fully received.
Sample code:
import usocket

def tcp_client(address, port):
    # Create a socket object
    sock = usocket.socket(usocket.AF_INET, usocket.SOCK_STREAM, usocket.IPPROTO_TCP)
    print('socket object created.')

    # Connect to the TCP server
    sock.connect((address, port))
    print('tcp link established: %s, %s' % (address, port))

    # Package user data
    data = 'GET / HTTP/1.1\r\n'
    data += 'Host: ' + address + ':' + str(port) + '\r\n'
    data += 'Connection: close\r\n'
    data += '\r\n'
    data = data.encode()

    # Send the data
    sock.send(data)
    print('<-- send data:')
    print(data)

    # Receive the data
    print('--> recv data:')
    while True:
        try:
            data = sock.recv(1024)
            print(data)
        except:
            # Connection ends until the data is fully received
            print('tcp disconnected.')
            sock.close()
            break
The HTTP request packet constructed in the above sample code is:
GET / HTTP/1.1<cr><lf>
Host: <host_addr>:<port><cr><lf>
Connection: close<cr><lf>
<cr><lf>
In this message:
<cr><lf>: Carriage return and line feed.<host_addr>: The domain name or IP address of the server.<port>: The port number of the server.
Note that the
Connection: closeheader is added to the above HTTP packet to notify the server that this is a short connection. When the HTTP request is complete, the server will actively close the connection.The advantage of doing this is that when the server actively closes the connection, an exception will be thrown at the underlying protocol stack. You can capture this exception to know that the client also needs to disconnect.
This is a shortcut to quickly implement TCP client test code. If the
Connection: closeheader field is not added, for HTTP/1.1 protocol, it defaults to a persistent connection and the server will not actively close the connection. In this case, the client needs to add code to parse the HTTP message, and the client can only close the connection after parsing the message to determine that all data has been received. This will increase the complexity of the test code, and the parsing of the HTTP message is not within the scope of this section.
After the request message is constructed, call encode() to convert the string to UTF-8 encoded bytes, i.e., data = data.encode() in the above code. Then, call sock.send(data) to send the data.
The data sent by the server may be very long and unpredictable. Therefore, you need to repeatedly call sock.recv(1024) in a while loop to read the data until a certain condition is met or an exception occurs. Then, call sock.close() to close the connection.
As mentioned above, because the constructed HTTP message includes the Connection: close header field, the server will actively close the connection, causing an exception to be thrown by the module's underlying protocol stack. Therefore, try is required for sock.recv(1024) in the while loop. When an exception is caught, close the connection and exit the loop in the except block.
Before starting the client code, you need to check the network status. If the network is confirmed to be normal, call tcp_client() to start the client.
import checkNet

if __name__ == '__main__':
    stage, state = checkNet.waitNetworkReady(30)
    if stage == 3 and state == 1: # Network connection is normal
        print('Network connection successful.')
        tcp_client('36.152.44.95', 80) # Start the client
    else:
        print('Network connection failed, stage={}, state={}'.format(stage, state))
In the above code, we directly use the IP address of the Baidu server 36.152.44.95. The running result is as follows:
Network connection successful.
socket object created.
tcp link established: 36.152.44.95, 80
<-- send data:
b'GET / HTTP/1.1\r\nHost: 36.152.44.95:80\r\nConnection: close\r\n\r\n'
--> recv data:
b'HTTP/1.1 200 OK\r\nAccept-Ranges: bytes\r\nCache-Control: no-cache\r\nContent-Length: 9508\r\nContent-Security-Policy: frame-ancestors......Baidu "</script></body></html>
tcp disconnected.
In general, users are more likely to remember the domain name www.baidu.com rather than the IP address. In this case, we need to call the domain name resolution interface to convert the domain name into an IP address instead of directly remembering the IP address.
The function prototype for domain name resolution is usocket.getaddrinfo(host, port), as follows:
Parameter
host: Host domain name (or IP address string).port: Port number.
Return Value
[(family, type, proto, canonname, sockaddr)]family: Address family.type: Socket type.proto: Protocol type.canonname: Host domain name.sockaddr: A list containing the IP address and port number.
After understanding how to use this interface, sockaddr can be directly used as the parameter of sock.connect() in the tcp_client() implementation.
The optimized implementation of tcp_client() is as follows (Click here to download the complete code in github):
import usocket
import checkNet

def tcp_client(address, port):
    # Create a socket object
    sock = usocket.socket(usocket.AF_INET, usocket.SOCK_STREAM, usocket.IPPROTO_TCP)
    print('socket object created.')

    # Domain name resolution
    sockaddr = usocket.getaddrinfo(address, port)[0][-1]
    print('DNS for %s: %s' % (address, sockaddr[0]))

    # Connect to the TCP server
    sock.connect(sockaddr)
    print('tcp link established.')

    # Package user data
    data = 'GET / HTTP/1.1\r\n'
    data += 'Host: ' + address + ':' + str(port) + '\r\n'
    data += 'Connection: close\r\n'
    data += '\r\n'
    data = data.encode()

    # Send the data
    sock.send(data)
    print('<-- send data:')
    print(data)

    # Receive the data
    print('--> recv data:')
    while True:
        try:
            data = sock.recv(1024)
            print(data)
        except:
            # Connection ends until the data is fully received
            print('tcp disconnected.')
            sock.close()
            break

if __name__ == '__main__':
    stage, state = checkNet.waitNetworkReady(30)
    if stage == 3 and state == 1: # Network connection is normal
        print('Network connection successful.')
        tcp_client('www.baidu.com', 80) # Start the client
    else:
        print('Network connection failed, stage={}, state={}'.format(stage, state))
The optimized client code allows passing a domain name or an IP address, making it easier to use. The running result is as follows:
Network connection successful.
socket object created.
DNS for www.baidu.com: 36.152.44.95
tcp link established.
<-- send data:
b'GET / HTTP/1.1\r\nHost: 36.152.44.95:80\r\nConnection: close\r\n\r\n'
--> recv data:
b'HTTP/1.1 200 OK\r\nAccept-Ranges: bytes\r\nCache-Control: no-cache\r\nContent-Length: 9508\r\nContent-Security-Policy: frame-ancestors......Baidu "</script></body></html>
tcp disconnected.
TCP Server Network Programming
For cellular communication modules, the IP address assigned by the base station is usually a LAN address, and external network devices cannot directly access the module. In this case, the significance of the module as a TCP server is not very high.
However, for private NICs, the base station assigns them private network addresses and allows network devices in the private network to access the module. In this case, the module can act as a TCP server, which is common in products like electric meters.
Moreover, devices in the LAN are allowed to access the host in Wi-Fi and Ethernet networks.
Therefore, it is still necessary to explain how to implement TCP server functionality in the module.
The left side of the diagram illustrating the socket programming model for TCP servers and clients shows the interface calling process for server programming:
- Call
socket()to create a socket object. - Call
bind()to bind the local address and port. - Call
listen()to listen for client connection requests. - Call
accept()to accept client connection requests. - Call
recv()to receive uplink data from the client. - Call
send()to send data to the client. - In each client connection, loop steps 5 and 6 until certain conditions are met or the connection ends, then call
close()to close the socket and release resources. - In the thread that accepts client connection requests, loop step 4 to accept more client connections.
When programming a TCP server, there are three additional interfaces compared to the client: bind(), listen(), and accept(). The explanations are as follows:
socket.bind(address): Bind local IP address and port.address: A tuple or list containing the IP address string and port number. Because the server generally requires a fixed IP address and port, binding is required, otherwise, the client cannot know the server's IP address and port number.
listen(backlog): Listens for client connection requests.backlog: The number of connection requests that can be queued for processing in addition to the ones being processed.
accept(): Accept a client connection request.
Having understood the process and usage of the interfaces, let's do an experiment: write a TCP server program and a TCP client program in the module. The client periodically sends data to the server and waits for the server to send data back.
TCP server code:
import usocket
import _thread

def _client_conn_proc(conn, ip_addr, port):
    while True:
        try:
            # Receive data sent by the client
            data = conn.recv(1024)
            print('[server] [client addr: %s, %s] recv data:' % (ip_addr, port), data)

            # Send data back to the client
            conn.send(data)
        except:
            # Exception occurred and connection closed
            print('[server] [client addr: %s, %s] disconnected' % (ip_addr, port))
            conn.close()
            break

def tcp_server(address, port):
    # Create a socket object
    sock = usocket.socket(usocket.AF_INET, usocket.SOCK_STREAM, usocket.IPPROTO_TCP_SER)
    print('[server] socket object created.')

    # Bind the server IP address and port
    sock.bind((address, port))
    print('[server] bind address: %s, %s' % (address, port))

    # Listen for client connection requests
    sock.listen(10)
    print('[server] started, listening ...')

    while True:
        # Accept a client connection request
        cli_conn, cli_ip_addr, cli_port = sock.accept()
        print('[server] accept a client: %s, %s' % (cli_ip_addr, cli_port))

        # Create a new thread for each client connection for concurrent processing
        _thread.start_new_thread(_client_conn_proc, (cli_conn, cli_ip_addr, cli_port))
In this code, for each client connection, a new thread is created to handle the connection concurrently.
TCP client code:
import usocket
import utime

def tcp_client(address, port):
    # Create a socket object
    sock = usocket.socket(usocket.AF_INET, usocket.SOCK_STREAM, usocket.IPPROTO_TCP)
    print('[client] socket object created.')

    # Connect to the TCP server
    print('[client] connecting: %s, %s' % (address, port))
    sock.connect((address, port))
    print('[client] connected.')

    data = b'1234567890'
    while True:
        try:
            # Send data to the server
            sock.send(data)
            print('[client] send data:', data)

            # Read the data sent back by the server
            data = sock.recv(1024)
            print('[client] recv data:', data)
            print('[client] -------------------------')

            # Delay for 1 second
            utime.sleep(1)
        except:
            # Connection ends until the data is fully received
            print('[client] disconnected.')
            sock.close()
            break
Main code:
import checkNet
import _thread
import utime
import dataCall
if __name__ == '__main__':
    stage, state = checkNet.waitNetworkReady(30)
    if stage == 3 and state == 1: # Network connection is normal
        print('[net] Network connection successful.')

        # Get the IP address of the module
        server_addr = dataCall.getInfo(1, 0)[2][2]
        server_port = 80

        # Start the server thread to listen for client connection requests
        _thread.start_new_thread(udp_server, (server_addr, server_port))

        # Delay for a while to ensure that the server starts successfully
        print('sleep 3s to ensure that the server starts successfully.')
        utime.sleep(3)

        # Start the client
        udp_client(server_addr, server_port)
    else:
        print('[net] Network connection failed, stage={}, state={}'.format(stage, state))
The above code calls dataCall.getInfo() to get the IP address of the module. The format of the return is (profileID, ipType, [state, reconnect, addr, priDNS, secDNS]). The explanations are as follows:
profileID: PDP context ID. This term is obscure, and a simple understanding is that the cellular communication module can establish multiple connections with the base station, and each connection corresponds to a different IP address. In general, one connection is sufficient to meet the requirements. If you want to get the IP address of a specific connection, fill in the corresponding ID for this parameter.ipType: IP protocol type.0: IPv4 (recommended for beginners)
1: IPv6
2: IPv4 and IPv6
state: Network connection status with the base station.0: Not connected
1: Connected.
reconnect: Reconnection flag. Reserved.addr: IP address.priDNS: Primary DNS server address.secDNS: Secondary DNS server address.
server_addr = dataCall.getInfo(1, 0)[2][2] in the code means to get the IPv4 address of connection 1 as the local server IP address.
- QuecPython-supported cellular communication modules will automatically establish the first cellular data connection after power-on.
- Click here for more information about cellular data connection-related interface usage.
- Click here to download the complete code in github
The running result of this sample code is as follows:
[net] Network connection successful.
sleep 3s to ensure that the server starts successfully.
[server] socket object created.
[server] bind address: 10.104.189.115, 80
[server] started, listening ...
[client] socket object created.
[client] connecting: 10.104.189.115, 80
[client] connected.
[client] send data: b'1234567890'
[server] accept a client: 10.104.189.115, 55187
[server] [client addr: 10.104.189.115, 55187] recv data: b'1234567890'
[client] recv data: b'1234567890'
[client] -------------------------
[client] send data: b'1234567890'
[server] [client addr: 10.104.189.115, 55187] recv data: b'1234567890'
[client] recv data: b'1234567890'
[client] -------------------------
...
UDP Network Programming
Before starting UDP network programming, let's first understand the socket programming model of UDP server and client through the following diagram:

From the diagram, we can see that the UDP server also needs to call bind() to bind the local IP address and port number, which is necessary for the server.
At the same time, UDP programming is different from TCP programming in interface calls:
- Different parameters for
socket():- For TCP programming, the second parameter
typeisusocket.SOCK_STREAM, while for UDP it isusocket.SOCK_DGRAM. - For TCP, the third parameter
protoisusocket.IPPROTO_TCPorusocket.IPPROTO_TCP_SER, while for UDP it isusocket.IPPROTO_UDP.
- For TCP programming, the second parameter
- Since UDP is connectionless, the client does not need to call
connect()to connect to the server. - The data sender only needs to call
sendto()to send data. - The data receiver calls
recvfrom()to receive data.
Whether
sendto()can send data to the destination depends on the network environment. If the host corresponding to the destination IP address cannot be found, the data will be discarded.
Next, let's do an experiment: write a UDP server program and a UDP client program in the module. The client periodically sends data to the server and waits for the server to send data back.
With experience in TCP programming, we give the sample code directly (Click here to download the complete code in github):
import usocket
import _thread
import utime
import checkNet
import dataCall

def udp_server(address, port):
    # Create a socket object
    sock = usocket.socket(usocket.AF_INET, usocket.SOCK_DGRAM, usocket.IPPROTO_UDP)
    print('[server] socket object created.')

    # Bind server IP address and port
    sock.bind((address, port))
    print('[server] bind address: %s, %s' % (address, port))

    while True:
        # Read client data
        data, sockaddr = sock.recvfrom(1024)
        print('[server] [client addr: %s] recv data: %s' % (sockaddr, data))

        # Send data back to the client
        sock.sendto(data, sockaddr)

def udp_client(address, port):
    # Create a socket object
    sock = usocket.socket(usocket.AF_INET, usocket.SOCK_DGRAM, usocket.IPPROTO_UDP)
    print('[client] socket object created.')

    data = b'1234567890'
    while True:
        # Send data to the server
        sock.sendto(data, (address, port))
        print('[client] send data:', data)

        # Read data sent back from the server
        data, sockaddr = sock.recvfrom(1024)
        print('[client] [server addr: %s] recv data: %s' % (sockaddr, data))
        print('[client] -------------------------')

        # Delay for 1 second
        utime.sleep(1)

if __name__ == '__main__':
    stage, state = checkNet.waitNetworkReady(30)
    if stage == 3 and state == 1: # Network connection is normal
        print('[net] Network connection successful.')

        # Get the IP address of the module
        server_addr = dataCall.getInfo(1, 0)[2][2]
        server_port = 80

        # Start the server thread
        _thread.start_new_thread(udp_server, (server_addr, server_port))

        # Delay for a while to ensure that the server starts successfully
        print('sleep 3s to ensure that the server starts successfully.')
        utime.sleep(3)

        # Start the client
        udp_client(server_addr, server_port)
    else:
        print('[net] Network connection failed, stage={}, state={}'.format(stage, state))
The running result is as follows:
[net] Network connection successful.
sleep 3s to ensure that the server starts successfully.
[server] socket object created.
[server] bind address: 10.110.90.159, 80
[client] socket object created.
[client] send data: b'1234567890'
[server] [client addr: ('10.104.189.115', 62104)] recv data: b'1234567890'
[client] [server addr: ('10.104.189.115', 80)] recv data: b'1234567890'
[client] -------------------------
[client] send data: b'1234567890'
[server] [client addr: ('10.104.189.115', 62104)] recv data: b'1234567890'
[client] [server addr: ('10.104.189.115', 80)] recv data: b'1234567890'
[client] -------------------------
...
Multi-NIC Network Programming
Multi-NIC means multiple network interface cards in one device. How to select the specified NIC when communicating over the network? There are two methods:
- Set a specific NIC as the default NIC. Once the default NIC is specified, the procedure for TCP client programming mentioned above does not need to be changed.
- Obtain the IP address of the specified NIC, and call
socket.bind()after creating the socket object and before connecting to the server.
socket.bind()is used to bind the current network connection to the specified IP address and port, regardless of a client or a server.- If the port number is set to 0, a random port number will be generated, which is commonly used in client programming. If the port number is non-zero, that is, a fixed port number, you need to set port reuse by calling
socket.setsockopt(usocket.SOL_SOCKET, usocket.SO_REUSEADDR, 1), otherwise the connection will fail.
How to achieve the two methods above in practical applications where sometimes multiple cellular data connections are established, and sometimes 4G NICs, external Ethernet NICs, or Wi-Fi NICs coexist?
Cellular Network
As mentioned earlier, after the module is powered on, it will automatically establish the first cellular data connection and set that NIC as the default NIC.
If multiple connections are established through dataCall interfaces, the IP address of the cellular data connection can be obtained through dataCall.getInfo().
Currently, there is no interface to set the NIC connected to the cellular data as the default NIC.
Ethernet NIC
Call socket.bind() to bind IP address
The Ethernet NIC provides ipconfig() to obtain the NIC properties, including the IP address. The format of the return value is [(mac, hostname), (iptype, ip, subnet, gateway, primary_dns, secondary_dns)].
mac: MAC address of the Ethernet NIC.hostname: NIC name.iptype: IP protocol type.4: IPv4
6: IPv6.
ip: IP address.subnet: Subnet mask.gateway: Gateway address.primary_dns: Primary DNS server address.secondary_dns: Secondary DNS server address.
The following sample code shows how to obtain the IP address of the Ethernet NIC and bind it (Click here to download the complete code in github):
import ethernet
import usocket

# Create an Ethernet NIC
eth = ethernet.W5500(b'\x12\x34\x56\x78\x9a\xbc','','','',-1,38,36,37, 0)
print('W5500 ethernet nic created.')

# Enable DHCP
eth.dhcp()
print('DHCP enabled.')

# Enable NIC
eth.set_up()
print('Ethernet nic enabled.')

# After the NIC is registered, check the network configuration information
ip_conf = eth.ipconfig()
print('get ip_conf:', ip_conf)

def tcp_client(address, port):
    # Create a socket object
    sock = usocket.socket(usocket.AF_INET, usocket.SOCK_STREAM, usocket.IPPROTO_TCP)
    print('socket object created.')

    # Bind the Ethernet NIC IP address after creating the socket object and before connecting to the server
    local_address = ip_conf[1][1]
    sock.bind((local_address, 0))
    print('bind ethernet address: %s', local_address)

    # Resolve the domain name
    sockaddr=usocket.getaddrinfo(address, port)[0][-1]
    print('DNS for %s: %s' % (address, sockaddr[0]))

    # Connect to the TCP server
    sock.connect(sockaddr)
    print('tcp link established.')

    # More code in TCP client samples above
Setting as Default NIC
The Ethernet NIC provides set_default_NIC(ip) to set the NIC with a specified IP address as the default NIC.
Sample code (Click here to download the complete code in github):
import ethernet

# Create an Ethernet NIC
eth = ethernet.W5500(b'\x12\x34\x56\x78\x9a\xbc','','','',-1,38,36,37, 0)
print('W5500 ethernet nic created.')

# Enable DHCP
eth.dhcp()
print('DHCP enabled.')

# After the NIC is registered, check the network configuration information
ip_conf = eth.ipconfig()
print('get ip_conf:', ip_conf)

# Set the Ethernet NIC as the default NIC
eth.set_default_NIC(ip_conf[1][1])
print('W5500 is set as default nic.')

# Enable the NIC
eth.set_up()
print('Ethernet nic enabled.')
- Click here to view the usage of Ethernet-related interfaces.
- For more NIC programming application notes, please refer to the relevant documentation.
Wi-Fi NIC
Binding IP Address through socket.bind()
The Wi-Fi NIC also provides an ipconfig() method, but the return value is slightly different from Ethernet. The format is (ip, subnet, gateway, mtu, primary_dns, secondary_dns).
The ipconfig() method of the Wi-Fi NIC is explained as follows:
ip: IP address.subnet: Subnet mask.gateway: Gateway address.mtu: Maximum Transmission Unit.primary_dns: Primary DNS server address.secondary_dns: Secondary DNS server address.
The following sample code shows how to obtain the IP address of the Wi-Fi NIC and bind it (Click here to download the complete code in github):
from usr.WLAN import ESP8266
from machine import UART
import usocket

# Create a Wi-Fi NIC
wifi = ESP8266(UART.UART2, ESP8266.STA)
print('Wi-Fi nic created.')

# Configure the SSID and password, and connect to the router
ssid = 'ssid'
password = 'password'
wifi.station(ssid,password)
print('Wi-Fi connected: %s, %s.' % (ssid, password))

# Configure the DNS server address for the Wi-Fi NIC
wifi.set_dns('8.8.8.8', '114.114.114.114')
print('Wi-Fi DNS server configured.')

# Check the network configuration information
ip_conf = wifi.ipconfig()
print('get ip_conf:', ip_conf)

def tcp_client(address, port):
    # Create a socket object
    sock = usocket.socket(usocket.AF_INET, usocket.SOCK_STREAM, usocket.IPPROTO_TCP)
    print('Socket object created.')

    # Before connecting to the server, bind the Wi-Fi NIC IP address
    local_address = ip_conf[0]
    sock.bind((local_address, 0))
    print('Bind ethernet address: %s', local_address)

    # Resolve the domain name
    sockaddr=usocket.getaddrinfo(address, port)[0][-1]
    print('DNS for %s: %s' % (address, sockaddr[0]))

    # Connect to the TCP server
    sock.connect(sockaddr)
    print('TCP link established.')

    # More code in TCP client samples above
Set as Default NIC
The Wi-Fi NIC also provides set_default_NIC(ip) to set the specified IP address as the default NIC.
Sample code (Click here to download the complete code in github):
from usr.WLAN import ESP8266
from machine import UART

# Create a Wi-Fi NIC
wifi = ESP8266(UART.UART2, ESP8266.STA)
print('Wi-Fi NIC created.')

# Configure the SSID and password, and connect to the router
ssid = 'ssid'
password = 'password'
wifi.station(ssid,password)
print('Wi-Fi connected: %s, %s.' % (ssid, password))

# Configure the DNS server address for the Wi-Fi NIC
wifi.set_dns('8.8.8.8', '114.114.114.114')
print('Wi-Fi DNS server configured.')

# Check the network configuration information
ip_conf = wifi.ipconfig()
print('get ip_conf:', ip_conf)

# Set the Wi-Fi NIC as the default NIC
wifi.set_default_NIC(ip_conf[0])
print('Wi-Fi is set as default NIC.')
- Click here to view the usage of the Wi-Fi NIC-related interfaces.
- For more Wi-Fi NIC programming application notes, please refer to the relevant documentation.
FAQs
1. Why does the connection to the server fail?
- The server must be a public IP address (except for connecting to the local server of the module).
- Use a TCP/UDP test tool client on the PC or mqtt.fx to connect to the server to confirm whether the connection is successful and exclude server failures.
- Do not use China Unicom SIM cards for 2G networks.
- Check the module's signal, network registration, network attachment, and PDP activation status.
- Check if the SIM card is overdue [There is a phenomenon of overdue fees for 4G modules: unable to register 4G network but can register 2G networks].
2. Does TCP have an automatic reconnection mechanism?
No. There is no automatic reconnection at the underlying layer, and the reconnection mechanism is executed at the application layer.
3. How to troubleshoot DNS resolution failure?
Check whether the SIM card has successfully registered to the network and check the validity of the address, then try again.
4. Why does the 4G module fail to connect to the server with a private NIC?
- Check if the APN parameters are set correctly.
- If there are modules from other manufacturers, compare and test whether the connection is normal.
- If it cannot be guaranteed that the server configuration is correct, capture packets with Wireshark on the server or install a third-party tool on the server to open a server port for comparison testing.
- For the IoT card with a fixed IP address, the domain name or IP address needs to be added to the whitelist in advance.
5. What is the maximum number of sockets each module series can create at the same time?
- The EC200A series module can create up to 64 sockets at the same time.
- The ECxxxG/ECxxxU series modules can create up to 15 sockets at the same time.
- The BG95 series module can create up to 20 sockets at the same time.
6. Can the 4G module be used as both a server and a client at the same time?
- For the IPv4 protocol, a module generally cannot be used as a server. The module can obtain the private IP address assigned by the operator. While for private NICs, the IP address assigned by the operator can be used for communication within the private network, so it can be used as a server.
- For the IPv6 protocol, the global link address is the public IP address, so it can be used as a server.
- The client inside the module can connect to the server inside the module, which is necessary for some application architectures.
7. Why does a packet of less than 50 B consume much more data in a day?
If TCP protocol is used, a three-way handshake and four-way handshake are required to complete a data interaction. Although the raw data is not much, the actual data consumed is more than 50 B due to the necessity of adding packet headers, trailer and checksum, etc. Some operators have a requirement that each packet must be sent with a minimum size of 1 KB, and if a packet is less than 1 KB, various checksums will be added to make it to 1 KB.
8. Will the connection be closed by the base station if the keepalive interval is set long?
Yes. It is generally recommended to set the keep alive interval to 2 minutes and not over 4 minutes. According to the base station policy, the connections with no data transmission for a long time will be closed. Therefore, a long keepalive interval may lead to disconnection by the base station.