LVGL - Workflow
Overview
In today's embedded system development field, the demand for graphical user interfaces (GUI) is becoming more prominent. Quecpython + LVGL will assist you in GUI development.
This document presents a complete LVGL workflow, from its association with hardware devices to the process of drawing and displaying the interface, providing you with an intuitive understanding.
Association of LVGL and Display Device
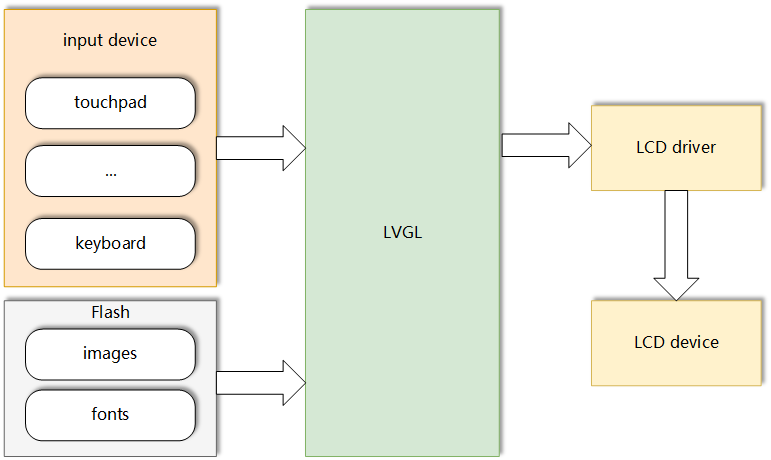
LVGL refreshes the drawn graphics data to the LCD through the registered LCD driver. The LCD, as the display device, is responsible for displaying the content of the graphical interface on the screen. The LCD driver acts as a bridge between LVGL and the LCD. It receives the graphics data generated by LVGL and efficiently transfers it to the LCD for display. In this way, the LVGL establishes a close connection with the LCD, allowing you to easily create beautiful and highly interactive embedded user interfaces using the functionality and flexibility of LVGL, and display and update the UIs in real time on the LCD.

LVGL Workflow
Initialize LVGL
Workflow Description
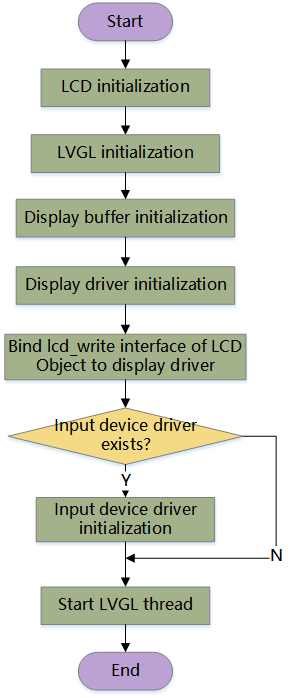
The LVGL initialization process is as follows:
- Properly initialize the LCD. Please refer to LCD - LCD Driver for details.
- Initialize the display buffer.
- Initialize the display driver and bind the refresh API as the write interface of the LCD.
- If there are input devices such as TP, initialize the TP.
- Initialize the input device driver.
- Start the LVGL thread.
The following diagram shows the LVGL initialization process:

Sample Code
The following is an example of LVGL initialization that includes a touchpad. Here takes a MIPI display as an example.
import lvgl as lv
from machine import LCD, Pin
from tp import gt9xx

# Input the MIPI initialization parameters according to the specific LCD driver model.
init_para = (0x29,0,0)
# See the notes below for the details about LCD initialization.
mipilcd = LCD()
mipilcd.mipi_init(initbuf=bytearray(init_para), width=480, hight=854)

# LVGL initialization
lv.init()
# Create a display buffer.
disp_buf1 = lv.disp_draw_buf_t()
# The size of the display buffer is width * height * 2.
buf1_1 = bytes(480 * 854 * 2)
disp_buf1.init(buf1_1, None, len(buf1_1))

# Create a LVGL display driver.
disp_drv = lv.disp_drv_t()
# Initialize the LVGL display driver.
disp_drv.init()
# Assign the display buffer to draw_buf of the driver.
disp_drv.draw_buf = disp_buf1
# Assign lcd_write of the LCD  to flush_cb of the driver.
disp_drv.flush_cb = mipilcd.lcd_write
# Set the horizontal resolution based on the actual screen width.
disp_drv.hor_res = 480
# Set the vertical resolution based on the actual screen height.
disp_drv.ver_res = 854
# Set whether rotation is required.
disp_drv.sw_rotate = 1
# Set the rotation angle.
disp_drv.rotated = lv.DISP_ROT._270
# Register the LVGL display driver.
disp_drv.register()

# Initilaize touchpad.
tp_gt911 = gt9xx(irq=40, reset=20)
tp_gt911.activate()
tp_gt911.init()
print("gt911 init...")

# Create LVGL input device driver.
indev_drv = lv.indev_drv_t()
indev_drv.init()
indev_drv.type = lv.INDEV_TYPE.POINTER
# Assign the reading function of the touchpad to read_cb of the LVGL input device driver.
indev_drv.read_cb = tp_gt911.read
indev_drv.register()

# Start LVGL thread.
lv.tick_inc(5)
lv.task_handler()
Note:
Please refer to LCD - LCD Driver for the details about LCD initialization.
LVGL requires lcd_write of the LCD to refresh the interface.
LVGL requires reading API of the TP for touch input.
Draw LVGL Interface
Workflow Description
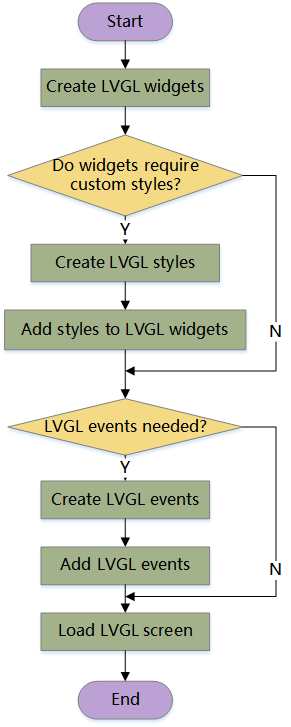
The LVGL drawing process is as follows:
- Create LVGL widgets.
- If custom styles are required, create LVGL styles.
- Add styles to LVGL widgets.
- If custom events are required, create LVGL event callback functions.
- Bind event callback functions to LVGL widgets and specify the triggering event types.
- Load the interface and start the GUI display logic.
The following diagram shows the LVGL drawing process:

Sample Code
The following is an example in which an interface has been created and a clickable button has been created on the interface.
import lvgl as lv

# LVGL initialization is omitted.

#----------script start----------

# Create an interface.
screen = lv.obj()

# Create a button.
btn1 = lv.btn(screen)
# Set the position of the button.
btn1.center()
# Add text to the button.
label = lv.label(btn1)
label.set_text("click")

# Create a style.
style_btn = lv.style_t()
style_btn.init()
# Set the background color.
style_btn.set_bg_color(lv.palette_main(lv.PALETTE.YELLOW))
# Set the font color.
style_btn.set_text_color(lv.palette_darken(lv.PALETTE.YELLOW, 4))

# Add the style to the button.
btn1.add_style(style_btn, 0)

# Define event callback function.
def event_handler(evt):
    code = evt.get_code()
    if code == lv.EVENT.CLICKED:
        print("Clicked event detected")

# Add the event (triggered when clicked) to the button.
btn1.add_event_cb(event_handler, lv.EVENT.CLICKED, None)

# Load the interface.
lv.scr_load(screen)
Note:
- You can only create an LVGL object after the LVGL thread starts, otherwise, errors may occur.
- LVGL drawing process can be interleaved with the display or can be dynamically drawn and displayed in real time during the display process.
Display Effect
The running result of the above sample code is shown in the following figure.

LVGL Interface Display
LVGL displays based on the interface (obj), and you can switch interfaces by calling the interface loading API according to the business logic.
Interface Refresh Mechanism
LVGL has several coexisting refresh mechanisms for interface refresh, and you only need to know them.
- Automatic Refresh
This is the default refresh mode of LVGL. In this mode, LVGL automatically detects changes in the object's state and refreshes the display. You do not need to refresh the interface manually.
- Partial Refresh
When a partial area of the interface changes, only that area instead of the entire interface is refreshed by default, which can improve the performance.
