
Helios SDK Development Guide__Intermediate
1. menuconfig
menuconfig, as the name suggests, has the meaning of both menu and configuring. It means menu-based configuration.
1.1 menuconfig Operation Instructions
1.1.1 Interface Description
Enter helios menuconfig in the command line to start the configuration menu, as shown in the figure:
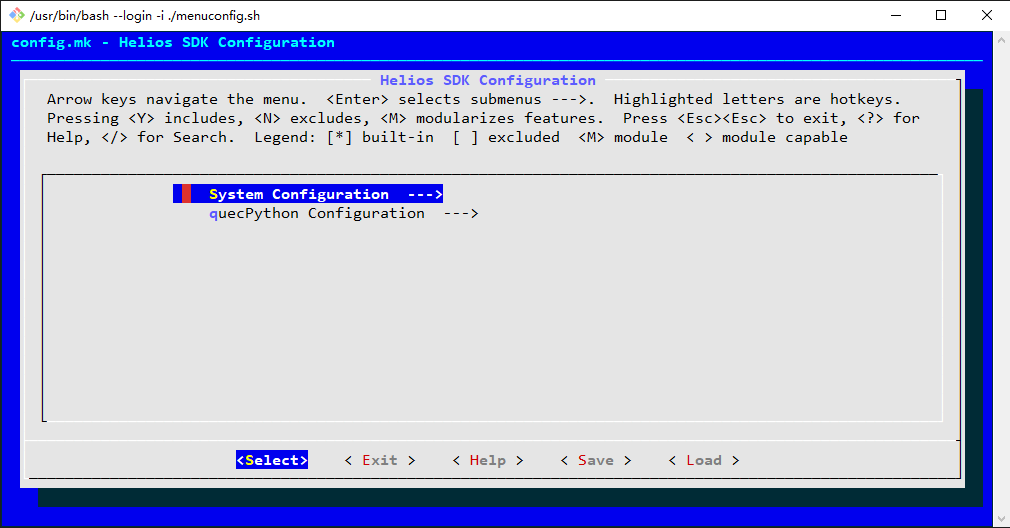
As shown in the figure above, menuconfig consists of four parts: Title, Usage Instructions, Menu List, and Operation Keys.
- Title: The light blue text on the top of the dark blue background in the figure above, saying
config.mk - Helios SDK Configuration. - Usage Instructions: The three rows of text in the gray background at the top of the figure. It guides users on how to operate menuconfig.
- Menu List: The two rows of text in the gray background within the recessed frame in the figure above, saying
System Configuration --->andquecPython Configuration --->. - Operation Keys: The bottom row in the figure, enclosed in angle brackets, namely
<Select> < Exit > < Help > < Save > < Load >.
1.1.2 Operation Instructions
menuconfig can only be operated with the keyboard:
- Up and Down Keys: Select different menus.
- Left and Right Keys: Select different operation keys.
- Enter Key: Enter the sub-menu or trigger the function of the operation key.
- Space Key: Open or close the selected menu function.
- Esc Key: Double-click "Esc" key to return to the previous menu. If this operation is performed in the root directory of the menu, menuconfig will exit.
For example, press the " Enter" key to enter System Configuration, and you can see that the mbedtls function is enabled, as shown in the following figure:

In the [*] Enable mbedtls menu, the * in the square brackets indicates that the mbedtls function is enabled. The asterisk * disappears after pressing the "Space" key, indicating that the mbedtls function is disabled.
1.1.3 Saving Configuration
After modifying the configuration(s), you can save the configuration(s) in the following three ways.
- i. In the configuration menu interface, select
<Save>at the bottom of the interface with the left and right key, and press the " Enter" key. After the pop-up interface shown in the figure below appears, select<OK>to save the configuration.
The name of the configuration file shall not be modified, because other script files search for the configurations based on this configuration file name. Once the name is modified, the configuration file will not be found.

ii. In the configuration menu interface, press the
Esckey multiple times until menuconfig exits. When exiting, if there are unsaved configuration items detected, the interface for saving the configurations shown in the figure above will pop up. Follow the operation in *Item i* to save the configuration.iii. In the configuration menu interface, select and execute
<Exit>function repeatedly until menuconfig exits. When exiting, if there are unsaved configuration items detected, the interface for saving the configurations shown in the figure above will pop up. Follow the operation in *Item i* to save the configuration.
1.1.4 Canceling Configuration Saving
After entering the interface for saving the configurations shown in *Section 1.1.3, if you need to cancel saving the configuration, double-click the "Esc*" key.
1.1.5 Configuration Files
The configuration files are saved in the config folder in the root directory of the SDK, with the file names autoconf.h and config.mk.
autoconf.his used to be called by C language. Developers can directly refer to the macro definitions in this file to the code without including this header file. The compilation script will automatically include this file into the C file being compiled.config.mkis used to be called by the compilation script.The mbedtls function is already enabled by default in the SDK.
The content of autoconf.h is as follows:
/*
 *
 * Automatically generated file; DO NOT EDIT.
 * Helios SDK Configuration
 *
 */
#define CONFIG_MBEDTLS 1
The content of config.mk is as follows:
#
# Automatically generated file; DO NOT EDIT.
# Helios SDK Configuration
#

#
# System Configuration
#
CONFIG_MBEDTLS=y

#
# quecPython Configuration
#
# CONFIG_LVGL is not set
# CONFIG_QRCODE is not set
# CONFIG_POC is not set
# CONFIG_CAMERA is not set
1.2 System Configuration
As mentioned in *Section 1* of this chapter, the system configuration currently only includes mbedtls.
When encryption algorithms or encrypted network communication functions are needed in the application, this function needs to be enabled.
mbedtls is used in QuecPython, so when compiling the QuecPython firmware, this function must be enabled.
1.3 QuecPython Configuration
The QuecPython configuration menu is shown in the following figure:
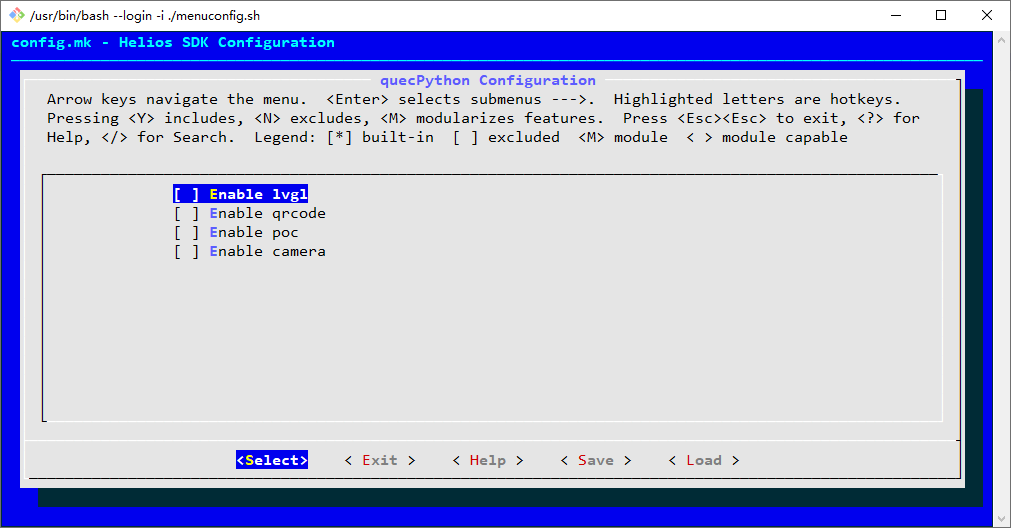
These four types of functional menus are used to configure whether the QuecPython firmware includes the lvgl interface, QR code scanning, intercom, camera and other functions.
2. Compilation of QuecPython Firmware
Users configure the functions supported by QuecPython with menuconfig according to their actual needs.
In this example, the default configurations of menuconfig is used. Taking the EC200UEU_AB module as an example, enter the following command in the command line and press Enter:
helios make services\microPython @ EC200UEU_AB EC200UEUABR03A01M08
- The path separator of the application entry address
services\microPythonfollows the requirements of the host system,\for win32 platform, and/for Linux platform. - The usage of the compilation command refers to Helios SDK Development Guide__Getting Started.
- Please refer to Quectel_QFlash_User_Guide in the Qflash tool directory for firmware flashing.
3. QuecPython Interactive Experience
**Step 1: Connect the PC and the EVB
Connect the QuecPython EVB to the PC via the Type-C USB interface.
Step 2: Module Power On
As shown in the figure below, press and hold the PWK button in the lower left corner on the back of the EVB to power on the module and start the program in the EVB.
If the network indicator on the upper right corner on the back of the EVB flashes, it indicate that the module is powered on successfully.
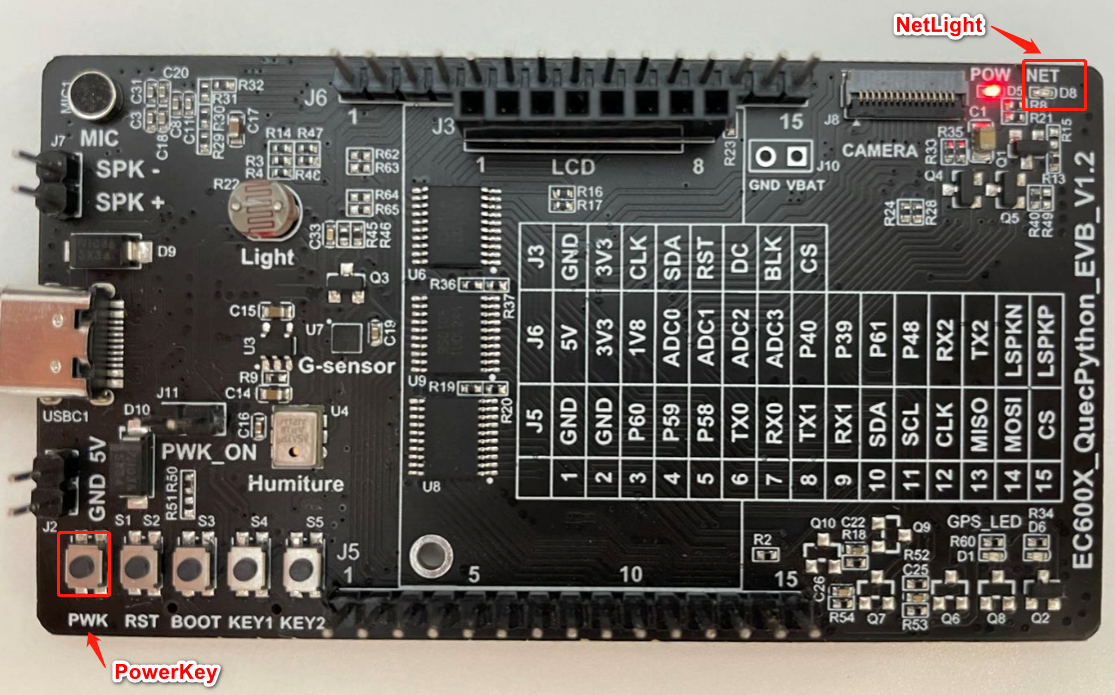
Instructions on buttons of EVB:
PWK: Power button, long press to power on
RST: Reset button, press to reboot the module
BOOT: Press to enter firmware flashing mode
KEY1,KEY2: Buttons provided for user development
Step 3: Open the Quectel USB REPL Port
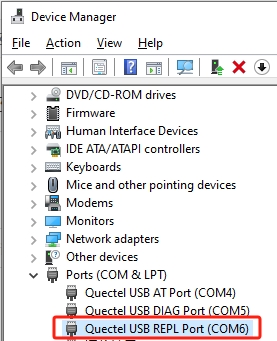
Open the Device Manager, expand Ports, and find the Quectel USB REPL Port (COM6). Take note of its serial port number. In this example, it is COM6, as shown in the following image:
Refer to *Section 7* in Helios SDK Quick Start - Getting Started for instructions on how to open COM6.
Step 4: QuecPython command interaction
Press the " Enter " key in the REPL window of QPYcom, and the QuecPython command prompt >>> will be displayed on the interface.
Now, let's print through the print function in QuecPython. Type the following code in SecureCRT:
print ('Hello, QuecPython!')
The execution result is shown in the following image:
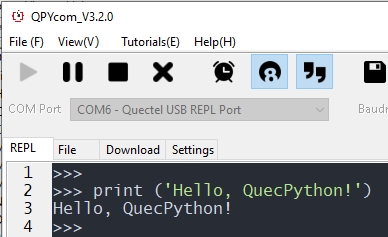
Now, we have developed our first simple application with QuecPython.
For further exploration of QuecPython features and API usage, please visit QuecPython API Reference Manual.