
Helios SDK Development Guide__Advanced
1. Executing Script Files from QuecPython File System
This section shows you how to import and run your own Python script files in the module.
1.1 Installing QPYcom
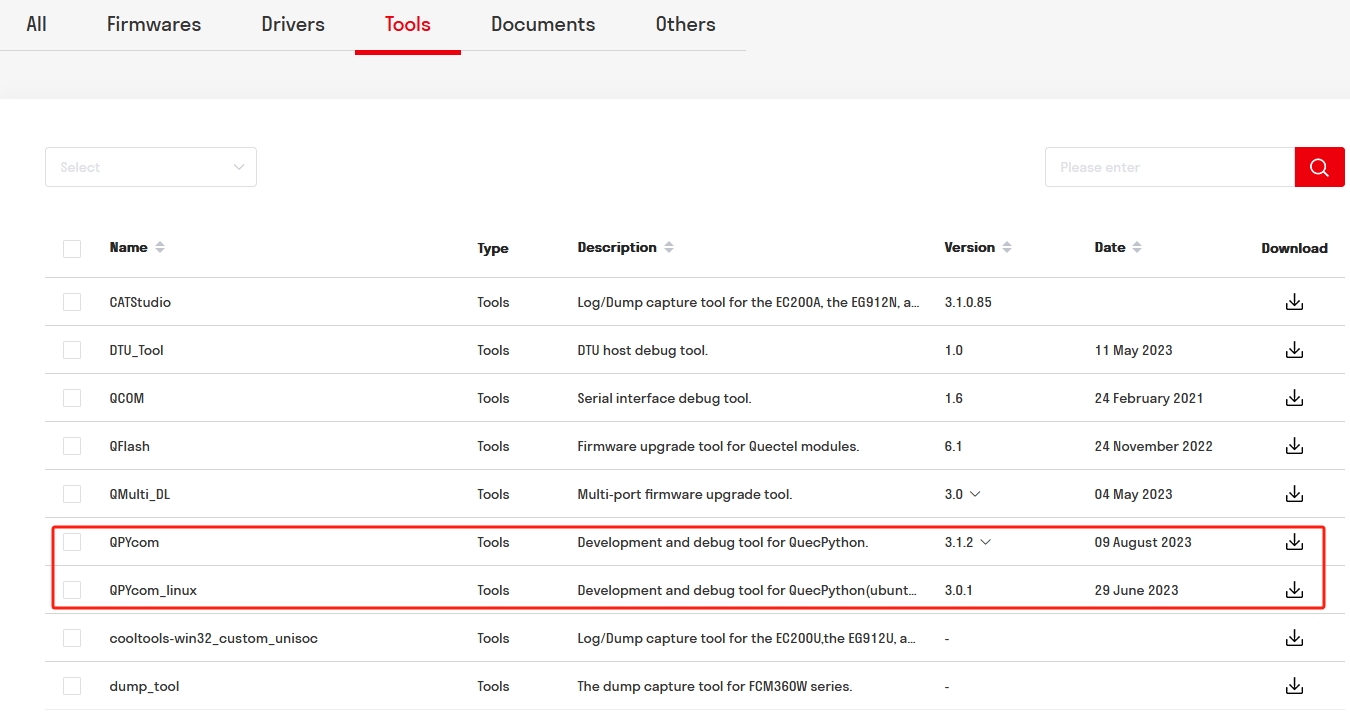
As shown in the figure below, you can visit the official download page to download QPYcom based on your computer's operating system:
- Use
QPYcomfor Windows systems. - Use
QPYcom_linuxfor Ubuntu systems.
After downloading, unzip the file to use it.
Click here for more information on how to use QPYcom.
1.2 Writing Python Script File
Write a script file named quecPython_demo.py on your PC with the following content:
import uos

print ('Hello, quecPython!')

root_list = uos.listdir('') # show file list under root dir
print ('root_list:', root_list)

usr_list = uos.listdir('usr') # show file list under /usr
print ('usr_list:', usr_list)
1.3 Importing Python Script File to QuecPython File System
Step 1: Open QPYcom
Double-click QPYcom.exe in the tool's root directory to open the tool.
Step 2: Open USB Serial Port
Follow *Step 3* in *Section 3* of Helios SDK Development Guide__Intermediate to select the corresponding port from the drop-down menu of Ports in QPYcom. In this example, it is COM5.
Click Open port to enter the command interaction interface by default. The interface is shown in the following figure:

Step 3: Enter File Transfer Interface
Click File in the tab to enter the file transfer interface, as shown in the following figure:

In the figure above, the left side of the interface is the file list on the PC, and the right side is the file list on the module. After QuecPython starts on the module, a file named system_config.json will be automatically generated. Users can temporarily ignore the purpose of this file.
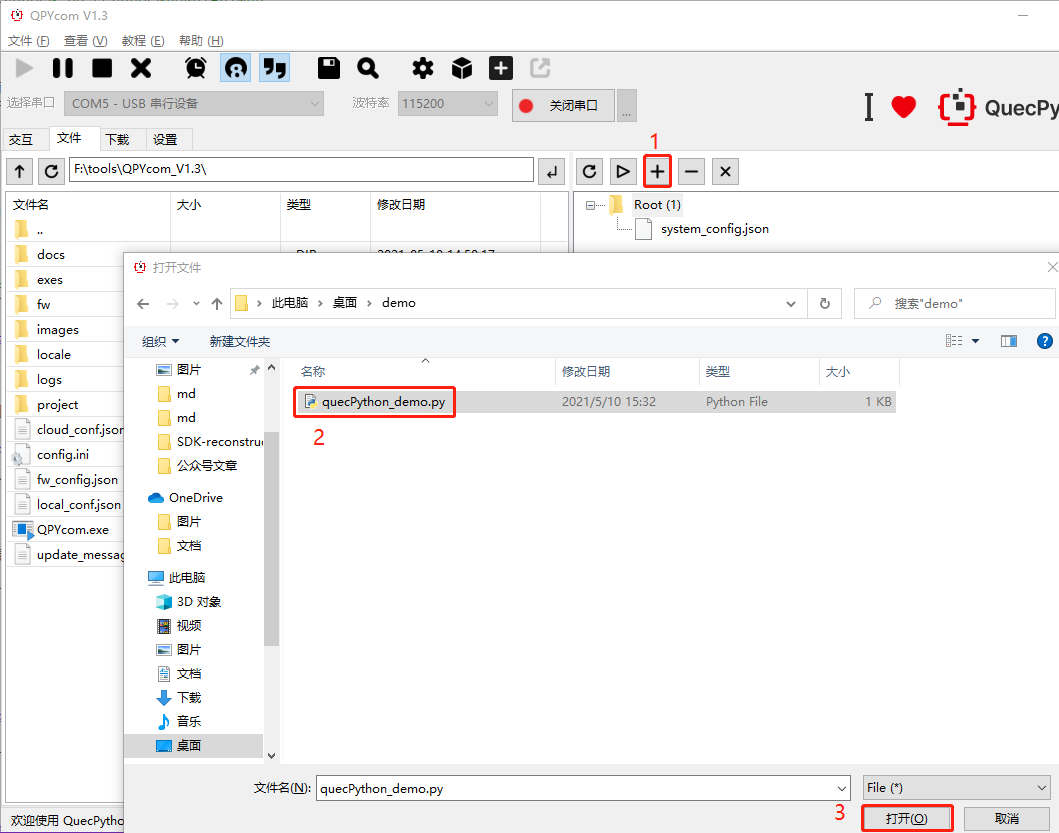
Step 4: Import Python Script File
Click the + button above the file list on the module to transfer the file to the module.
As shown in the following figure, follow the order of 1, 2, and 3 to import the quecPython_demo.py file to the file system.
After the import is complete, the quecPython_demo.py file will appear in the file list on the module, as shown in the following figure:

1.4 Executing Imported Script File
Click the REPL tab to enter the command interaction interface.
In the command interaction interface, enter the following two commands one by one:
import example
example.exec('/usr/quecPython_demo.py')
After the commands are executed, you can see the following output on the interface:
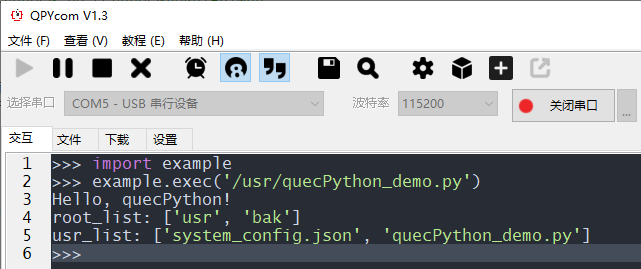
At this point, quecPython_demo.py has been successfully executed, and the newly imported script file is also displayed in usr_list.
1.5 Automatically Starting Application Script from main.py
Through the previous learning, you have learned how to import script files to the QuecPython file system and trigger the execution of the script through commands. However, QuecPython can automatically start the application script by executing main.py after startup.
Step 1: Write the main.py File
Write a script file named main.py on your PC with the following content:
import utime

if __name__ == '__main__':
    while True:
        print('Hello, quecPython!')
        utime.sleep(1)
Step 2: Import the main.py File to the Module File System
Use the method in *Section 1.3* of this chapter to import the main.py file to the module file system.
Step 3: Restart the Module
Restart the module to automatically execute main.py after startup.
Step 4: Reconnect the USB Serial Port
After the module restarts, the USB serial port opened by QPYcom will be disconnected from the PC. Follow *Step 2* in *Section 1.3* of this chapter to reconnect the port.
Step 5: Observe the Execution Result
After reconnecting the USB serial port, the command interaction interface will periodically print Hello, quecPython! every 1 second. This indicates that the main.py script has been successfully auto-started.

2. Writing Python Modules Based on Python Language
In QuecPython, the module based on the Python language are stored in the services\microPython\ports\quectel\core directory.
The following example demonstrates how to write a module named hello.py based on the Python language in QuecPython.
Step 1: Create the hello.py File
Create a file named hello.py in the services\microPython\ports\quectel\core directory.
Step 2: Write the File Content
In the newly created hello.py file, write the following content:
def say_hello(name):
    print ('Hello,', name)
Step 3: Modify the Compilation Script
Open services\microPython\ports\quectel\core\Makefile and add $(BUILD)/hello.mpy \ to the dependency files and execution commands of $(BUILD)/_frozen_mpy.c, as shown in the following figure:

Please note the backslash
\at the end of$(BUILD)/hello.mpy \.
In the Makefile, when splitting one command into multiple lines, a backslash \ needs to be added at the end, and no characters, including spaces, can appear after the backslash \.
Step 4: Compile the QuecPython Firmware
Because the script files under services\microPython\ports\quectel\core are compiled into the firmware package in binary form and exist as built-in libraries, the compilation command needs to be executed to compile a new firmware package.
Refer to *Section 2* of Helios SDK Development Guide__Intermediate for the compilation command.
Step 5: Download Firmware and Verify Functionality
After downloading the firmware to the module and restarting, open QPYcom.
Enter the following two commands in REPL:
import hello
hello.say_hello('quecPython')
The execution result is shown in the following figure:
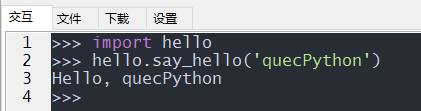
As shown in the figure, you have your own hello module, and the hello.say_hello(name) method is successfully executed.
3. Writing Python Modules in C
Some requirements may not be achieved by writing Python modules in Python, such as some algorithms that require fast execution speed or self-developed peripheral drivers.
This section demonstrates how to write the Python modules in C language.
3.1 Classification of Module Interface Levels
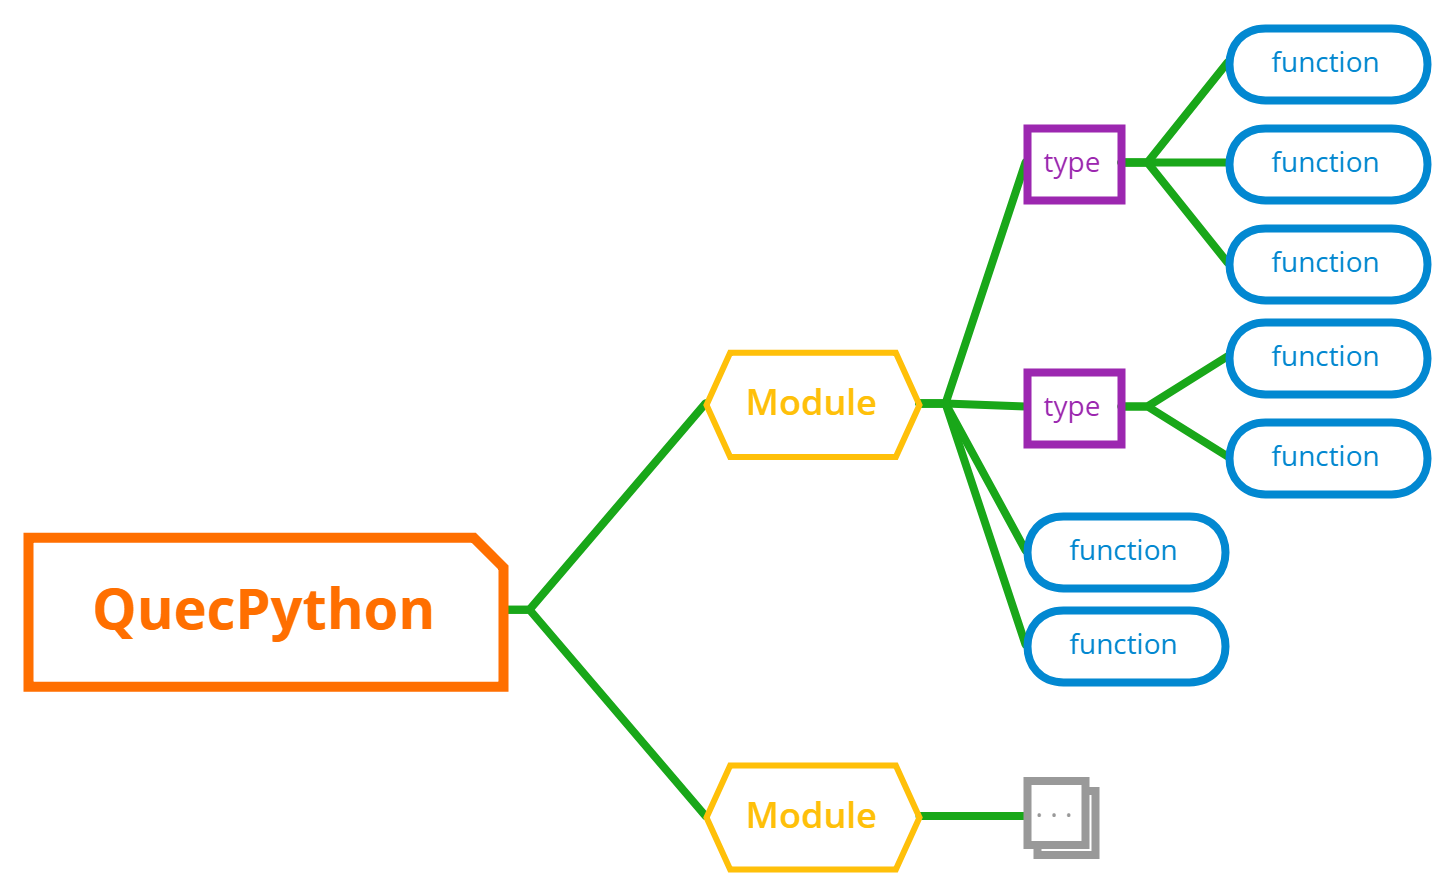
From the above figure, we can see that the QuecPython module interface can be divided into three categories: module, type, and function.
The hierarchical relationship between the three is also obvious:
- There can be multiple modules under QuecPython.
- Each module can have multiple types or functions.
- Each type can have multiple functions.
Taking the machine module as an example, machine.Pin and machine.UART belong to the type category.
Under the type category are the specific functions, such as Pin.value() used to set the high or low level of GPIO.
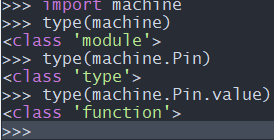
We can enter the following commands in the QPYcom REPL window to check their types:
import machine
type(machine)
type(machine.Pin)
type(machine.Pin.value)
The output result is shown in the following figure, which verifies the above statement.
With the concept of hierarchical classification mentioned above, you can write C language Python modules with the templates provided by MicroPython.
3.2 Adding a Module
Step 1: Create A File Named modtest.c
Go to the services\microPython\ports\quectel\core\source directory and create the modtest.c file.
The services\microPython\ports\quectel\core\source directory stores all the C language implementation of Python modules added by Quectel.
#include <stdint.h>
#include <stdio.h>

#include "obj.h"
#include "runtime.h"

/* Definition of the modtest global dictionary, where we add types and functions */
STATIC const mp_rom_map_elem_t modtest_globals_table[] = {
    {MP_OBJ_NEW_QSTR(MP_QSTR___name__), MP_ROM_QSTR(MP_QSTR_modtest)},   // This corresponds to the __name__ attribute in Python
};

/* Register the modtest_globals_table to mp_module_modtest_globals */
STATIC MP_DEFINE_CONST_DICT(mp_module_modtest_globals, modtest_globals_table);

/* Define a module type */
const mp_obj_module_t mp_module_modtest = {
    .base = {&mp_type_module},
    .globals = (mp_obj_dict_t *)&mp_module_modtest_globals,
};
From the above code, we can see that modtest.c mainly consists of three parts, which are required to add a module:
mp_rom_map_elem_t modtest_globals_table[ ]MP_DEFINE_CONST_DICT(mp_module_modtest_globals, modtest_globals_table)mp_obj_module_t mp_module_modtest
Step 2: Register the modtest Module to QuecPython
Open services\microPython\ports\quectel\core\source\mpconfigport.h.
Find where MICROPY_PORT_BUILTIN_MODULES is defined, and make an external reference declaration for mp_module_modtest before it.
Refer to the format defined by MICROPY_PORT_BUILTIN_MODULES, and register the modtest module.
The completed code is as follows:
extern const struct _mp_obj_module_t mp_module_wifiscan;

extern const struct _mp_obj_module_t mp_module_modtest; //Make an external reference declaration for mp_module_modtest

#define MICROPY_PORT_BUILTIN_MODULES \
    	{ MP_OBJ_NEW_QSTR(MP_QSTR_uos), (mp_obj_t)&uos_module }, \
    	{ MP_OBJ_NEW_QSTR(MP_QSTR_machine), (mp_obj_t)&mp_module_machine }, \
    	{ MP_OBJ_NEW_QSTR(MP_QSTR_usocket), (mp_obj_t)&mp_module_usocket }, \
    	{ MP_OBJ_NEW_QSTR(MP_QSTR_misc), (mp_obj_t)&mp_module_misc}, \
    	{ MP_OBJ_NEW_QSTR(MP_QSTR_osTimer), (mp_obj_t)&mp_ostimer_type}, \
    	{ MP_OBJ_NEW_QSTR(MP_QSTR_example), (mp_obj_t)&example_module }, \
    	{ MP_OBJ_NEW_QSTR(MP_QSTR_dial), (mp_obj_t)&mp_module_dial}, \
    	{ MP_OBJ_NEW_QSTR(MP_QSTR_modem), (mp_obj_t)&mp_module_modem}, \
    	{ MP_OBJ_NEW_QSTR(MP_QSTR_utime), (mp_obj_t)&utime_module }, \
    	{ MP_OBJ_NEW_QSTR(MP_QSTR_utils), (mp_obj_t)&mp_module_utils},\
    	{ MP_OBJ_NEW_QSTR(MP_QSTR_hmacSha1), (mp_obj_t)&mp_module_hmacSha1}, \
    	{ MP_OBJ_NEW_QSTR(MP_QSTR_sms), (mp_obj_t)&mp_module_sms}, \
    	{ MP_OBJ_NEW_QSTR(MP_QSTR_sim), (mp_obj_t)&mp_module_sim}, \
    	{ MP_OBJ_NEW_QSTR(MP_QSTR_pm), (mp_obj_t)&mp_module_pm}, \
    	{ MP_OBJ_NEW_QSTR(MP_QSTR_net), (mp_obj_t)&mp_module_net}, \
    	{ MP_OBJ_NEW_QSTR(MP_QSTR_cellLocator), (mp_obj_t)&mp_module_celllocator}, \
    	{ MP_OBJ_NEW_QSTR(MP_QSTR_wifiScan), (mp_obj_t)&mp_module_wifiscan},\
    	{ MP_OBJ_NEW_QSTR(MP_QSTR_modtest), (mp_obj_t)&mp_module_modtest }, /* Register the modtest module/ \
    	MICROPY_PORT_BUILTIN_MODULES_FOTA \
    	MICROPY_PORT_BUILTIN_MODULES_LVGL
The lines with comments in the provided code are the parts that have been added:
- The C macro definition
MICROPY_PORT_BUILTIN_MODULESis used to define content. Due to the lengthy content, line breaks are implemented using the backslash\. It's important to note that there should be no characters, including spaces, following the\. This method of line continuation using the backslash is consistent with what was described earlier regarding the Makefile. If comments are needed, they should be enclosed in/* */and placed in front of the\. - The format of the last two lines of the
MICROPY_PORT_BUILTIN_MODULESmacro definition is different from the previous lines. This is done to facilitate the trimming of related functionalities using macro definitions. If you are interested, you can further explore this concept.
Step 3: Add modtest.c to the Compilation Script
Open Makefile in services/microPython/ports/quectel/core/Makefile. Add the modtest.c file according to the following code snippet, similar to Line 7:
SRC_QSTR += source/moduos.c \
    		source/quecpython.c \
    		source/utf8togbk.c \
    		... \
    		source/modlvgl.c \
    		source/modwifiscan.c \
    		source/modtest.c # Add the modtest.c file

ifeq ($(strip $(PLAT)),ASR)
SRC_QSTR += source/modfota.c
endif
Note: If the current line in the "Makefile" contains a line continuation character
\, and the next line is not blank, do NOT add comments in front of the\. Otherwise, the make system will consider all lines concatenated with a trailing "" as comments.
Open the microPython.mk file in services/microPython/microPython.mk. Append the value ports/quectel/core/source/modtest.c to the $(NAME)_SRCS variable, as shown in the code snippet (Line 7):
$(NAME)_SRCS = \
    extmod/modubinascii.c \
    extmod/moducryptolib.c \
    extmod/moductypes.c \
    ... \
    ports/quectel/core/source/modwifiscan.c \
    ports/quectel/core/source/modtest.c \
    ports/quectel/core/build/_frozen_mpy.c \
    ...
Step 4: Compile the Firmware
Refer to *Section 2* of Helios SDK Development Guide__Intermediate for compiling the new QuecPython firmware.
Step 5: Download the Firmware and Verify Functionality
Refer to Quectel_QFlash_User_Guide for instructions on downloading the firmware.
After downloading, restart the module, open QPYcom, and enter the following commands:
import modtest
type(modtest)
dir(modtest)
You will receive an output in QPYcom similar to what is shown in the image in the guide.
On QPYcom, you can see the command output.
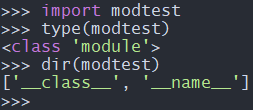
From the output, it's clear that the modtest module has been successfully added, but no types or functions have been added yet.
3.3 Adding Functions to the Module
Functions can be divided into two categories: those with no parameters and those with parameters. In the following steps, examples of adding both a function without parameters and a function with parameters to the modtest module will be shown. In Python, they correspond to two methods: modtest.func_noargs() and modtest.func_withargs(argv).
3.3.1 Function Without Parameters
Here adds a method mp_obj_t modtest_func_noargs(void) implemented by C function. Its purpose is to respond to the command modtest.func_noargs() by outputting the string here we go.
Step 1: Modify the Code
Open the services\microPython\ports\quectel\core\source\modtest.c file and make the following modifications.
The complete code is as follows.
#include <stdint.h>
#include <stdio.h>
#include <string.h>

#include "obj.h"
#include "runtime.h"

#include "mphal.h"

/* Definition of modtest module without parameters */
STATIC mp_obj_t modtest_func_noargs(void)
{
    mp_hal_stdout_tx_strn("here we go\n", strlen("here we go\n"));
    return mp_const_none; //No data is required to be returned in python. Here returns mp_const_none
}

/* Register the function object modtest_obj_func_noargs */
STATIC const MP_DEFINE_CONST_FUN_OBJ_0(modtest_obj_func_noargs, modtest_func_noargs);

/* Definition of the modtest global dictionary, where we add types and functions */
STATIC const mp_rom_map_elem_t modtest_globals_table[] = {
    {MP_OBJ_NEW_QSTR(MP_QSTR___name__), MP_ROM_QSTR(MP_QSTR_modtest)}, //This corresponds to the __name__ attribute in Python
    {MP_OBJ_NEW_QSTR(MP_QSTR_func_noargs), MP_ROM_PTR(&modtest_obj_func_noargs)}, //Register the newly added modtest_obj_func_noargs object to modtest
};

/* Register modtest_globals_table to modtest mp_module_modtest_globals */
STATIC MP_DEFINE_CONST_DICT(mp_module_modtest_globals, modtest_globals_table);

/* Define a module type */
const mp_obj_module_t mp_module_modtest = {
    .base = {&mp_type_module},
    .globals = (mp_obj_dict_t *)&mp_module_modtest_globals,
};
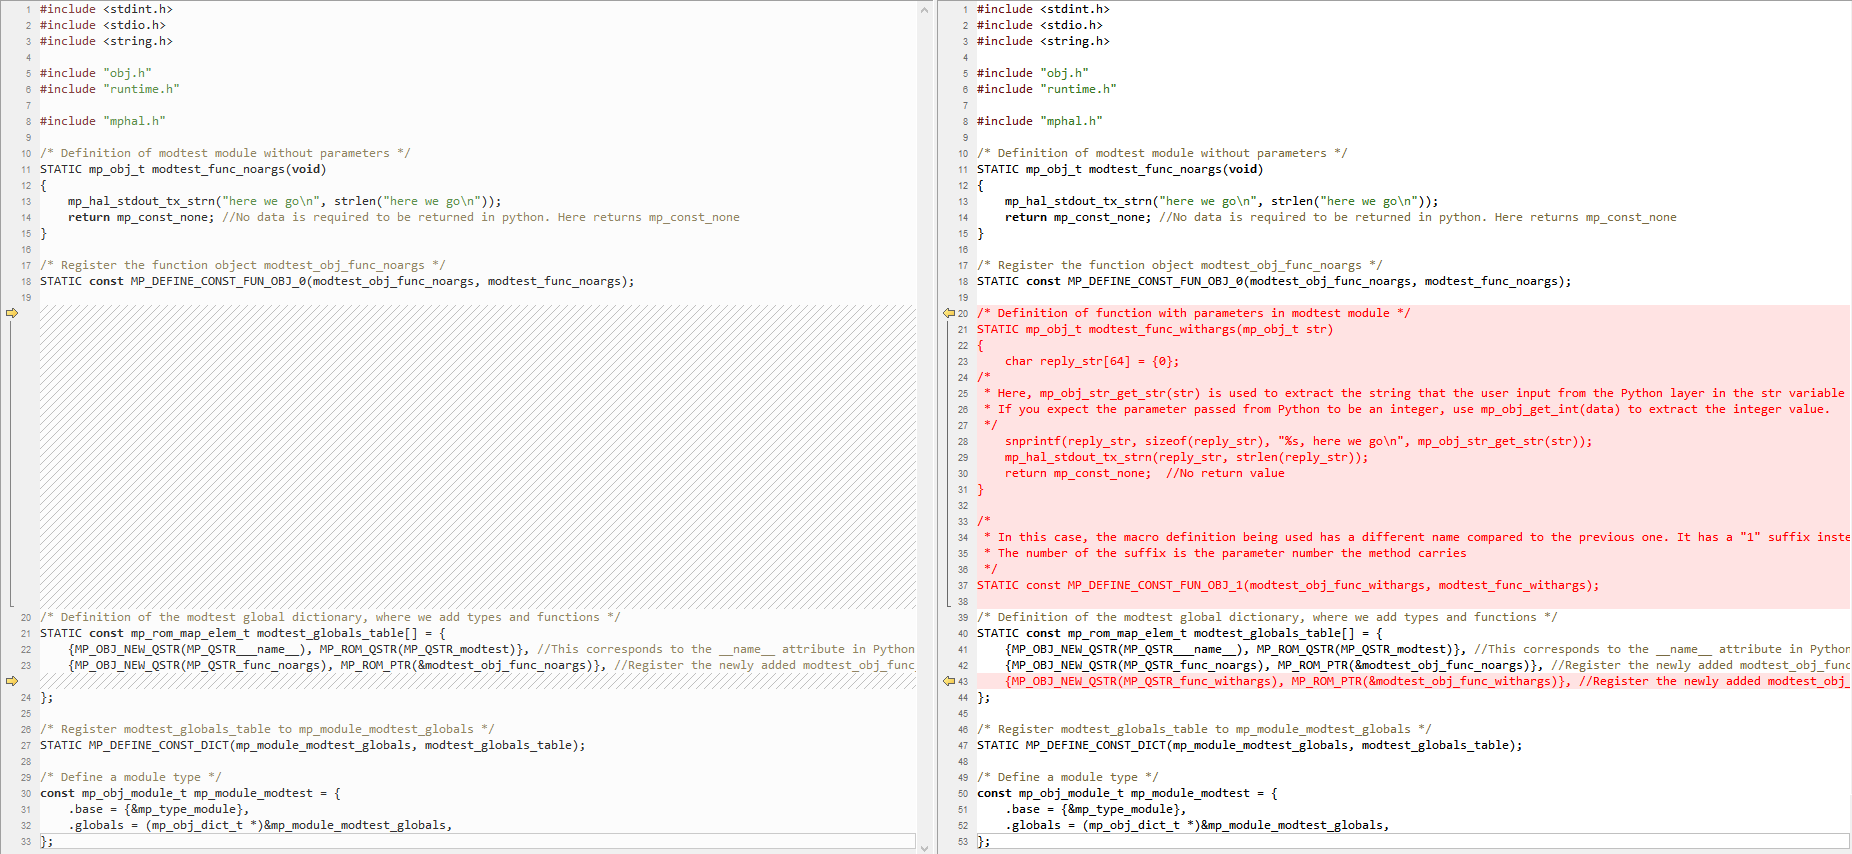
The difference comparison in the figure below shows the difference between this code and the code in section 3.2 (the current code is on the right, and the red part is the difference):
- Added the C language function modtest_func_noargs corresponding to the Python module
modtestmethod modtest.func_noargs(). Any C language function corresponding to Python will return themp_obj_ttype. In this example, no value is returned from modtest.func_noargs(). Therefore, the corrsponding C function should return mp_const_none to inform Python that this method has no return value. - Use the macro
MP_DEFINE_CONST_FUN_OBJ_0to add a function objectmodtest_obj_func_noargs, which is the code on Line 18. - Register the newly added
modtest_obj_func_noargsobject to modtest, which is the code on Line 23.

Step 2: Verify the Functionality
After completing *Step 1*, you can compile and download the firmware directly without modifying the script file.
After downloading is complete, restart the module, open QPYcom, and enter the following commands:
import modtest
dir(modtest)
modtest.func_noargs()
The execution result is shown in the following figure:

From the figure, it can be seen that the execution result of dir(modtest) has listed the func_noargs method.
Executing modtest.func_noargs() outputs the expected string here we go.
3.3.2 Function With Parameters
Here add a method mp_obj_t modtest_func_withargs(mp_obj_t argv) implemented by C function. Its purpose is to respond to the command modtest.func_withargs('Bingo') by outputting the string Bingo, here we go.
Step 1: Modify the Code
Open the services\microPython\ports\quectel\core\source\modtest.c file and make the following modifications.
The complete code is as follows.
#include <stdint.h>
#include <stdio.h>
#include <string.h>

#include "obj.h"
#include "runtime.h"

#include "mphal.h"

/* Definition of modtest module without parameters */
STATIC mp_obj_t modtest_func_noargs(void)
{
    mp_hal_stdout_tx_strn("here we go\n", strlen("here we go\n"));
    return mp_const_none; //No data is required to be returned in python. Here returns mp_const_none
}

/* Register the function object modtest_obj_func_noargs */
STATIC const MP_DEFINE_CONST_FUN_OBJ_0(modtest_obj_func_noargs, modtest_func_noargs);

/* Definition of function with parameters in modtest module */
STATIC mp_obj_t modtest_func_withargs(mp_obj_t str)
{
    char reply_str[64] = {0};

    /*
     * Here, mp_obj_str_get_str(str) is used to extract the string that the user input from the Python layer in the str variable
     * If you expect the parameter passed from Python to be an integer, use mp_obj_get_int(data) to extract the integer value.
     */
    snprintf(reply_str, sizeof(reply_str), "%s, here we go\n", mp_obj_str_get_str(str));
    mp_hal_stdout_tx_strn(reply_str, strlen(reply_str));
    return mp_const_none;  //No return value
}

/*
 * In this case, the macro definition being used has a different name compared to the previous one. It has a "1" suffix instead of "0".
 * The number of the suffix is the parameter number the method carries
 */
STATIC const MP_DEFINE_CONST_FUN_OBJ_1(modtest_obj_func_withargs, modtest_func_withargs);

/* Definition of the modtest global dictionary, where we add types and functions*/
STATIC const mp_rom_map_elem_t modtest_globals_table[] = {
    {MP_OBJ_NEW_QSTR(MP_QSTR___name__), MP_ROM_QSTR(MP_QSTR_modtest)}, //This corresponds to the __name__ attribute in Python
    {MP_OBJ_NEW_QSTR(MP_QSTR_func_noargs), MP_ROM_PTR(&modtest_obj_func_noargs)}, //Register the newly added modtest_obj_func_noargs object to modtest
    {MP_OBJ_NEW_QSTR(MP_QSTR_func_withargs), MP_ROM_PTR(&modtest_obj_func_withargs)}, //Register the newly added modtest_obj_func_withargs object to modtest
};

/* Register modtest_globals_table to mp_module_modtest_globals */
STATIC MP_DEFINE_CONST_DICT(mp_module_modtest_globals, modtest_globals_table);

/* Define a module type */
const mp_obj_module_t mp_module_modtest = {
    .base = {&mp_type_module},
    .globals = (mp_obj_dict_t *)&mp_module_modtest_globals,
};
The difference comparison in the figure below shows the difference between this code and the code in *Section 3.3.1* (the current code is on the right, and the red part is the difference):
- Added the C language function modtest_func_withargs corresponding to the Python module
modtestmethod modtest.func_withargs(str). In this example, the string parameters that the user input from the Python layer is returned through mp_obj_str_get_str(str). - Use the macro
MP_DEFINE_CONST_FUN_OBJ_1to add a function objectmodtest_obj_func_withargs, which is the code on Line 38. - Register the newly added
modtest_obj_func_noargsobject to modtest, which is the code on Line 43.
Step 2: Verify the Functionality
After completing *Step 1*, you can compile and download the firmware directly without modifying the script file.
After downloading is complete, restart the module, open QPYcom, and enter the following commands:
import modtest
dir(modtest)
modtest.func_withargs('Bingo') # with argv: 'Bingo'
The execution result is shown in the following figure:
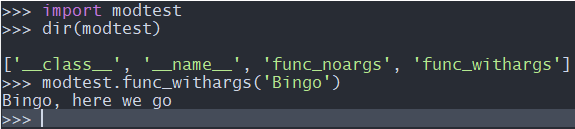
From the figure, it can be seen that the execution result of dir(modtest) has listed the func_withargs method.
Executing modtest.func_withargs('Bingo') outputs the expected string Bingo, here we go.
3.4 Adding Types to the Module
This section introduces how to add a type called math to the modtest module.
Step 1: Create A File Named *modtest_math.c*
Enter the services\microPython\ports\quectel\core\source directory and create a file named modtest_math.c.
#include <stdint.h>
#include <stdio.h>

#include "obj.h"
#include "runtime.h"

/* Define the local dictionary for this type */
STATIC const mp_rom_map_elem_t math_locals_dict_table[] = {
};

/* Register math_locals_dict_table into math_locals_dict */
STATIC MP_DEFINE_CONST_DICT(math_locals_dict, math_locals_dict_table);

/* Define the structure of mp_obj_type_t; note that this is different from the type used for modules */
const mp_obj_type_t modtest_math_type = {
    .base = { &mp_type_type },
    .name = MP_QSTR_math, // Define the type's name attribute here, not in the DICT
    .locals_dict = (mp_obj_dict_t*)&math_locals_dict, // Register math_locals_dict
};
In the code above, modtest_math.c consists of three main parts, which are essential for adding a type:
mp_rom_map_elem_t math_locals_dict_table[ ]MP_DEFINE_CONST_DICT(math_locals_dict, math_locals_dict_table)mp_obj_type_t modtest_math_type
When comparing the code for adding a module, you'll find that:
- Both consist of three parts.
- The way the dictionary is defined and registered is identical, with the only difference being the variable names.
- The
mp_obj_module_tstructure is used to define a module, while themp_obj_type_tstructure is used to define a type.
Step 2: Add modtest_math.c to the Compilation Script
This step is exactly the same as *Step 3* in *Section 3.2*.
Open Makefile in services\microPython\ports\quectel\core\Makefile. Add the modtest_math.c file according to the following code snippet, similar to Line 7 and 8:
SRC_QSTR += source/moduos.c \
    		source/quecpython.c \
    		source/utf8togbk.c \
    		... \
    		source/modlvgl.c \
    		source/modwifiscan.c \
    		source/modtest.c \
    		source/modtest_math.c # Add modtest_math.c

ifeq ($(strip $(PLAT)),ASR)
SRC_QSTR += source/modfota.c
endif
Note: When adding source/modtest_math.c to this script, you need to remove the comment after the previous line source/modtest.c and add a backslash
\.
Open microPython.mk in the services\microPython\microPython.mk path and add the value ports/quectel/core/source/modtest.c to the $(NAME)_SRCS variable, as shown on Line 8 below.
$(NAME)_SRCS = \
    extmod/modubinascii.c \
    extmod/moducryptolib.c \
    extmod/moductypes.c \
    ... \
    ports/quectel/core/source/modwifiscan.c \
    ports/quectel/core/source/modtest.c \
    ports/quectel/core/source/modtest_math.c \
    ports/quectel/core/build/_frozen_mpy.c \
    ...
Step 3: Register modtest_math_type for modtest
Open the services\microPython\ports\quectel\core\source\modtest.c file.
Add a reference declaration for modtest_math_type before mp_rom_map_elem_t modtest_globals_table[].
Register modtest_math_type within mp_rom_map_elem_t modtest_globals_table[].
The modified code is as follows:
/* Definition of the modtest global dictionary, where we add types and functions */
extern const mp_obj_type_t modtest_math_type;
STATIC const mp_rom_map_elem_t modtest_globals_table[] = {
    {MP_OBJ_NEW_QSTR(MP_QSTR___name__), MP_ROM_QSTR(MP_QSTR_modtest)}, // This corresponds to the __name__ attribute in Python
    {MP_OBJ_NEW_QSTR(MP_QSTR_func_noargs), MP_ROM_PTR(&modtest_obj_func_noargs)}, // Register the newly added modtest_obj_func_withargs object to modtest
    {MP_OBJ_NEW_QSTR(MP_QSTR_func_withargs), MP_ROM_PTR(&modtest_obj_func_withargs)}, // Newly added `modtest_obj_func_withargs` object registered in `modtest`
    {MP_OBJ_NEW_QSTR(MP_QSTR_math), MP_ROM_PTR(&modtest_math_type)}, // Register modtest_math_type
};
Compared to the original code, only lines 2 and 7 of the above code are added.
Step 4: Verify the Functionality
After completing *Step 3*, you can compile and download the firmware.
After downloading, restart the module. Open QPYcom and enter the following commands:
import modtest
dir(modtest)
type(modtest.math)
The execution result is shown in the following image:

From the image, we can see that a type named math is added.
3.5 Adding a Function to the Type
This section demonstrates how to add a function to the type.
Similar to the procedure of adding a function to a module, there are two types: functions without parameters and functions with parameters.
3.5.1 Function Without Parameters
Here, we add a C function called mp_obj_t math_nothing(void).
Functionality: When entering modtest.math.nothing() in the command prompt, it outputs the string do nothing in this function.
Here adds a method mp_obj_t math_nothing(void) implemented by C function. Its purpose is to respond to the command modtest.math.nothing() by outputting the string do nothing in this function.
Step 1: Modify the Code
Open the services\microPython\ports\quectel\core\source\modtest_math.c file and make the following modifications.
The complete code is as follows:
#include <stdint.h>
#include <stdio.h>
#include <string.h>

#include "obj.h"
#include "runtime.h"

#include "mphal.h"

/* Definition of the function without parameters under modtest_math_type */
STATIC mp_obj_t math_nothing(void)
{
    mp_hal_stdout_tx_strn("do nothing in this function\n", strlen("do nothing in this function\n"));
    return mp_const_none; // Return mp_const_none if no data needs to be returned in the Python function
}

/* Register the function object math_nothing_obj */
STATIC MP_DEFINE_CONST_FUN_OBJ_0(math_nothing_obj, math_nothing);

/* Define the local dictionary for the type */
STATIC const mp_rom_map_elem_t math_locals_dict_table[] = {
    { MP_ROM_QSTR(MP_QSTR_nothing), MP_ROM_PTR(&math_nothing_obj) }, // Register the newly added math_nothing_obj object to modtest_math_type
};

/* Register math_locals_dict_table to math_locals_dict */
STATIC MP_DEFINE_CONST_DICT(math_locals_dict, math_locals_dict_table);

/* Define a structure of type mp_obj_type_t; note that this is different from the type used to define the module */
const mp_obj_type_t modtest_math_type = {
    .base={ &mp_type_type },
    .name = MP_QSTR_math, // The name attribute of the type class is defined here, not in the DICT
    .locals_dict = (mp_obj_dict_t*)&math_locals_dict, // Register math_locals_dict
};
The difference comparison in the figure below shows the difference between this code and the code before the modification (the current code is on the right, and the red part is the difference):
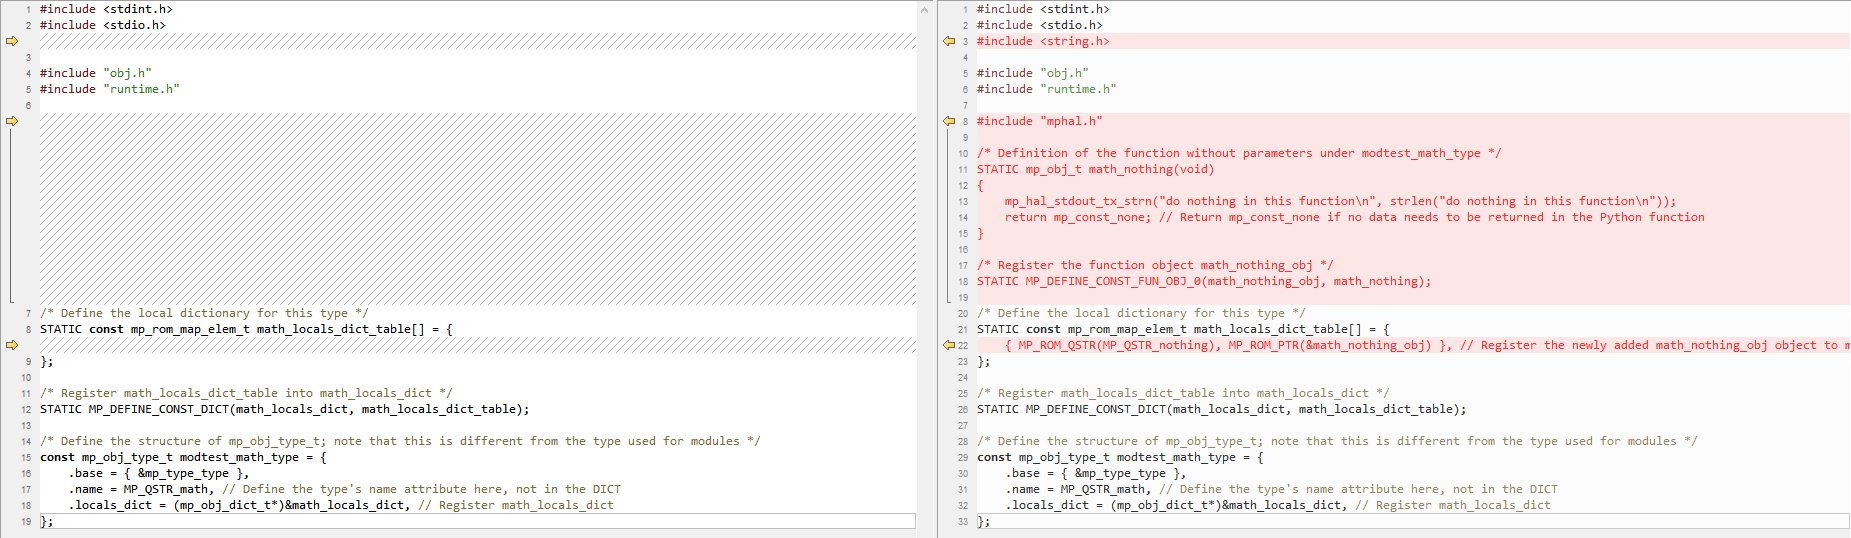
As can be seen from the figure, adding a function without parameters to the type is the same as adding it to the module, so no further explanation is needed.
Step 2: Verify the Functionality
After completing *Step 1*, you can compile and download the firmware without modifying the script file.
After downloading, restart the module. Open QPYcom, and enter the following command:
import modtest
dir(modtest.math)
modtest.math.nothing()
The execution result is shown in the figure below:

As can be seen from the figure, executing modtest.math.nothing() outputs the expected string do nothing in this function.
3.5.2 Function with Parameters
Adding a function with parameters to the type is very different from adding it to the module.
The type in Python is a class, and you need to instantiate an object (e.g. mymath=modtest.math()) to operate a function with parameters. In C language, you must have corresponding space to be allocated space, the functions to create the objects, and the structures to represent objects.
Here, we implement the following functionality: create an object mymath in Python by modtest.math(), and execute its addition method mymath.add(10, 20), expecting the output result 30.
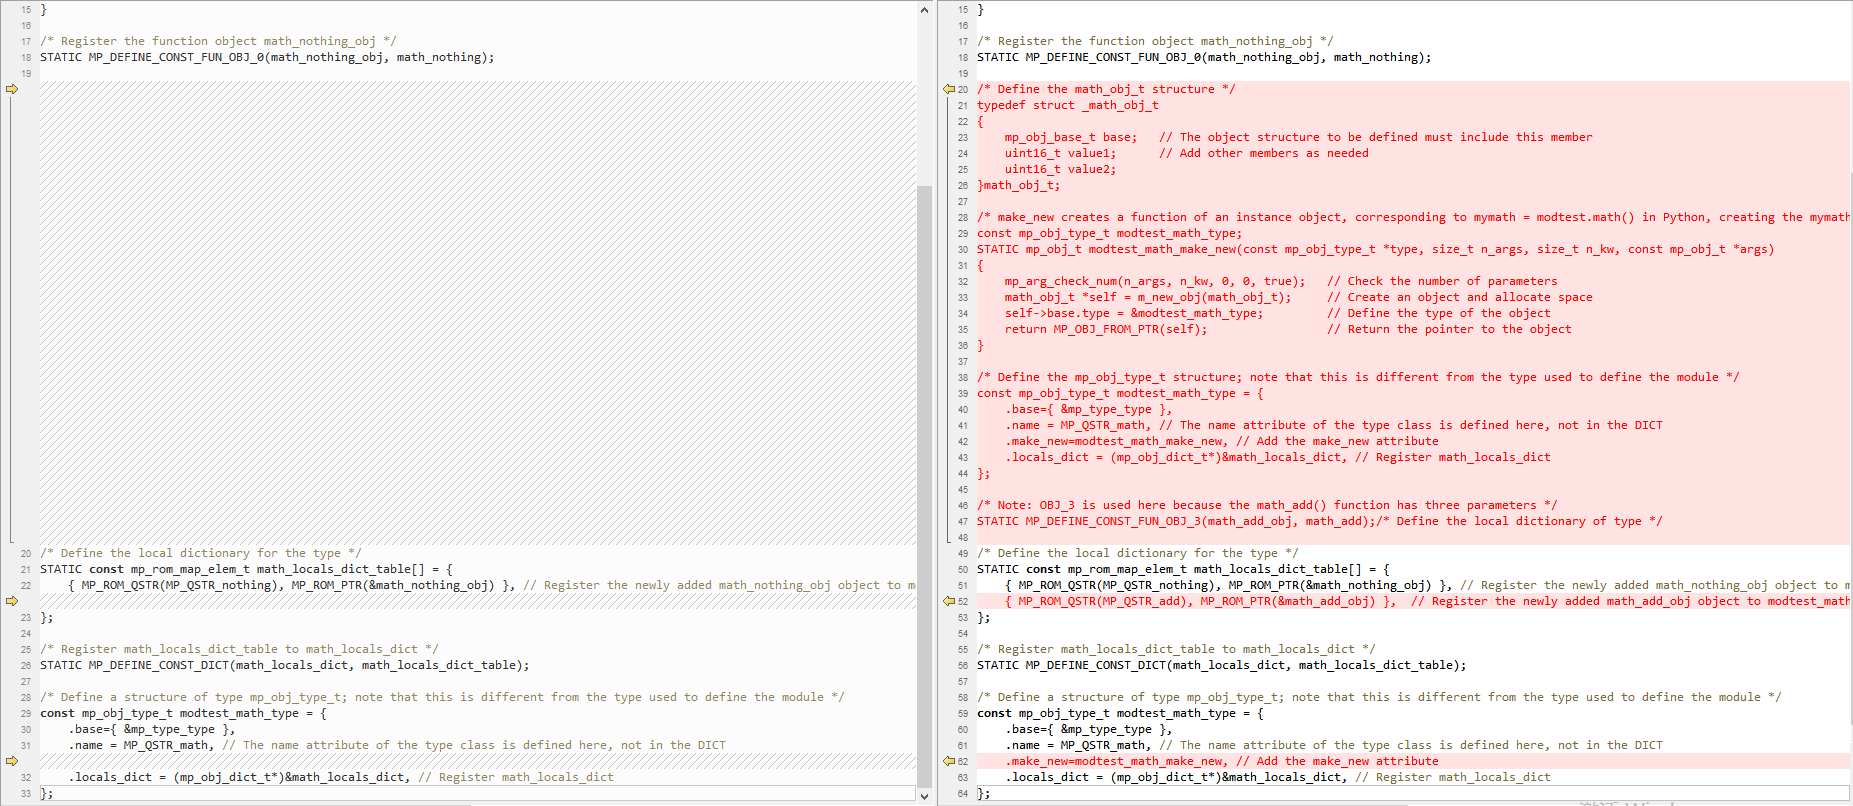
Step 1: Define the math_obj_t Structure
Add the math_obj_t structure to services\microPython\ports\quectel\core\source\modtest_math.c to represent the structure of the math object:
/* Define the math_obj_t structure */
typedef struct _math_obj_t
{
    mp_obj_base_t base;   // The object structure to be defined must include this member
    uint16_t value1;      // Add other members as needed
    uint16_t value2;
}math_obj_t;
Step 2: Add .make_new to modtest_math_type And Corresponding Function
The code is as follows:
/* make_new creates a function of an instance object, corresponding to mymath = modtest.math() in Python, creating the mymath object */
const mp_obj_type_t modtest_math_type;
STATIC mp_obj_t modtest_math_make_new(const mp_obj_type_t *type, size_t n_args, size_t n_kw, const mp_obj_t *args)
{
    mp_arg_check_num(n_args, n_kw, 0, 0, true);   // Check the number of parameters
    math_obj_t *self = m_new_obj(math_obj_t);     // Create an object and allocate space
    self->base.type = &modtest_math_type;         // Define the type of the object
    return MP_OBJ_FROM_PTR(self);                 // Return the pointer to the object
}

/* Define the mp_obj_type_t structure; note that this is different from the type used to define the module */
const mp_obj_type_t modtest_math_type = {
    .base={ &mp_type_type },
    .name = MP_QSTR_math, // The name attribute of the type class is defined here, not in the DICT
    .make_new=modtest_math_make_new, // Add the make_new attribute
    .locals_dict = (mp_obj_dict_t*)&math_locals_dict, // Register math_locals_dict
};
Step 3: Add the math_add method to modtest_math_type
The code is as follows:
/* Define the math_add function */
mp_obj_t math_add(mp_obj_t self_in, mp_obj_t val1, mp_obj_t val2) {
    math_obj_t *self=MP_OBJ_TO_PTR(self_in); // Get the pointer to the object from the first parameter
    self->value1 = mp_obj_get_int(val1);  // Get the first parameter of the addition operation from the second parameter
    self->value2 = mp_obj_get_int(val2);  // Get the second parameter of the addition operation from the third parameter
    return mp_obj_new_int(self->value1+self->value2);  // Return the calculation result
}

/* Note: OBJ_3 is used here because the math_add() function has three parameters */
STATIC MP_DEFINE_CONST_FUN_OBJ_3(math_add_obj, math_add);/* Define the local dictionary of type */
STATIC const mp_rom_map_elem_t math_locals_dict_table[] = {
    { MP_ROM_QSTR(MP_QSTR_nothing), MP_ROM_PTR(&math_nothing_obj) }, // Register the newly added math_nothing_obj object to modtest_math_type
    { MP_ROM_QSTR(MP_QSTR_add), MP_ROM_PTR(&math_add_obj) },  // Register the newly added math_add_obj object to modtest_math_type
};
After completing the above three steps, let's see the differences between the code in this section and the code before the modification.
The red font in the following figure is all the code we added.
Step 4: Verify the Functionality
After completing the first three steps, you can directly compile and download the code without modifying the script file.
After downloading, restart the module. Open QPYcom, and enter the following commands:
import modtest
mymath = modtest.math() # Create a mymath object
mymath.add(10, 20) # Perform addition operation
The execution result is shown in the following figure:
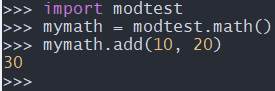
As shown in the above figure, the mymath.add() method is successfully executed.
4. Conclusion
With this, Helios SDK Developemt Guide comes to an end. I believe that everyone can successfully enter the world of QuecPython.
I hope that everyone can implement powerful functions based on QuecPython.