
Scenario Instructions
This document will provide detailed instructions on how to configure and use NICs for network communication in different scenarios, as well as provide sample code for reference.
Users can refer to the following table to choose and view the configuration method for the corresponding scenario:
| Corresponding scenario | Reference section |
|---|---|
| The SIM card can access the Internet without configuring an APN. Users only need to determine that the module has successfully connected to the Internet and directly use socket/mqtt/http to directly access the public network. | Automatically Activate One NIC at Startup Without Configuring APN |
| The SIM card needs to be configured with APN before it can access the Internet. Users only need to determine that the module is successfully connected to the Internet and directly use socket/mqtt/http to directly access the public network or a private network. | Automatically Activate One NIC at Startup and Configure APN |
| The SIM card needs to be configured with APN before it can access the Internet. For user business, it is necessary to automatically activate multiple network cards after the module is powered on. For example, one network card is used to access a public network, and another network card is used to access a private network. | Automatically Activate Multiple NICs at Startup and Configure APN |
| The SIM card needs to be configured with an APN before it can access the Internet. Users do not want the module to automatically activate the network card when it is powered on. Instead, they want the user to actively activate a certain network card when needed, and then deactivate the network card after the network service is completed. | Manually Activate One NIC |
| The SIM card needs to be configured with APN before it can access the Internet. For user business, the module needs to activate multiple network cards. For example, one network card is used to access a public network, and another network card is used to access a private network. And users hope that they can control the activation of multiple network cards when needed, instead of having the module automatically complete it when it is powered on. | Manually Activate Multiple NICs |
Automatically Activate One NIC at Startup Without Configuring APN
This scenario refers to the situation where the module has not configured any APN for any NIC and automatically activates one NIC at startup. There are two situations as follows.
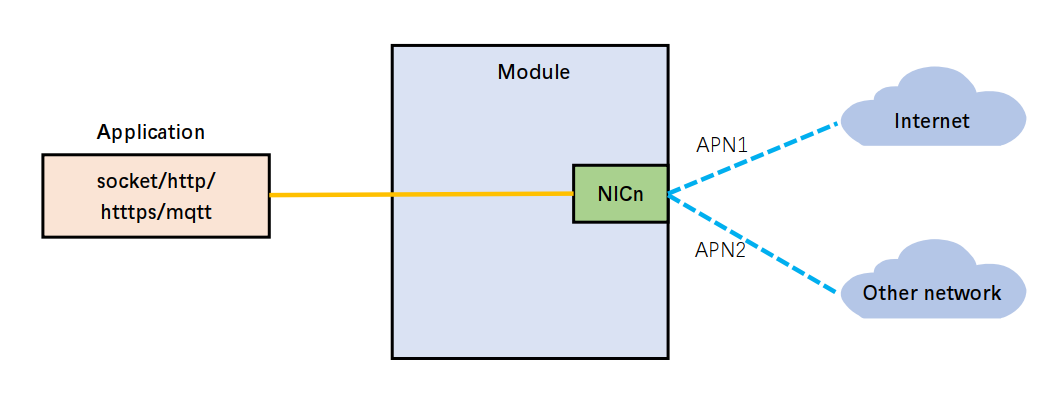
Scenario 1: You have not configured any NIC to be automatically activated at module startup. In this case, QuecPython will automatically activate the first NIC by default. NICn in the following diagram represents the NIC1.
Scenario 2: You have configured a specific NIC to be automatically activated at module startup by calling dataCall.setAutoActivate. In this case, QuecPython will activate the NIC specified by you at module startup.
In both cases, only one cellular NIC is automatically activated at module startup. When using protocols such as socket, HTTP, and MQTT for network communication, the module does not need to specify the NIC and will automatically select the activated cellular NIC for network communication.

In this scenario, you should follow the steps below to write the application code.
Step 1: Use checkNet to wait for the network to be ready.
Step 2: Perform network communication.
Take the socket communication as an example:
import checkNet
import usocket


def main():
    stage, state = checkNet.waitNetworkReady(20)
    if stage == 3 and state == 1:
        print('Network connected successfully.')
        # Create a socket object
        sock = usocket.socket(usocket.AF_INET, usocket.SOCK_STREAM)
        # Resolve the domain name
        try:
            sockaddr = usocket.getaddrinfo('python.quectel.com', 80)[0][-1]
        except Exception:
            print('Domain name resolution failed.')
            sock.close()
            return
        # Connect to the server
        sock.connect(sockaddr)
        # Send data to the server
        ret = sock.send('GET /News HTTP/1.1\r\nHost: python.quectel.com\r\nAccept-Encoding: deflate\r\nConnection: keep-alive\r\n\r\n')
        print('send {} bytes'.format(ret))

        # Receive data from the server
        data = sock.recv(256)
        print('recv {} bytes:'.format(len(data)))
        print(data.decode())

        # Close the connection
        sock.close()
    else:
        print('Network connection failed, stage={}, state={}'.format(stage, state))


if __name__ == '__main__':
    main()
The above sample code download link:Download
In this scenario, you do not configure any APN for the cellular NIC, but the module can still communicate normally after startup. However, there is a major issue: you may find that the application program written according to the above example can run normally in some places but fail in others, especially in countries or regions outside China. The specific manifestation is that the return value of the checkNet.waitNetworkReady() is not (3,1). The module fails to register on the network due to the lack of APN configuration.
Whether the cellular NIC can be successfully activated when no APN is configured depends on whether the automatic APN correction feature of the current base station is enabled. The automatic APN correction feature means that when the UE attaches to the network, if you do not configure an APN for the cellular NIC or configure an incorrect APN, the base station will automatically send a correct APN to the device and allow the UE to attach successfully.
That's why the above application program can run normally in China. Currently, most base stations of operators in China have the automatic APN correction feature, but some do not. We cannot determine in advance whether a base station supports this feature, so you are recommended to configure APN when using QuecPython modules. This is the scenario we are going to introduce next.
Automatically Activate One NIC at Startup and Configure APN
This scenario refers to the situation where you configure the correct APN for a specific cellular NIC based on the SIM card used, and the NIC with the configured APN is automatically activated at module startup.
In this case, when using protocols such as socket, HTTP, and MQTT for network communication, the module does not need to specify the NIC and will automatically select the activated cellular NIC for network communication. Depending on the configured APN, the module can access different networks, as shown in the following diagram. Please note that APN1 and APN2 in the diagram do not mean that the module can configure two APNs for one NIC at the same time, but represent different networks that can be accessed when different APNs are configured for one NIC.
In this scenario, you should follow the steps below to write the application code.
Step 1: Check the current APN configuration of the NIC automatically activated at module startup and determine whether the APN needs to be configured. If the current APN is already the one you need to configure, there is no need to configure it again; otherwise, you need to configure the APN and reboot the module.
Step 2: Use checkNet to wait for the network to be ready.
Step 3: Perform network communication.
Take automatically activating the first cellular NIC at module startup as an example:
import checkNet
import usocket
import dataCall
from misc import Power
# Configure the APN information according to your actual needs
usrCfg = {'apn': '3gnet', 'username': '', 'password': ''}
```def checkAPN():
# Get the APN information of the first cellular NIC and check if the current one is the one you specified
pdpCtx = dataCall.getPDPContext(1)
if pdpCtx != -1:
if pdpCtx[1] != usrCfg['apn']:
# If it is not the APN you need, configure it as follows
ret = dataCall.setPDPContext(1, 0, usrCfg['apn'], usrCfg['username'], usrCfg['password'], 0)
if ret == 0:
print('APN configuration successful. Ready to restart to make APN take effect.')
print('Please re-execute this program after restarting.')
# Make a data call according to the configured information after the module reboots
Power.powerRestart()
else:
print('APN configuration failed.')
return False
else:
print('The APN is correct and no configuration is required')
return True
else:
print('Failed to get PDP Context.')
return False
def main():
checkpass = checkAPN()
if not checkpass:
return
stage, state = checkNet.waitNetworkReady(20)
if stage == 3 and state == 1:
print('Network connected successfully.')
# Create a socket object
sock = usocket.socket(usocket.AF_INET, usocket.SOCK_STREAM)
# Resolve the domain name
try:
sockaddr = usocket.getaddrinfo('python.quectel.com', 80)[0][-1]
except Exception:
print('Domain name resolution failed.')
sock.close()
return
# Connect to the server
sock.connect(sockaddr)
# Send data to the server
ret = sock.send('GET /News HTTP/1.1\r\nHost: python.quectel.com\r\nAccept-Encoding: deflate\r\nConnection: keep-alive\r\n\r\n')
print('send {} bytes'.format(ret))
# Receive data from the server
data = sock.recv(256)
print('recv {} bytes:'.format(len(data)))
print(data.decode())
# Close the connection
sock.close()
else:
print('Network connected failed, stage={}, state={}'.format(stage, state))
if __name__ == '__main__':
main()
The above sample code download link:Download
Automatically Activate Multiple NICs at Startup and Configure APN
This scenario refers to a situation where you need the module to automatically activate multiple cellular NICs at startup. The application program can access different networks using different NICs, for example, one NIC for public network access and another for private network access.
In this scenario, you need to configure the automatic activation of multiple cellular NICs at module startup and configure different APNs for each of the activated NICs. We will take the diagram below as an example to illustrate the automatic activation of NIC1 and NIC2 at startup.
When you configure the automatic activation of NIC1 and NIC2 at module startup, and configure an APN that allows access to the public network for NIC1, and an APN that only allows access to a specific private network for NIC2, the situation is as follows:
Features like HTTP, HTTPS, and MQTT can only use NIC1 for network communication by default, and you cannot specify which NIC to use.
The socket feature can be used to bind IP addresses and ports to determine which cellular NIC to use for network communication. If you do not specify, the NIC1 is used by default.
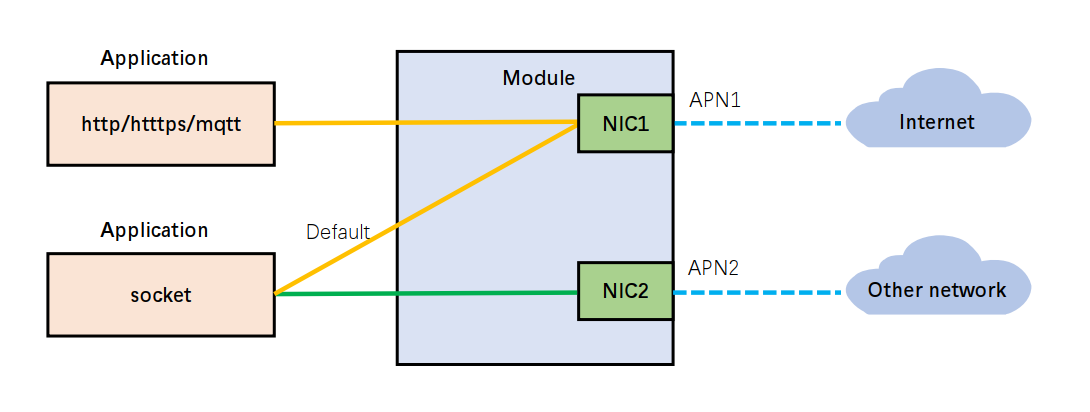
In QuecPython, when the module activates multiple cellular NICs and uses the socket feature for network communication, if you do not specify which NIC to use, the system will use the NIC with the smallest index by default. For example, if the module activates NIC1 and NIC2, NIC1 will be used. If the module activates NIC2 and NIC3, NIC2 will be used.
In this scenario, you should follow the steps below to write the application code.
Step 1: Configure which cellular NICs should be automatically activated at module startup.
Step 2: Configure APNs for the NICs that need automatic activation.
Step 3: Reboot the module to make the configuration take effect.
Step 4: Use checkNet to wait for the network to be ready.
Step 5: Perform network communication.
Below is a sample routine - NIC1 and NIC2 are configured for automatic activation with different APNs. Two socket objects are created - socket1 uses default NIC1, while socket2 specifies NIC2 for private network access.
import checkNet
import usocket
import dataCall
from misc import Power


# Configure the APN information according to your actual needs
usrCfg1 = {'profileID': 1, 'apn': '3gnet', 'username': '', 'password': ''}
usrCfg2 = {'profileID': 2, 'apn': '3gwap', 'username': '', 'password': ''}


def checkAPN(usrCfg, reboot=False):
    if type(usrCfg) != dict:
        print("Error: Input is not a dictionary.")
        return False

    print('Check the APN configuration of the {} network card.'.format(usrCfg['profileID']))
    # Get the APN information of the cellular NICs and check if the current one is the one you specified
    pdpCtx = dataCall.getPDPContext(usrCfg['profileID'])
    if pdpCtx != -1:
        if pdpCtx[1] != usrCfg['apn']:
            # If it is not the APN you need, configure it as follows
            ret = dataCall.setPDPContext(usrCfg['profileID'], 0, usrCfg['apn'], usrCfg['username'], usrCfg['password'], 0)
            if ret == 0:
                print('APN configuration successful.')
                # Make a data call according to the configured information after the module reboots
                if reboot:
                    print('Ready to restart to make APN take effect.')
                    print('Please re-execute this program after restarting.')
                    Power.powerRestart()
                else:
                    return True
            else:
                print('APN configuration failed.')
                return False
        else:
            print('The APN is correct and no configuration is required')
            return True
    else:
        print('Failed to get PDP Context.')
        return False


def main():
    # Enable automatic activation for NIC1
    dataCall.setAutoActivate(1, 1)
    # Enable automatic reconnection for NIC1
    dataCall.setAutoConnect(1, 1)
    # Enable automatic activation for NIC2
    dataCall.setAutoActivate(2, 1)
    # Enable automatic reconnection for NIC2
    dataCall.setAutoConnect(2, 1)

    # Check the APN configuration of NIC1. Do not reboot now.
    checkpass = checkAPN(usrCfg1, reboot=False)
    if not checkpass:
        return
    # Check the APN configuration of NIC2. Reboot the module after configuration.
    checkpass = checkAPN(usrCfg2, reboot=True)
    if not checkpass:
        return

    stage, state = checkNet.waitNetworkReady(20)
    if stage == 3 and state == 1:
        print('Network connected successfully.')
        # Get the IP addresses of NIC1 and NIC2
        ret1 = dataCall.getInfo(usrCfg1['profileID'], 0)
        ret2 = dataCall.getInfo(usrCfg2['profileID'], 0)
        print('NIC{}:{}'.format(usrCfg1['profileID'], ret1))
        print('NIC{}:{}'.format(usrCfg2['profileID'], ret2))
        ip_nic1 = None
        ip_nic2 = None
        if ret1 == -1 or ret1[2][2] == '0.0.0.0':
            print("Error: Failed to get the IP of the NIC{}.".format(usrCfg1['profileID']))
            return
        else:
            ip_nic1 = ret1[2][2]
        if ret2 == -1 or ret2[2][2] == '0.0.0.0':
            print("Error: Failed to get the IP of the NIC{}.".format(usrCfg2['profileID']))
            return
        else:
            ip_nic2 = ret2[2][2]
        print('NIC{} IP:{}'.format(usrCfg1['profileID'], ip_nic1))
        print('NIC{} ip:{}'.format(usrCfg2['profileID'], ip_nic2))

        print('---------------sock1 test-----------------')
        # Create a socket object
        sock1 = usocket.socket(usocket.AF_INET, usocket.SOCK_STREAM)
        # Resolve the domain name
        try:
            sockaddr = usocket.getaddrinfo('python.quectel.com', 80)[0][-1]
        except Exception:
            print('Domain name resolution failed.')
            sock1.close()
            return
        # Connect to the server
        sock1.connect(sockaddr)
        # Send data to the server
        ret = sock1.send('GET /News HTTP/1.1\r\nHost: python.quectel.com\r\nAccept-Encoding: deflate\r\nConnection: keep-alive\r\n\r\n')
        print('send {} bytes'.format(ret))
        # Receive data from the server
        data = sock1.recv(256)
        print('recv {} bytes:'.format(len(data)))
        print(data.decode())
        # Close the connection
        sock1.close()
        print('---------------sock2 test-----------------')
        sock2 = usocket.socket(usocket.AF_INET, usocket.SOCK_STREAM, usocket.TCP_CUSTOMIZE_PORT)
        sock2.bind((ip_nic2, 0))
        sock2.settimeout(10)
        # Configure server IP address and port number. The IP address and port number below are for example only
        server_addr = ('192.0.2.2', 8305)
        # Connect to the server
        sock2.connect(server_addr)
        # Send data to the server
        ret = sock2.send('test data.')
        print('send {} bytes'.format(ret))
        # Receive data from the server
        try:
            data = sock2.recv(256)
            print('recv {} bytes:'.format(len(data)))
            print(data.decode())
        except Exception:
            print('No reply from server.')
        # Close the connection
        sock2.close()
    else:
        print('Network connected failed, stage={}, state={}'.format(stage, state))


if __name__ == '__main__':
    main()
The above sample code download link:Download
Manually Activate One NIC
There are generally few scenarios for manually activating cellular NIC. This scenario is mainly used to meet some special needs of users. For example, users do not need to automatically activate the cellular NIC when the device is turned on. Instead, the user application actively performs the NIC activation operation when needed. It should be noted that there is no essential difference between manually activating a NIC and automatically activating a NIC at startup. The main difference lies in the timing of activation. After successful activation, the NIC can be used for network communication, and the two activation methods are exactly the same.
In the scenario of manually activating a cellular NIC, you manually activate the cellular NIC and use it for network communication. The diagram is shown below.
As can be seen from the diagram, the scenario is the same as that of "Automatically Activate One NIC at Startup and Configure APN". In this scenario, you should follow the steps below to write the application code.
Step 1: Disable the automatic activation feature of the NIC at startup. This configuration takes effect after the module is rebooted.
Step 2: Configure the APN for the NIC that needs to be manually activated. This configuration takes effect after the module is rebooted.
Step 3: Reboot the module to make the configuration take effect.
Step 4: Manually activate the cellular NIC when needed.
Step 5: Confirm whether the activation is successful.
Step 6: Perform network communication.
Step 7: Decide whether to deactivate the NIC after communication ends as needed.
Take manually activating the first cellular NIC at module startup as an example:
import checkNet
import usocket
import dataCall
import utime
from misc import Power

# Configure the APN information according to your actual needs
usrCfg1 = {'profileID': 1, 'apn': '3gnet', 'username': '', 'password': ''}

'''
Environment configuration:
1. Disable the feature of automatic data call at startup
2. Configure APN
'''
def cfgEnv(usrCfg):
    errcode = 0
    need_reboot1 = False
    need_reboot2 = False
    if "datacall_config.json" not in uos.listdir('/usr'):
        # Disable automatic activation at startup for the first cellular NIC
        dataCall.setAutoActivate(usrCfg['profileID'], 0)
        # It is recommended to enable the automatic reconnection for the cellular NIC
        dataCall.setAutoConnect(usrCfg['profileID'], 1)
        need_reboot1 = True

print('Check the APN configuration.')
    # Get the APN information of the cellular NICs and check if the current one is the one you specified
    pdpCtx = dataCall.getPDPContext(usrCfg['profileID'])
    if pdpCtx != -1:
        if pdpCtx[1] != usrCfg['apn']:
            # If it is not the APN you need, configure it as follows
            ret = dataCall.setPDPContext(usrCfg['profileID'], 0, usrCfg['apn'], usrCfg['username'], usrCfg['password'], 0)
            if ret == 0:
                print('APN configuration successful.')
                need_reboot2 = True
            else:
                print('APN configuration failed.')
                errcode = -1
        else:
            print('The APN is correct and no configuration is required')
            errcode = 0
    else:
        print('Failed to get PDP Context.')
        errcode = -1
    # Reboot the module to make the configuration take effect
    if need_reboot1 or need_reboot2:
        print('Ready to restart.')
        print('Please re-execute this program after restarting.')
        Power.powerRestart()
        utime.sleep(2)
    return errcode


def main():
    if cfgEnv(usrCfg1) == -1:
        return

    # Manually activate the cellular NIC
    print('Prepare to activate the NIC{}.'.format(usrCfg1['profileID']))
    ret = dataCall.activate(usrCfg1['profileID'])
    if ret == -1:
        print('NIC activation failed.')
        return

    stage, state = checkNet.waitNetworkReady(10)
    if stage == 3 and state == 1:
        print('Network connected successfully.')
        # Get the IP address and other information of the first NIC
        ret = dataCall.getInfo(usrCfg1['profileID'], 0)
        print('NIC{}:{}'.format(usrCfg1['profileID'], ret))

        print('---------------sock test-----------------')
        # Create a socket object
        sock = usocket.socket(usocket.AF_INET, usocket.SOCK_STREAM)
        # Resolve the domain name
        try:
            sockaddr = usocket.getaddrinfo('python.quectel.com', 80)[0][-1]
        except Exception:
            print('Domain name resolution failed.')
            sock.close()
            return
        # Connect to the server
        sock.connect(sockaddr)
        # Send data to the server
        ret = sock.send('GET /News HTTP/1.1\r\nHost: python.quectel.com\r\nAccept-Encoding: deflate\r\nConnection: keep-alive\r\n\r\n')
        print('send {} bytes'.format(ret))
        # Receive data from the server
        data = sock.recv(256)
        print('recv {} bytes:'.format(len(data)))
        print(data.decode())
        # Close the connection
        sock.close()

        # Decide whether to deactivate the NIC after communication ends as needed
        # dataCall.deactivate(usrCfg1['profileID'])
    else:
        print('Network connected failed, stage={}, state={}'.format(stage, state))


if __name__ == '__main__':
    main()
The above sample code download link:Download
Manually Activate Multiple NICs
The scenario is similar to that of "Automatically Activate Multiple NICs at Startup and Configure APN". The only difference is that you need to disable the automatic activation at startup, and then manually activate the NICs when needed.
We will take the diagram below as an example to illustrate the automatic activation of NIC1 and NIC2 at startup.
When you configure an APN that allows access to the public network for NIC1, and an APN that only allows access to a specific private network for NIC2, the situation is as follows:
- Features like HTTP, HTTPS, and MQTT can only use NIC1 for network communication by default, and you cannot specify which NIC to use.
- The socket feature can be used to bind IP addresses and ports to determine which cellular NIC to use for network communication. If you do not specify, the NIC1 is used by default.
In this scenario, you should follow the steps below to write the application code.
Step 1: Disable the automatic activation feature of the NICs at startup. This configuration takes effect after the module is rebooted.
Step 2: Configure the APN for the NICs that need to be manually activated. This configuration takes effect after the module is rebooted.
Step 3: Reboot the module to make the configuration take effect.
Step 4: Manually activate the cellular NICs when needed.
Step 5: Confirm whether the activation is successful.
Step 6: Perform network communication.
Step 7: Decide whether to deactivate the NICs after communication ends as needed.
Below is a sample routine - NIC1 and NIC2 are configured for automatic activation with different APNs. Two socket objects are created - socket1 uses default NIC1, while socket2 specifies NIC2 for private network access.
import checkNet
import usocket
import dataCall
import utime
from misc import Power

# Configure the APN information according to your actual needs
usrCfg1 = {'profileID': 1, 'apn': '3gnet', 'username': '', 'password': ''}
usrCfg2 = {'profileID': 2, 'apn': '3gwap', 'username': '', 'password': ''}

'''
Disable the feature of automatic data call at startup
The return value indicates whether the module needs rebooting
True - Need
False - Not need
'''
def disableAutoActivate():
    need_reboot = False
    if "datacall_config.json" not in uos.listdir('/usr'):
        # Disable automatic activation at startup for NIC1
        dataCall.setAutoActivate(1, 0)
        # It is recommended to enable the automatic reconnection for the cellular NICs
        dataCall.setAutoConnect(1, 1)
        need_reboot = True
    return need_reboot

'''
Configure APN parameters for the cellular NIC
The return value indicates whether the module needs rebooting
True - Need
False - Not need
'''
def cfgAPN(usrCfg):
    need_reboot = False
    print('Check the APN configuration of the NIC{}.'.format(usrCfg['profileID']))
    # Get the APN information of the cellular NICs and check if the current one is the one you specified
    pdpCtx = dataCall.getPDPContext(usrCfg['profileID'])
    if pdpCtx != -1:
        if pdpCtx[1] != usrCfg['apn']:
            # If it is not the APN you need, configure it as follows
            ret = dataCall.setPDPContext(usrCfg['profileID'], 0, usrCfg['apn'], usrCfg['username'], usrCfg['password'], 0)
            if ret == 0:
                print('APN configuration successful.')
                need_reboot = True
            else:
                raise ValueError("APN configuration failed.")
        else:
            need_reboot = False
            print('The APN is correct and no configuration is required')
    else:
        raise ValueError("Failed to get PDP Context.")
    return need_reboot


def main():
    need_reboot1 = disableAutoActivate()
    need_reboot2 = cfgAPN(usrCfg1)
    need_reboot3 = cfgAPN(usrCfg2)
    if need_reboot1 or need_reboot2 or need_reboot3:
        print('Ready to restart.')
        print('Please re-execute this program after restarting.')
        Power.powerRestart()
        utime.sleep(2)

    # Manually activate the cellular NICs
    print('Prepare to activate the NIC{}.'.format(usrCfg1['profileID']))
    ret = dataCall.activate(usrCfg1['profileID'])
    if ret == -1:
        print('NIC activation failed.')
        return
    print('Prepare to activate the NIC{}.'.format(usrCfg2['profileID']))
    ret = dataCall.activate(usrCfg2['profileID'])
    if ret == -1:
        print('NIC activation failed.')
        return

    stage, state = checkNet.waitNetworkReady(10)
    if stage == 3 and state == 1:
        print('Network connected successfully.')
        # Get the IP address of NIC2 and NIC2
        ret1 = dataCall.getInfo(usrCfg1['profileID'], 0)
        ret2 = dataCall.getInfo(usrCfg2['profileID'], 0)
        print('NIC{}:{}'.format(usrCfg1['profileID'], ret1))
        print('NIC{}:{}'.format(usrCfg2['profileID'], ret2))
        ip_nic1 = None
        ip_nic2 = None
        if ret1 == -1 or ret1[2][2] == '0.0.0.0':
            print("Error: Failed to get the IP of the NIC{}.".format(usrCfg1['profileID']))
            return
        else:
            ip_nic1 = ret1[2][2]
        if ret2 == -1 or ret2[2][2] == '0.0.0.0':
            print("Error: Failed to get the IP of the NIC{}.".format(usrCfg2['profileID']))
            return
        else:
            ip_nic2 = ret2[2][2]
        print('NIC{} IP:{}'.format(usrCfg1['profileID'], ip_nic1))
        print('NIC{} ip:{}'.format(usrCfg2['profileID'], ip_nic2))

        print('---------------sock1 test-----------------')
        # Create a socket object
        sock1 = usocket.socket(usocket.AF_INET, usocket.SOCK_STREAM)
        # Resolve the domain name
        try:
            sockaddr = usocket.getaddrinfo('python.quectel.com', 80)[0][-1]
        except Exception:
            print('Domain name resolution failed.')
            sock1.close()
            return
        # Connect to the server
        sock1.connect(sockaddr)
        # Send data to the server
        ret = sock1.send('GET /News HTTP/1.1\r\nHost: python.quectel.com\r\nAccept-Encoding: deflate\r\nConnection: keep-alive\r\n\r\n')
        print('send {} bytes'.format(ret))
        # Receive data from the server
        data = sock1.recv(256)
        print('recv {} bytes:'.format(len(data)))
        print(data.decode())
        # Close the connection
        sock1.close()
        print('---------------sock2 test-----------------')
        sock2 = usocket.socket(usocket.AF_INET, usocket.SOCK_STREAM, usocket.TCP_CUSTOMIZE_PORT)
        sock2.bind((ip_nic2, 0))
        sock2.settimeout(10)
        # Configure server IP address and port number. The IP address and port number below are for example only
        server_addr = ('192.0.2.2', 8305)
        # Connect to the server
        sock2.connect(server_addr)
        # Send data to the server
        ret = sock2.send('test data.')
        print('send {} bytes'.format(ret))
        # Receive data from the server
        try:
            data = sock2.recv(256)
            print('recv {} bytes:'.format(len(data)))
            print(data.decode())
        except Exception:
            print('No reply from server.')
        # Close the connection
        sock2.close()

        # Decide whether to deactivate the NIC after communication ends as needed
        # dataCall.deactivate(usrCfg1['profileID'])
        # dataCall.deactivate(usrCfg2['profileID'])
    else:
        print('Network connected failed, stage={}, state={}'.format(stage, state))


if __name__ == '__main__':
    main()
The above sample code download link:Download
Configure DNS Server Address
Generally, when activating the cellular NIC, as long as the module uses Internet APN, the core network will automatically assign DNS server address to the module. Under normal circumstances, you do not need to manually configure the DNS server address. However, sometimes the DNS server addresses assigned by the core network may be unavailable, and in this case, you have to manually configure DNS server addresses.
You can call the following function to configure the server address of the specified DNS.
dataCall.setDNSServer(profileID, simID, priDNS, secDNS)
Please refer to DNS Configuration in the wiki on the QuecPython official website for details.
Parameter description:
profileIDThe value of
profileIDdepends on which cellular NIC is activated. Generally, the activated NIC is NIC1, so the value ofprofileIDshould be set to1.simIDDefault value: 0.
Example of configuring the DNS server address of the first NIC.
import dataCall
dataCall.setDNSServer(1, 0, "8.8.8.8", "114.114.114.114")