
UNISOC8910 Platform Log Tool User Guide
This document introduces how to use coolwatcher and ArmTracer to capture AP and CP logs, as well as export dump files.
Overview
Tool Introduction
coolwatcher is a software tool used to capture AP logs on the UNISOC8910 platform module. It also supports exporting dump files.
ArmTracer is a software tool used to capture CP logs on the UNISOC8910 platform module. It is used to analyze module network registration-related issues.
Software Installation
Either CATStudio or QWinLog is a portable software tool, so you only need to depress the tool's zip to a directory on your computer. Please note that the decompression path cannot contain any Chinese characters, otherwise, the tool cannot run properly.
System Requirements
coolwatcher is compatible with Windows XP/7/10 system, with a minimum of 4 GB RAM and a dual-core processor.
ArmTracer is compatible with Windows XP or later versions. If ArmTracer fails to run properly, try running it as an administrator or in XP SP3 compatibility mode.
Hardware Connection
Before capturing logs, make sure to:
Install the USB driver for the UNISOC8910 platform module.
Connect the module to the computer using a USB data cable.
Power on the module.
Go to the "Device Manager" interface on your computer. If the USB driver is loaded correctly, you should see several ports as shown in the following figure.
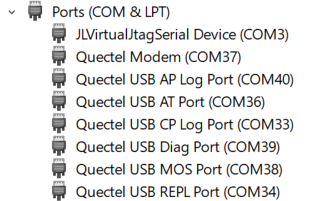
The functions of the ports are as follows:
Quectel Modem: Used for PPP data calls and sending AT commands. However, AT commands are seldom sent through this port but from a dedicated AT port.
Quectel USB AP Log Port: Used for capturing AP logs.
Quectel USB AT Port: The dedicated AT port for sending AT commands.
Quectel USB CP Log Port: Used for capturing CP logs.
Quectel USB Diag Port: Reserved.
Quectel USB MOS Port: Reserved.
Quectel USB REPL Port: For QuecPython firmware, this port is the REPL port for Python, where you can execute Python codes. Please note that the REPL port name may vary on different platforms. If you are unsure which port is the Python REPL port, you can contact Quectel Technical Support for confirmation.
User Guide
Please make sure that the device has been connected to the PC and all USB ports are enumerated successfully, and then you can configure and use the software tool.
Capture AP Logs
Step 1: Open *cooltools*
Decompress the cooltools zip to a directory on your computer. Please note that the path to cooltools should not contain any Chinese characters. After decompression, navigate to the root directory of cooltools.

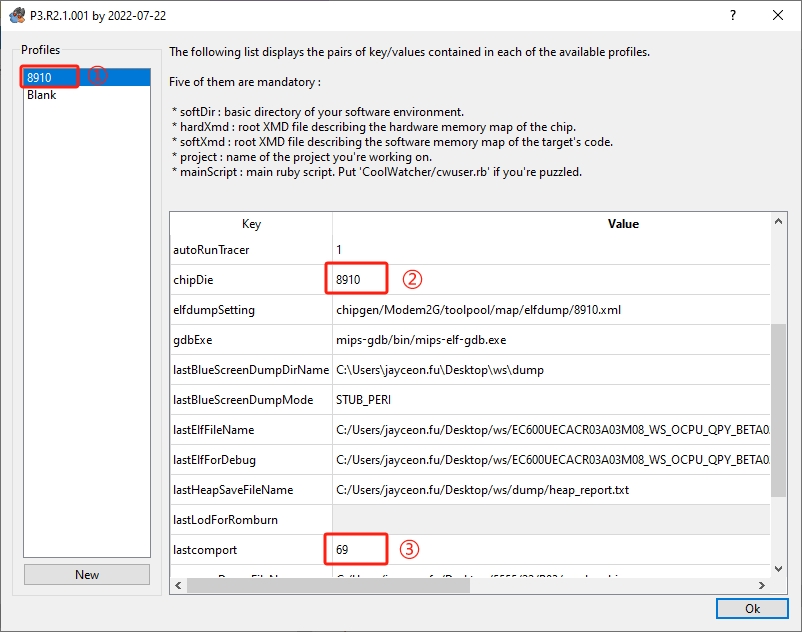
Double click coolwatcher_usb.exe to open the tool. The following configuration window will pop up. The left side is the module model selection area, and the right side is the configuration options for the selected model.
Click "8910" at position ① to enter the configuration interface for the corresponding platform.
Confirm that the model at position ② is "8910".
In the input box at position ③, enter the port number corresponding to "Quectel USB AP Log Port". Click "OK".
Step 2: Wait for the Tool to Successfully Connect to the Module
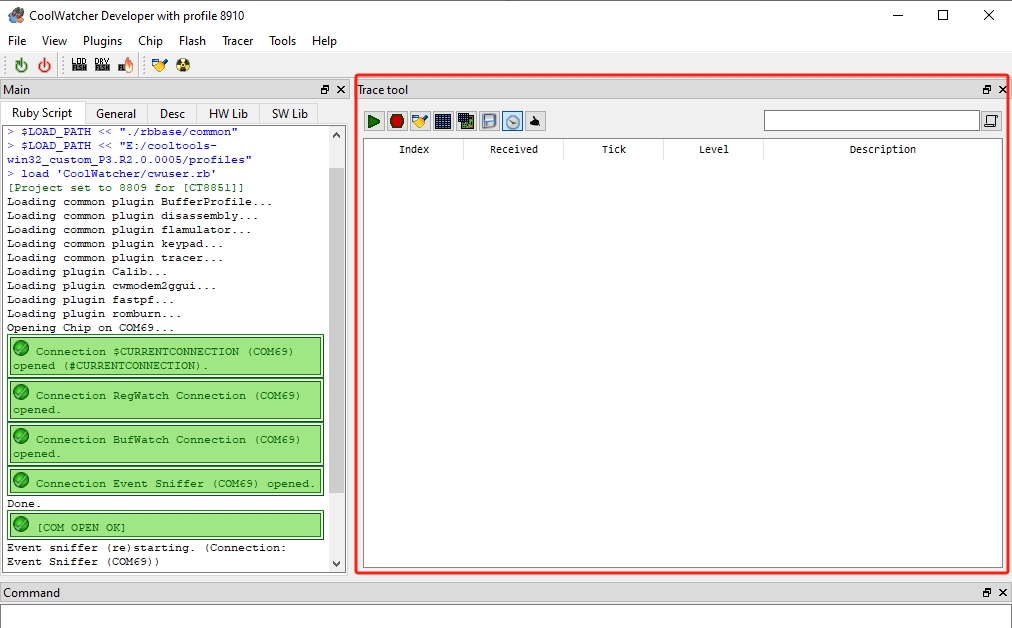
After configuring the port in "Step 1" and clicking "OK", coolwatcher will automatically open the "Quectel USB AP Log Port" and establish a connection with the module. Once the connection is successfully established, the following interface will pop up. There will be several green prompt messages on the left side, and the last message will be "[COM OPEN OK]".
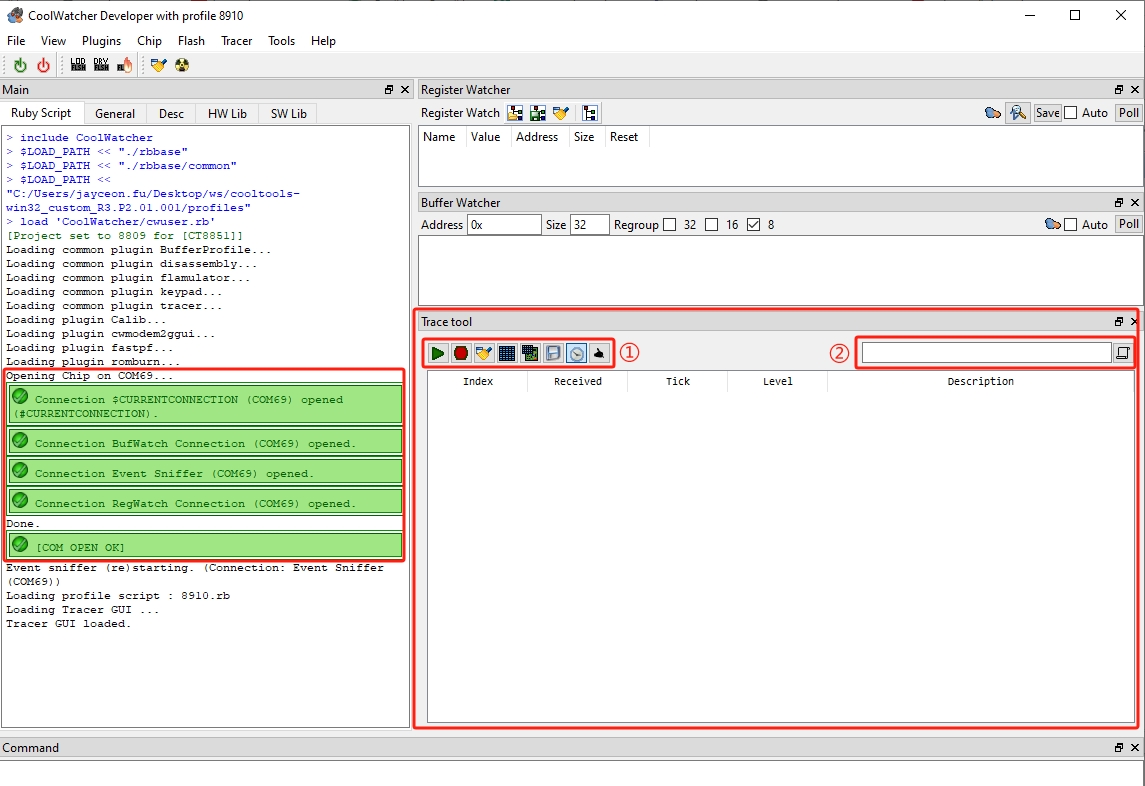
The above figure shows the main interface of coolwatcher. The "Trace tool" window on the right side is where the AP logs are displayed. The buttons at position ① control the AP logs, and below are the function descriptions of several commonly used buttons.
| Button | Function |
|---|---|
 |
Start: Click to start outputting AP logs in the trace window. |
 |
Stop: Click to stop outputting AP logs in the trace window. |
| Clear: Click to clear all AP logs in the trace window. | |
 |
Set: Click to open the settings window, where you can configure auto-saving, file types, save path, size of a single file and pcap file saving. |
 |
Save: Click to save the logs immediately. You can configure auto-saving through the "Set" button, so manual saving is not required. |
The box at position ② in the figure is the keyword input box for the AP log filtering criteria. You can enter a keyword in the input box as a filter, and then coolwatcher will list all AP logs that contain the keyword.
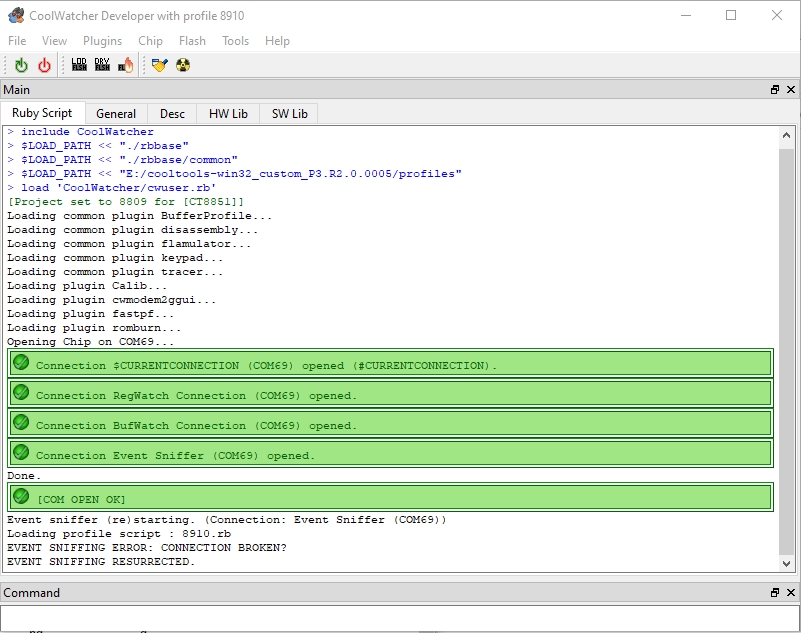
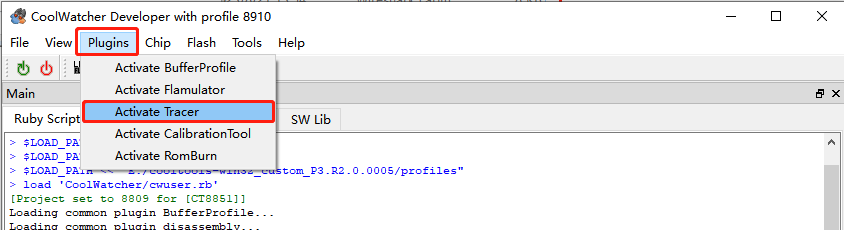
If, after the port configuration in "Step 1", the Trace tool window on the right side of the above figure does not pop up, but the following window pops up instead, it means that the software version you are using is not the latest.
In this case, follow the steps below:
Click "Plugins", and in the drop-down window, click "Activate Tracer" to display the Trace tool window.
Step 3: Configure Parameters
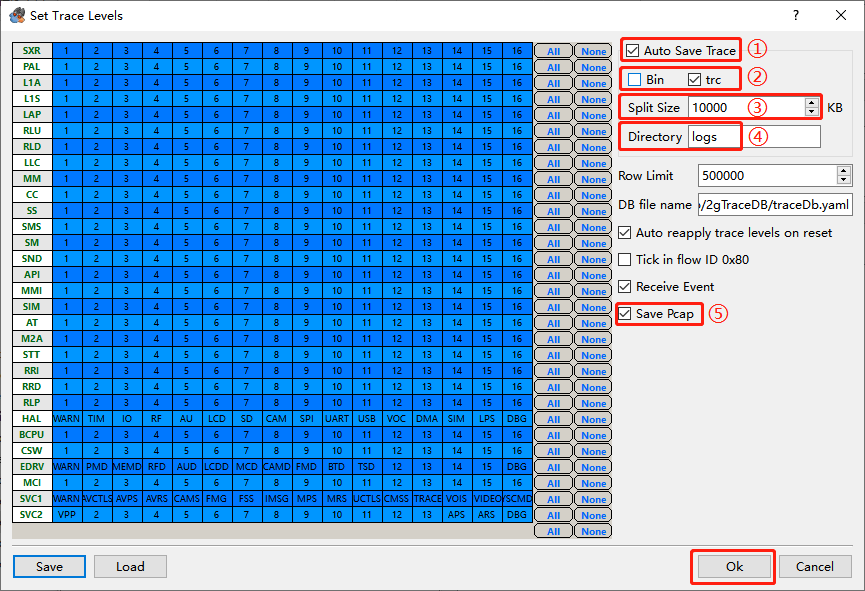
Click the "Set" icon in the "Trace tool" window toolbar to open the "Set Trace Levels" window. You only need to pay attention to and set the parts marked in the figure.
① Auto Save Trace: It is ticked by default. If it is not ticked, you are recommended to tick this option.
② Log file type: Two types, Bin and trc, with trc being the default. Bin files can only be viewed with coolwatcher, while trc files are plain text files.
③ Split Size: When the log size exceeds this value, it will be automatically saved to a new file.
④ Directory: You can set the directory to save log files according to your needs. The default directory is the logs directory under coolwatcher root directory.
⑤ Save Pcap: This option is not ticked by default. You are recommended to tick this option. When this option is ticked, coolwatcher will automatically capture and save pcap files.
After configuring parameters as the above instructions, click "OK" to save the configuration.
Step 4: Capture Logs
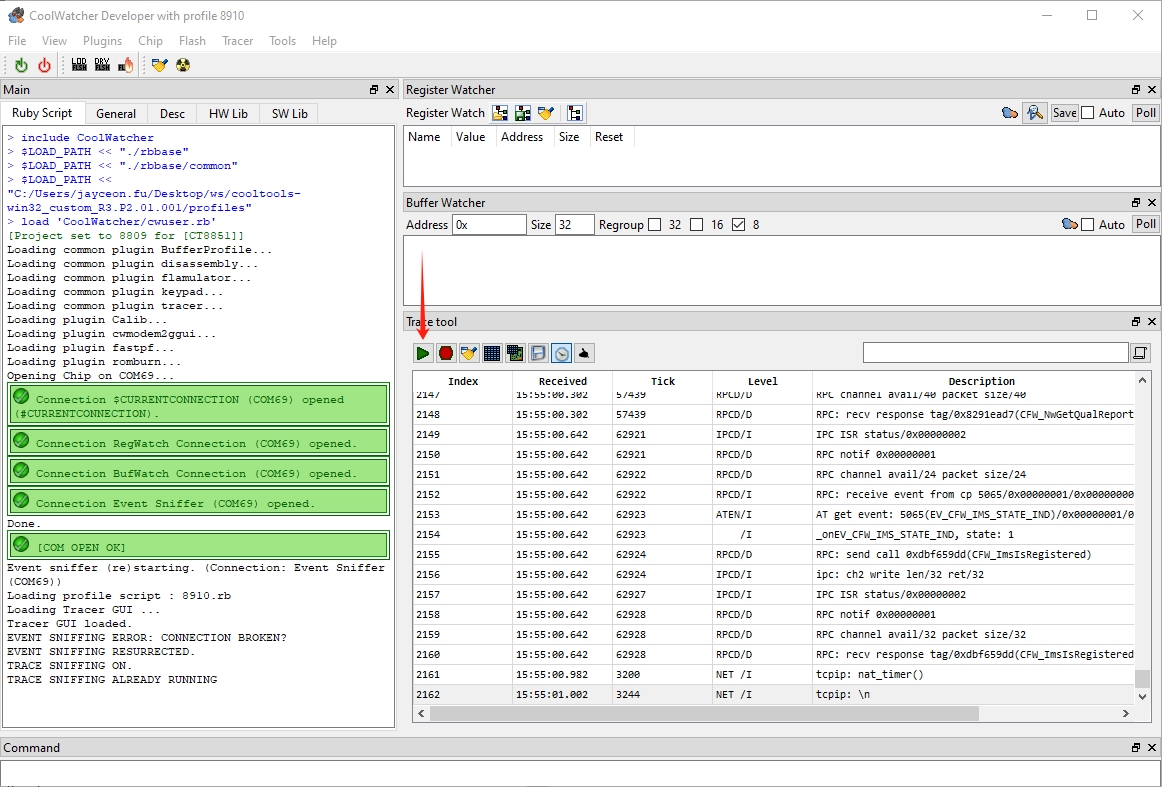
Click the "Start" icon in the "Trace tool" window to start outputting logs, as shown in the following figure.
Step 5: Package Log Files
When the required AP logs have been captured, click the "Stop" icon in the "Trace tool" window. Go to the custom directory for saving logs. If you have not customized it, logs will be saved to the logs folder under the coolwatcher root directory by default. After entering the directory for saving AP logs, package and compress all the files in the logs directory, and then send them to Quectel Technical Support or software engineers for problem analysis.

It is recommended to delete the historical log files in the default log-saving path before each log capture.
Capture CP Logs
To capture CP logs of the UNISOC8910 platform modules, you need to use ArmTracer. The following will explain how to use ArmTracer to capture the CP logs of a module.
Step 1: Open *ArmTracer*
Decompress the ArmTracer zip to a directory on your computer. Please note that the path to ArmTracer should not contain any Chinese characters. After decompression, navigate to the root directory of ArmTracer. Double click ArmTracer.exe to open the tool. The main interface window will pop up.
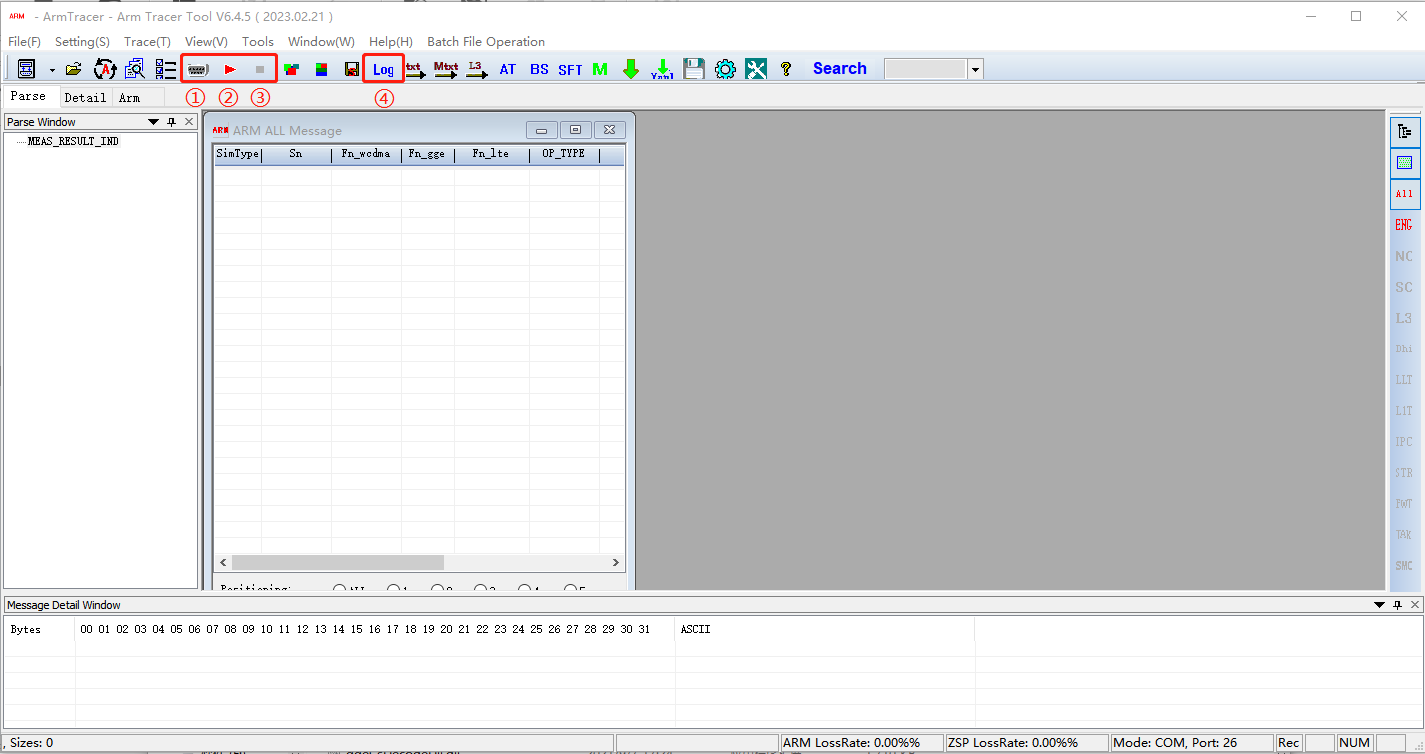
In the above figure, ① is the "Configure Parameter" icon, ② is the "Start" icon, ③ is the "Stop" button, and ④ is the "Set Log-saving Path" icon.
Step 2: Configure Port Parameters
Click the "Configure Parameter" icon on the toolbar to open the following window. Since the USB port is used, you only need to select the port number, and other parameters are generally kept as default. Click the drop-down button in the "Device Port" option box and select the port number corresponding to the "Quectel USB CP Log Port". Then click "OK".

Step 3: Set the Log Save Path
Click the "Set Log-saving Path" icon on the toolbar to open the following setting window. "Saved Path" is the path of saving the CP logs, and you can set it according to your needs. "Filename" is the name of the log file. ArmTracer will combine this name with a timestamp to form the final log file name. After setting the log file saving path and file name, click "OK".

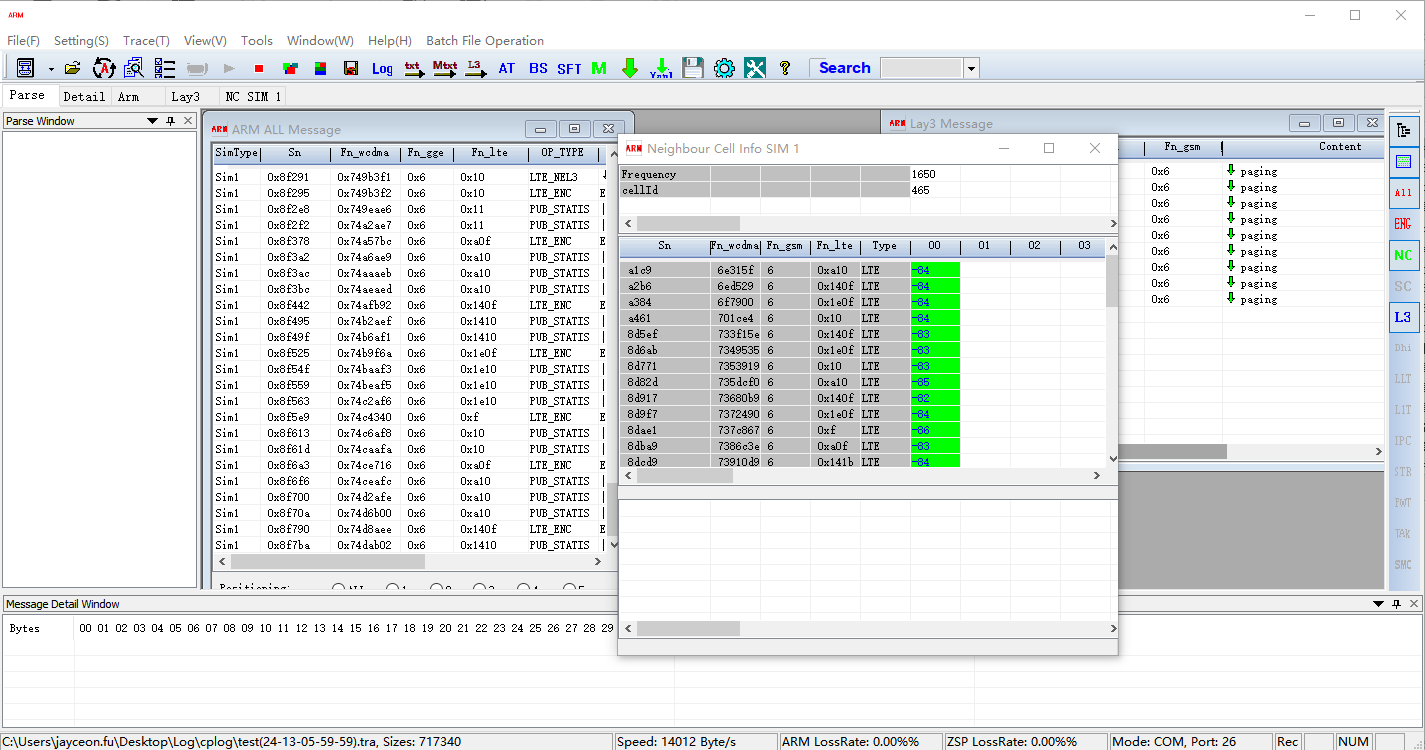
Step 4: Capture CP Logs
Click the "Start" icon on the toolbar. At this time, the "log setting" window in "Step 3" may pop up automatically. Just click "OK". If the hardware connection is normal and the tool is configured correctly, the tool window should start outputting log information, as shown in the following figure.
Step 5: Package and Save Log Files
When the required logs are captured, click the "Stop" icon on the ArmTracer toolbar, and the log will be automatically saved to the directory previously customized. You can package and compress all the latest .tra files in the log-saving directory into one zip, and send it to Quectel Technical Support.

Configure Automatic Log Capture
The purpose of capturing CP logs is to analyze wireless network-related issues of the device, such as device network registration failure. The device's network registration process is automatically performed during the boot stage, so to analyze network registration failure and related issues, it is necessary to capture the CP logs during the device boot stage. To capture CP logs during the device boot stage, you can configure ArmTracer to automatically detect the CP log port and capture the logs. The following explains how to configure this feature.
To analyze the network registration failure of the module only, you can also choose not to configure this feature and manually capture the CP logs that include the CFUN0/1 switching process.
Step 1: Open Configuration File
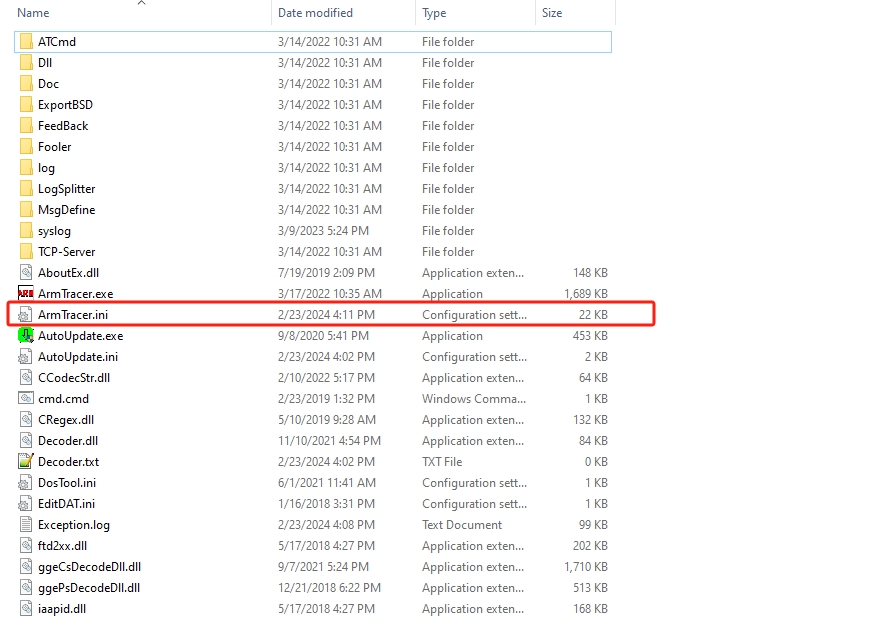
Go to the root directory of ArmTracer and find the configuration file, ArmTracer.ini, as shown in the following figure.
Open ArmTracer.ini in a text editor. Find the "[USBDevice]" section, as shown in the following figure.

Step 2: Modify Configuration File
After finding the "[USBDevice]" section, you need to add "Quectel USB CP Log Port" to the "DeviceList" and change the value of "DeviceSel" to "Quectel USB CP Log Port", as shown below.

After modification, save and exit.
Step 3: Select Automatic Detection of CP Port
If ArmTracer has been already opened before you modify the configuration file, you need to close ArmTracer and reopen it for the configuration to take effect. After opening ArmTracer, enter the following main interface.

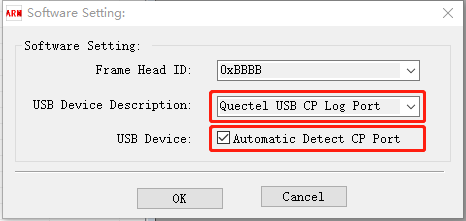
Click the icon pointed by the arrow in the figure, and the "Software Setting" window will pop up. You can see that the value corresponding to "USB Device Description" is already set to "Quectel USB CP Log Port". Tick "Automatic Detect CP Port" and click "OK".
If the configuration is correct, theoretically, after you click "OK", the tool will automatically detect the CP log port and start capturing logs. You can see the CP logs output as shown below.
To further verify if the configuration is correct, restart the device and observe if ArmTracer can automatically detect the CP log port and start outputting logs. If you can see continuous log output in the log output window, it means the configuration is effective. Then you can start capturing CP logs.
Export Dump Files
coolwatcher supports exporting dump files. When the module encounters a crash dump, you can use coolwatcher to export the dump files, and then compress them into a zip and send the zip to Quectel software engineers for analysis. The following describes how to use coolwatcher to export dump files.
Step 1: Configure Dump Mode
By default, ASR platform modules will reboot when a dump occurs, making it impossible to export dump files. To export dump files, you need to configure the module's dump mode by sending the following AT commands when the module runs normally to ensure the module will not reboot automatically when a dump occurs but stays in dump status.
The following is the AT command that needs to be sent to configure the dump mode for the UNISOC8910 platform modules.
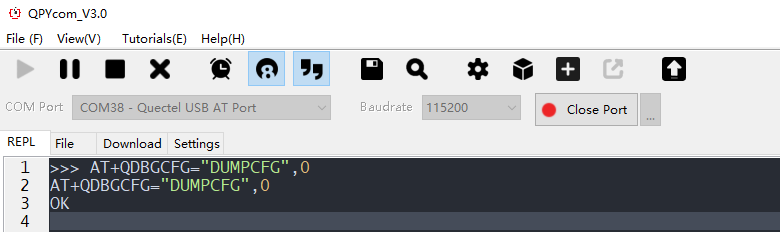
AT+QDBGCFG="DUMPCFG",0
Open QPYcom, select "Quectel USB AT Port" for "COM Port," and click "Open port". Then, send the AT command above.
The AT command takes effect immediately but the configuration is not saved. If the module is rebooted, you need to send the command again.
Step 2: Reproduce Dump Issue
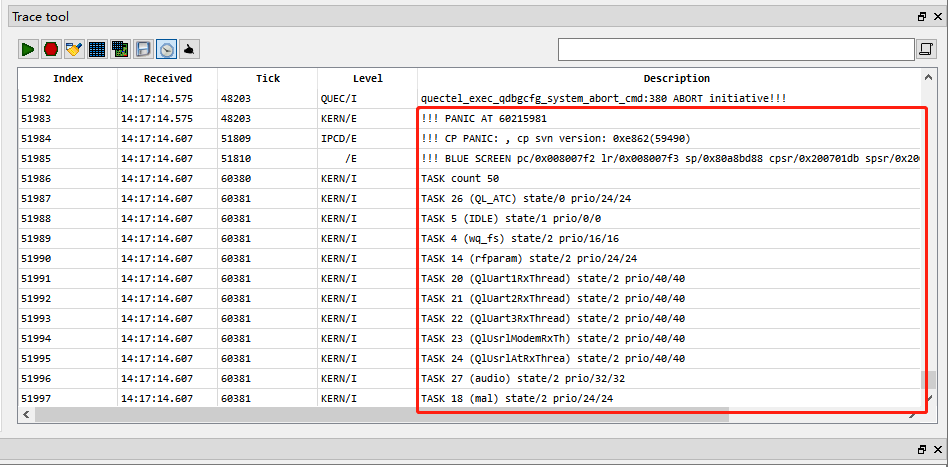
After sending the AT command in "Step 1", you can reproduce the dump issue. When the module encounters a dump issue, you can see the following log information from the coolwatcher log output window.
Step 3: Export Dump Files
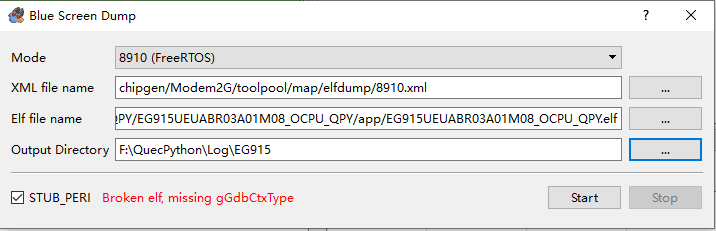
Click "Tools" → "Blue Screen Dump", as shown in the following figure。

After clicking, the "Blue Screen Dump" window will pop up, as shown in the following figure。
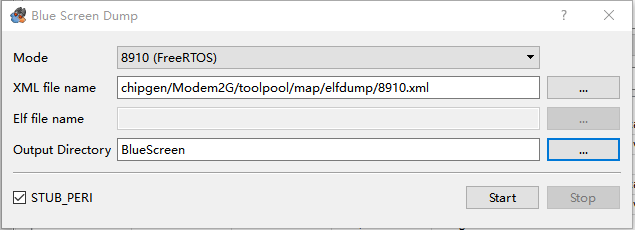
In the window shown above, you need to perform the following operations.
"Mode": Select "8910 (FreeRTOS)".
"XML file name": Select the file shown in the figure, which is generally the default file.
"Elf file name": Select the elf file corresponding to the firmware currently used by the module, which can generally be found directly in the firmware package, as shown in the figure below. If it is not available in the firmware package, you can contact Quectel Technical Support to obtain the corresponding elf file for the firmware.

If you are using the latest version of coolwatcher, when exporting the dump file, you do not need to select the elf file, that is, in the "Bule Screen Dump" window above, the "Elf file name" option is disabled. If the "Elf file name" option is selectable, you can select the corresponding elf file according to the above instructions.
- "Output Directory": Select the directory to save the dump file. Please note that the selected directory should not contain any Chinese characters or spaces.
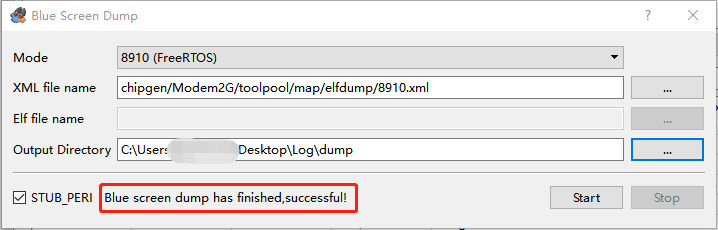
After configuring the parameters according to the above instructions, click the "Start" icon to start exporting the dump file and wait for the dump file export to complete, as shown in the following figure.
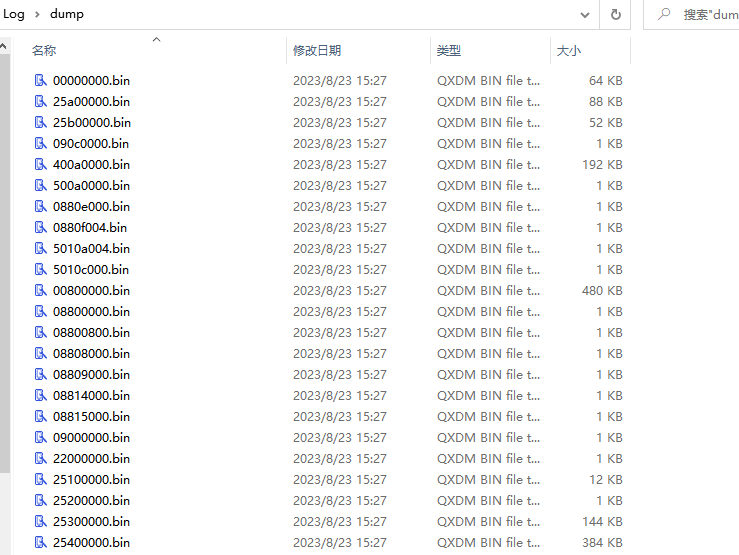
Go to the directory to save the dump file, compress all the dump files, and send them to Quectel Technical Support or software engineers for analysis.
Export Pcap Files
coolwatcher supports the automatic saving of pcap files, but this function is not enabled by default. The method to enable the automatic saving of pcap files has been mentioned in "Step 3" of the [Capture AP Logs](./UNISOC8910.html#Capture AP Logs). That is, click the "Set" icon in the "Trace tool" window toolbar, and the following settings window will pop up. Tick "Save Pcap" at position ⑤ in the figure, and click "OK".
After ticking this function, coolwatcher will automatically capture and save pcap files. The path to save pcap files is the "cap" subdirectory under the directory set at position ④ in the figure. The "cap" directory is automatically created by coolwatcher, so you do not need to create this folder.

If you need any assistance in analyzing network application-related issues, you can compress the AP log files and pcap files together and send them to Quectel Technical Support.
FAQ
Q1: The dump export failed.
There are multiple reasons for the failure of dump export. The common reasons are as follows.
Scenario 1:
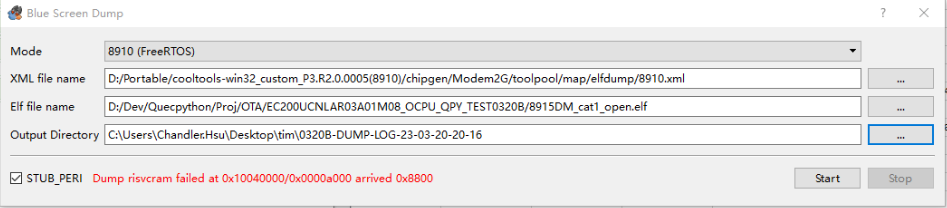
If the error message for the export failure is similar to the figure above, the possible reasons are:
The USB data cable connecting the module and the computer is too long. You can try a shorter USB data cable.
The module and the computer are not directly connected via a USB cable but through a hub. This situation can easily lead to dump export failure. It is recommended to directly connect the module to the computer via a USB data cable.
Scenario 2:
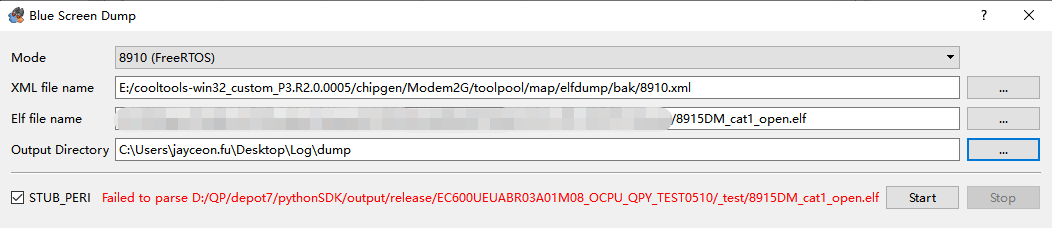
If the error message for export failure is similar to the above two figures, it is likely that the selected elf file does not match the firmware currently used by the module. In this case, you need to select an elf file that matches the firmware currently used by the module.
If you have followed the above troubleshooting steps and still cannot export dump files, please contact Quectel Technical Support for assistance.
Q2: After opening coolwatcher as instructed earlier and clicking the "Start" icon, there is no AP log output in the "Trace tool" window.
AP logs are normally output from the USB port, which, for coolwatcher, is the "Quectel USB AP Log Port". If you have previously switched the AP log output to the physical debug port with AT commands, clicking the "Start" icon will result in no AP log output in the "Trace tool" window. In this case, you can follow the steps below.
Step 1: Confirm the current AP log output port.
Send the following AT command to query the current AP log output port.
at+qdbgcfg="tracecfg"
Open QPYcom, select "Quectel USB AT Port" for "COM Port," and click "Open port". Then, send the AT command above.
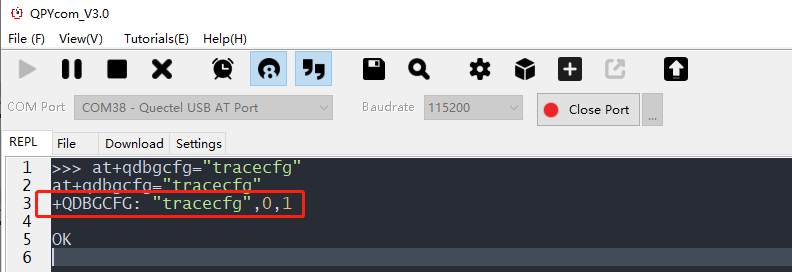
If the query result is as shown in the above figure, with the last two digits being 0 and 1, it means that the current AP log output port is the physical debug port.
In this case, you can send the following AT command to switch the AP log output port to the USB port.
at+qdbgcfg="tracecfg",0,2
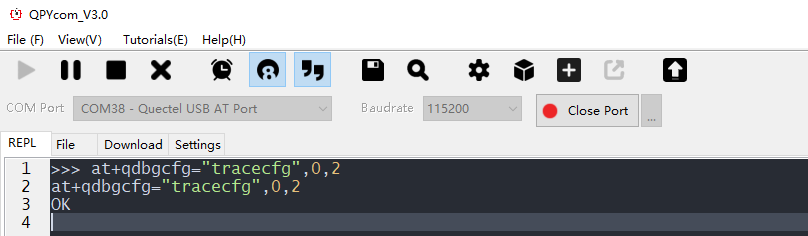
Since the above AT command takes effect after the module is rebooted, after sending the above AT command, reboot the module. Then go back to the coolwatcher interface, click the "Start" icon again, and you should see the log output.
Q3: If the following information is shown, is something wrong with the system?
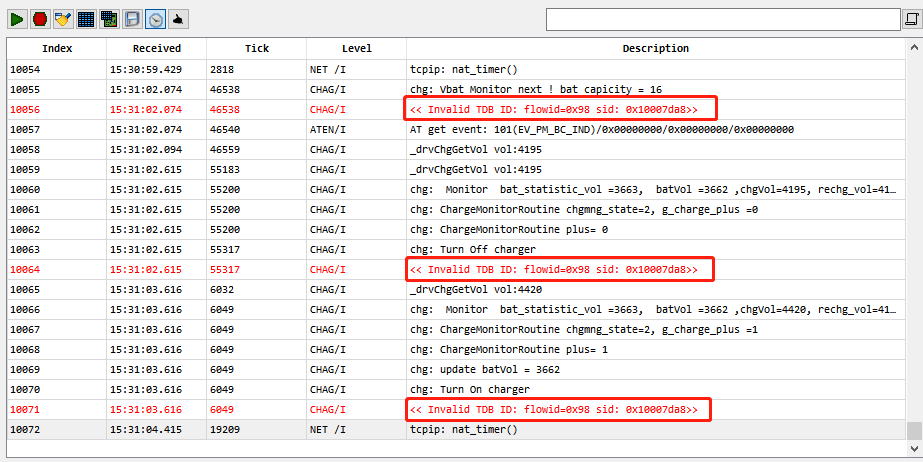
The information shown in the above figure is not an indication of abnormal module functionality, but rather because the version of coolwatcher being used is old and cannot recognize and parse certain logs. You can contact Quectel Technical Support to request the latest version of coolwatcher.