
Module Accesses the Network via Ethernet NIC
To connect the module to the network via the Ethernet NIC, you need to configure the Ethernet NIC working mode to WAN mode. For example, when the Ethernet NIC is connected to a router, the NIC can obtain IP information through DHCP and connect to the external network, enabling the module to connect to the network properly.
Please refer to Getting Started for setting up the development environment. This document introduces the use of Ethernet NIC.
Hardware Preparation
To use the external Ethernet feature, you need to prepare an external Ethernet NIC, cable, router, and DuPont wires.
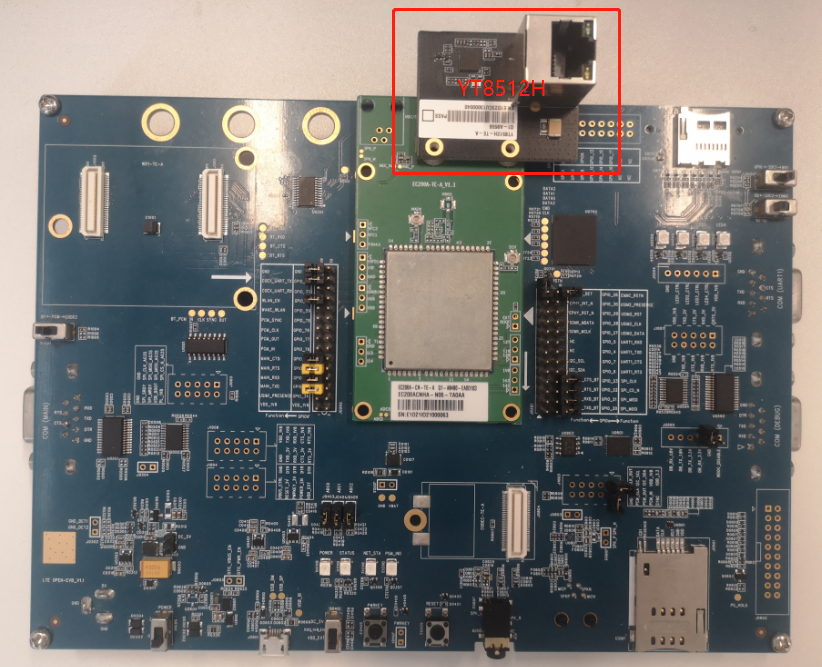
Connect the module to the Ethernet NIC with DuPont wires according to your actual needs (Refer to ethernet - Ethernet Driver for specific interface configuration parameters), and then connect the Ethernet NIC to the router with a cable.
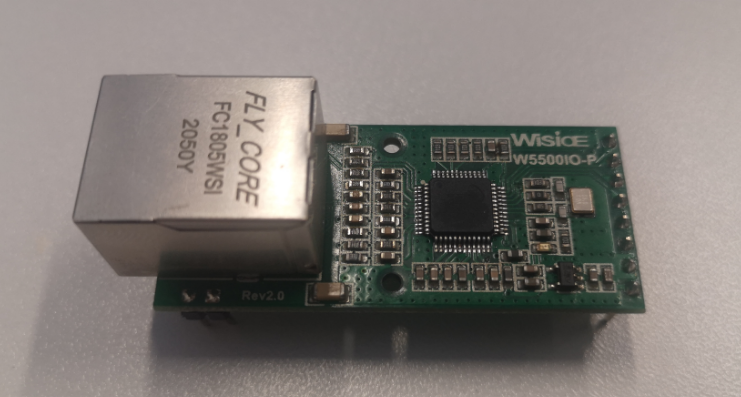
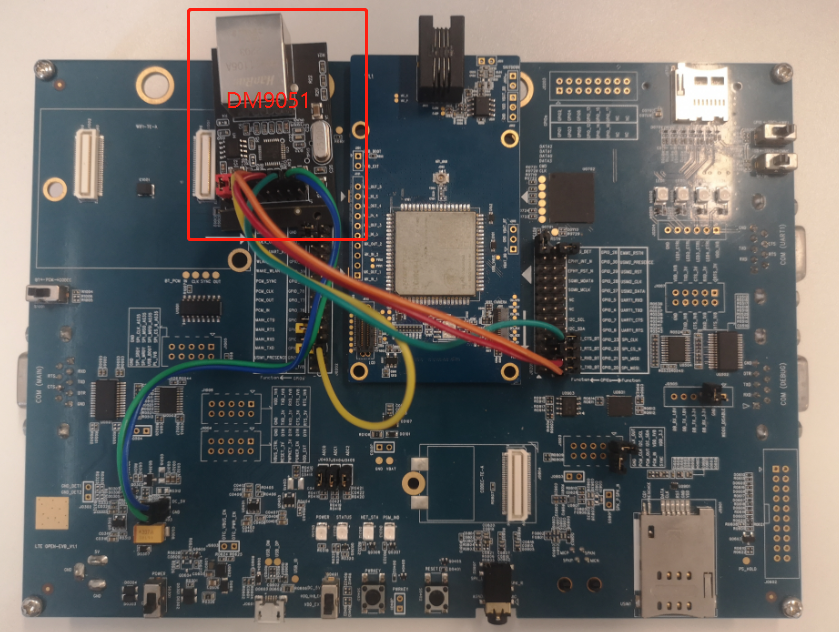
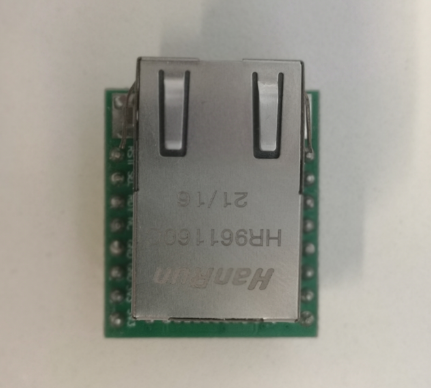
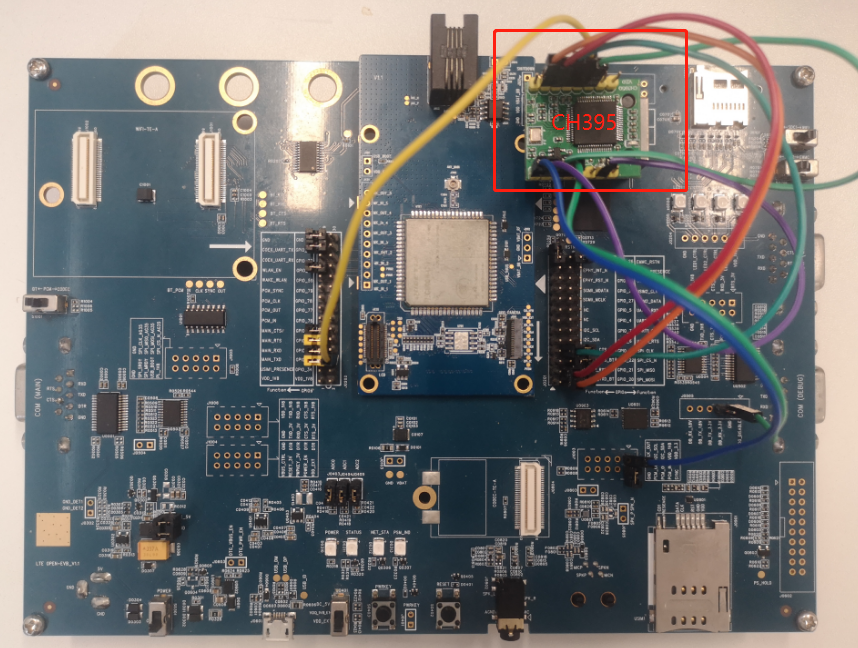
| Ethernet Chip Model | Ethernet Module Picture | Hardware Connection Picture | Chip Manual | Code Example |
|---|---|---|---|---|
| W5500 | W5500 Module Picture | W5500 Hardware Connection Picture | W5500 Chip Manual | Download Code Example |
| DM9051 | DM9051 Module Picture | DM9051 Hardware Connection Picture | DM9051 Chip Manual | Download Code Example |
| CH395 | CH395 Module Picture | CH395 Hardware Connection Picture | CH395 Chip Manual | Download Code Example |
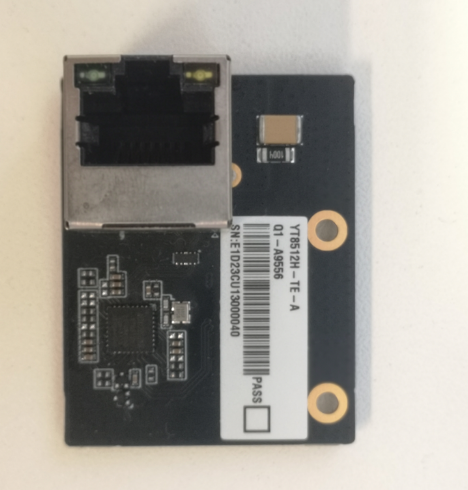
| YT8512 | YT8512 Module Picture | YT8512 Hardware Connection Picture | YT8512 Chip Manual | Download Code Example |
- The hardware connection pictures are just for reference and you need to configure the connection according to your actual environment.
- SZ18201/J1101 has the same connection and usage method as YT8512, both using the RMII interface, so they are not listed here.
Software Preparation
Ethernet NIC Initialization
Ethernet NIC is not enabled by default and needs to be manually enabled. The following is the process of initializing the Ethernet NIC and obtaining IP information through DHCP for external communication.
The following example demonstrates the initialization process for the W5500 Ethernet NIC. For other Ethernet NICs, you can call the corresponding class in the ethernet - Ethernet Driver. Please refer to the specific model class for parameter configuration.
# First, import the ethernet package.
>>> import ethernet

# Initialize the Ethernet NIC and configure the parameters. The CS pin, RST pin, and INT pin entered here are GPIO pin numbers (Please refer to "Pin-Control I/O Pins" for the mapping between GPIO pin numbers and physical pins).
>>> eth = ethernet.W5500(b'\x12\x34\x56\x78\x9a\xbc','','','',-1,38,36,37, 0)

# After the Ethernet NIC successfully registers on the network, check the default static IP address.
>>> eth.ipconfig()
[('12-34-56-78-9A-BC', 'W5500'), (4, '192.168.1.100', '255.255.255.0 ', '192.168.1.1', '8.8.8.8', '114.114.114.114')]

# Enable the Ethernet NIC.
>>> eth.set_up()
0

# Now the module can access the external network via the Ethernet NIC.
Network Configuration
There are two ways to configure the network: obtaining dynamic IP information through DHCP or configuring a static IP.
Get dynamic IP information through DHCP
# First, import the ethernet package.
>>> import ethernet

# Initialize the Ethernet NIC and configure the parameters. The CS pin, RST pin, and INT pin entered here are GPIO pin numbers (Please refer to "Pin-Control I/O Pins" for the mapping between GPIO pin numbers and physical pins).
>>> eth = ethernet.W5500(b'\x12\x34\x56\x78\x9a\xbc','','','',-1,38,36,37, 0)

# After the Ethernet NIC successfully registers on the network, check the default static IP address.
>>> eth.ipconfig()
[('12-34-56-78-9A-BC', 'W5500'), (4, '192.168.1.100', '255.255.255.0 ', '192.168.1.1', '8.8.8.8', '114.114.114.114')]

# Enable DHCP.
>>> eth.dhcp()
0

# After DHCP is enabled successfully, check the IP address again and you will find that the IP address has been updated.
>>> eth.ipconfig()
[('12-34-56-78-9A-BC', 'W5500'), (4, '192.168.31.203', '255.255.255. 0', '192.168.31.1', '192.168.31.1', '0.0.0.0')]

# Enable the Ethernet NIC.
>>> eth.set_up()
0

# Now the module can access the external network via the Ethernet NIC.
Configure static IP address
# First import the ethernet package.
>>> import ethernet

# Initialize the NIC and configure the IP information parameters so that the configured IP information instead of the default IP information will be used when the Ethernet NIC is enabled.
>>> eth = ethernet.W5500(b'\x12\x34\x56\x78\x9a\xbc','192.168.2.10','255.255.255.0','192.168.2.1',-1,38,36,37, 0)

#  After the Ethernet NIC successfully registers on the network, check the default static IP address.
>>> eth.ipconfig()
[('12-34-56-78-9A-BC', 'W5500'), (4, '192.168.2.10', '255.255.255.0 ', '192.168.1.1', '8.8.8.8', '114.114.114.114')]

# Configure the static IP.
>>> eth.set_addr('192.168.3.10','255.255.255.0','192.168.3.1')
0

# Configure DNS server address.
>>> eth.set_dns('114.114.114.114','8.8.8.8')
0

# After the DNS server address is configured, check the IP address again and you will find that the IP address has been updated.
>>> eth.ipconfig()
[('12-34-56-78-9A-BC', 'W5500'), (4, '192.168.3.10', '255.255.255.0', '192.168.3.1', '114.114.114.114', '8.8.8.8')]

# Enable the Ethernet NIC.
>>> eth.set_up()
0

# Now the module can access the external network via the Ethernet NIC.
TCP (socket) Application Example
The following examples demonstrate two methods of TCP communication using Ethernet NIC.
TCP client binds Ethernet NIC for communication
In this example, the module performs TCP communication by using the Ethernet NIC and calls sock.bind() in the socket module to specify the Ethernet NIC for data sending.
In the example below, the parameter 192.168.1.100 in
sock.bind()specifies the IP address of the Ethernet NIC.
# Import the usocket module.
import usocket

if __name__ == '__main__':
    # Create a socket object.
    sock = usocket.socket(usocket.AF_INET, usocket.SOCK_STREAM, usocket.TCP_CUSTOMIZE_PORT)
    sock.settimeout(5)
    sock.bind(("192.168.1.100", 0))
    # Resolve the domain name.
    sockaddr=usocket.getaddrinfo('python.quectel.com', 80)[0][-1]
    print('start connect')
    # Connect to the server.
    sock.connect(sockaddr)
    # Send data to the server.
    ret=sock.send('GET /NEWS HTTP/1.1\r\nHost: python.quectel.com\r\nAccept-Encoding: deflate\r\nConnection: keep-alive\r\n\r\n')
    print('send %d bytes' % ret)
    # Receive data from the server.
    data=sock.recv(1024)
    print('recv %s bytes:' % len(data))
    print(data.decode())

    # Close the connection.
    sock.close()
TCP client communication without binding Ethernet NIC
In this example, the module performs TCP communication by setting the default NIC rather than binding the Ethernet NIC. You should set the Ethernet NIC as the default NIC.
# Import the usocket module.
import usocket

if __name__ == '__main__':
    # Create a socket object.
    sock = usocket.socket(usocket.AF_INET, usocket.SOCK_STREAM)
    sock.settimeout(5)
    # Resolve the domain name.
    sockaddr=usocket.getaddrinfo('python.quectel.com', 80)[0][-1]
    print('start connect')
    # Connect to the server.
    sock.connect(sockaddr)
    # Send data to the server.
    ret=sock.send('GET /NEWS HTTP/1.1\r\nHost: python.quectel.com\r\nAccept-Encoding: deflate\r\nConnection: keep-alive\r\n\r\n')
    print('send %d bytes' % ret)
    # Receive data from the server.
    data=sock.recv(1024)
    print('recv %s bytes:' % len(data))
    print(data.decode())

    # Close the connection.
    sock.close()
MQTT/HTTP Applications
To use an Ethernet NIC for MQTT/HTTP communication, it is necessary to configure the Ethernet NIC as the default NIC, as the built-in MQTT/HTTP module does not have the API for NIC binding. For specific MQTT/HTTP usage, please refer to umqtt - MQTT Protocol and request - HTTP Client in the "API Reference" on the official website of QuecPython.