LED
Scenario Description
It is available to build one LED classification via QuecPython, which is capable to switch on/off and toggle LED. This design makes the modularized and extensible LED manipulation.
Design
HW
LED Connection: The anode of LED will be connected to GPIO pin of communication module via one restricted resistor while the cathode of LED will be connected to GND.
SW
API definition
LED(gpio)
- Function: Create LED Object
- Return: LED Object
- LED: LED Classification
- gpio: GPIO number used to control LED. For specific, please refer to machine.Pin
LED.on()
- Function: Turn on LED
LED.off()
- Function: Turn off LED
LED.toggle()
- Function: Toggle LED Status
SW Design
- Import into module
- The GPIO manipulation can be achieved by
machinein QuecPython.
- The GPIO manipulation can be achieved by
- Define LED classification
- Create one LED classification, including switch on/off and toggle.
import machine
import utime

class LED:
    def __init__(self, pin_number):
        self.pin = machine.Pin(pin_number, machine.Pin.OUT)
        self.state = False  # The initial status is off

    def on(self):
        self.pin.write(1)
        self.state = True
        print("on")

    def off(self):
        self.pin.write(0)
        self.state = False
        print("off")

    def toggle(self):
        if self.state:
            self.off()
        else:
            self.on()

if __name__ == "__main__":
    # Create one LED object and connect to GPIO2
    led = LED(2)

    while True:
        led.toggle()  # Toggle LED status
        utime.sleep(1)  # Wait for 1s
Extended Item
Adjust Blink speed
while True:
    led.toggle()
    time.sleep(0.5)  # Modify as 0.5s for faster blink
Control multiple LEDs
class MultiLED:
    def __init__(self, pin_numbers):
        self.leds = [LED(pin) for pin in pin_numbers]

    def all_on(self):
        for led in self.leds:
            led.on()

    def all_off(self):
        for led in self.leds:
            led.off()

# Create one MultiLED object and connect to GPIO2 and GPIO3 respectively
multi_led = MultiLED([2, 3])
multi_led.all_on()  # Switch on all LEDs.
Test
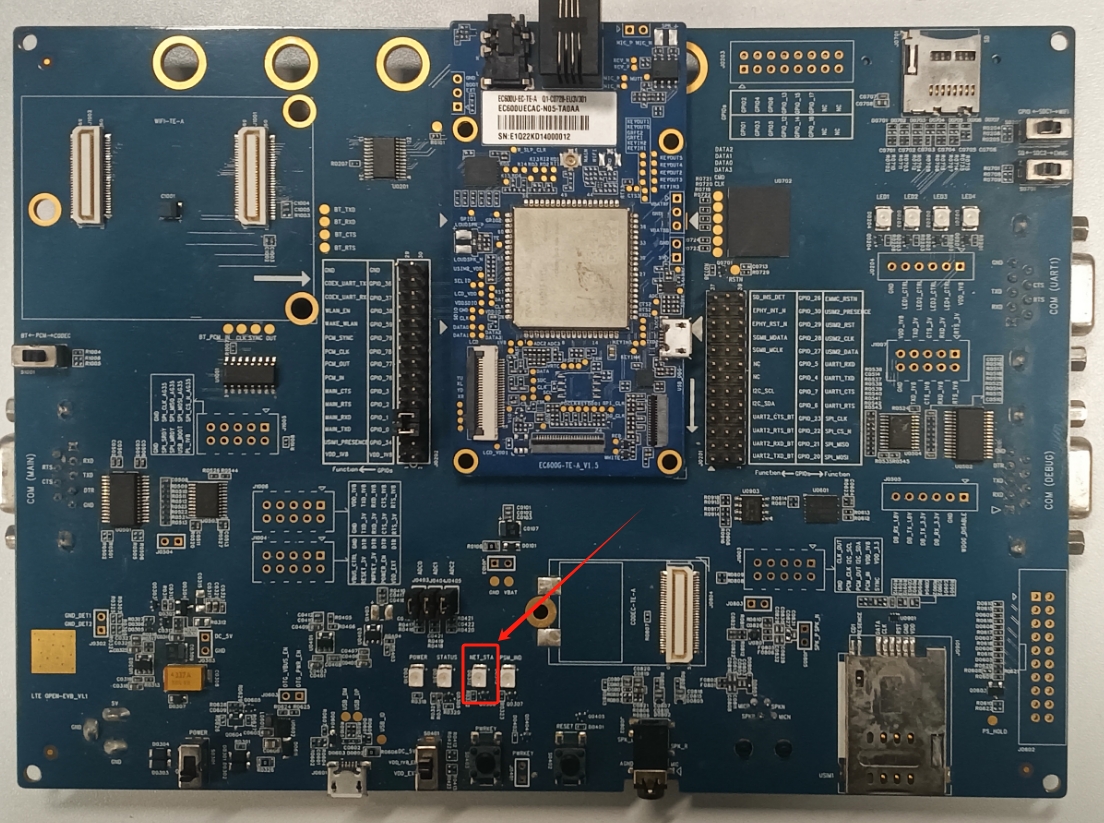
In this section, it will perform how to manipulate LED using EC600U TE-A and LTE OPEN-EVB_V1.1.
Component: LED, QuecPython EC600U module and LTE OPEN-EVB_V1.1.
In convenience of test, the LED in LTE OPEN-EVB_V1.1 such as NET_STATUS can be deployed directly.

The NET_STATUS will be taken as network indicator by default. However, it is mandatory to disable network indicator via API beforehand. See misc in detail.
Moreover, it is available to turn off network indicator via following commands in EC600U module
import misc
misc.net_light(0)# Reboot module after disabling network indicator funtion Parameter:0- OFF. 1- ON
Execute following steps once above procedure is done
- Reach pin that controls network indicator in EC600U module via Hardware_Design. It is found the NET_STATUS of EC600U is controlled by pin 54.
- After acquring pin number, it is available to find the exact GPIO 14 that corresponding to pin 54 in EC600U module based on the mapping relationship between GPIO pin number and physical pin via machine.Pin
- Compile script to control LED and run it
By running above codes via QPYcom, it is vivid that the NET_STATUS will blink with an interval of 1s.
Please note the GPIO number used to control NET_STATUS will be varied in accordance with different platforms.
