
基于TCP协议设备开发
修改配置文件
工程配置文件路径:code/dtu_config.json。
基于 TCP 私有服务器数据透传做如下配置:
打开 TCP 服务器 :http://tt.ai-thinker.com:8000/ttcloud
默认
system_config.cloud配置项定义为"tcp"即 TCP 透传模式,系统会自行读取socket_private_cloud_config配置项。{ "system_config": { "cloud": "tcp" # The tcp transparent mode is configured by default } }本实验采用 TCP 透传模式,用户需根据实际情况设置
socket_private_cloud_config配置项中的 TCP 服务器域名(domain)和端口(port)。{ "socket_private_cloud_config": { "domain": "36.137.226.30", # ip "port": 42298, # port number "timeout": 5, # time-out period (unit: s) "keep_alive": 1 # heartbeat cycle (unit: s) } }uart_config配置项是串口配置参数,默认是根据当前实验开发板做的配置,不可更改。如用户采用其他开发板则需要根据实际硬件进行配置。
{
    "uart_config": {
        "port": 2,  # Serial port number. Set this parameter based on the actual hardware configuration
        "baudrate": 115200,  # Baud rate
        "bytesize": 8,  # data bits
        "parity": 0,  # parity check
        "stopbits": 1,  # stop bit
        "flowctl": 0,  # fluid control
    }
}
完整配置文件模版如下:
{
    "system_config": {
        "cloud": "tcp"
    },
    "mqtt_private_cloud_config": {
        "server": "mq.tongxinmao.com",
        "port": 18830,
        "client_id": "txm_1682300809",
        "user": "",
        "password": "",
        "clean_session": true,
        "qos": 0,
        "keepalive": 60,
        "subscribe": {"down": "/public/TEST/down"},
        "publish": {"up":  "/public/TEST/up"}
    },
   "socket_private_cloud_config": {
        "ip_type":"IPv4",
        "domain": "36.137.226.30",
        "port": "42298",
        "keep_alive": 1
    },
    "uart_config": {
        "port": 2,
        "baudrate": 115200,
        "bytesize": 8,
        "parity": 0,
        "stopbits": 1,
        "flowctl": 0,
    }
}
参数说明:
system_config.config: 指定当前使用的私有云类型。目前支持tcp和mqtt。mqtt_private_cloud_config: MQTT私有云配置。socket_private_cloud_config: tcp私有云配置。uart_config:串口参数配置。
脚本导入并运行
下载安装 QPYCom 工具后使用该工具下载脚本至 QuecPython 模组。
💡 Tips
QPYCom 安装和使用教程 :https://python.quectel.com/doc/Application_guide/zh/dev-tools/QPYcom/index.html
业务调试
程序运行后,在 REPL 交互页面可以看到日志输出如下图所示。
左侧图示,我们使用 QCOM 模拟 MCU 打开用于透传的模组串口(即 USB 转 TTL 模块对应的 COM 口)。
右侧图示,REPL 交互口输出的模组日志。
使用串口工具 QCOM 模拟 MCU 串口上行数据,通过 DTU 透传至 TCP 回显服务器,再由回显服务器将相同数据通过 DTU 下行透传至 QCOM。
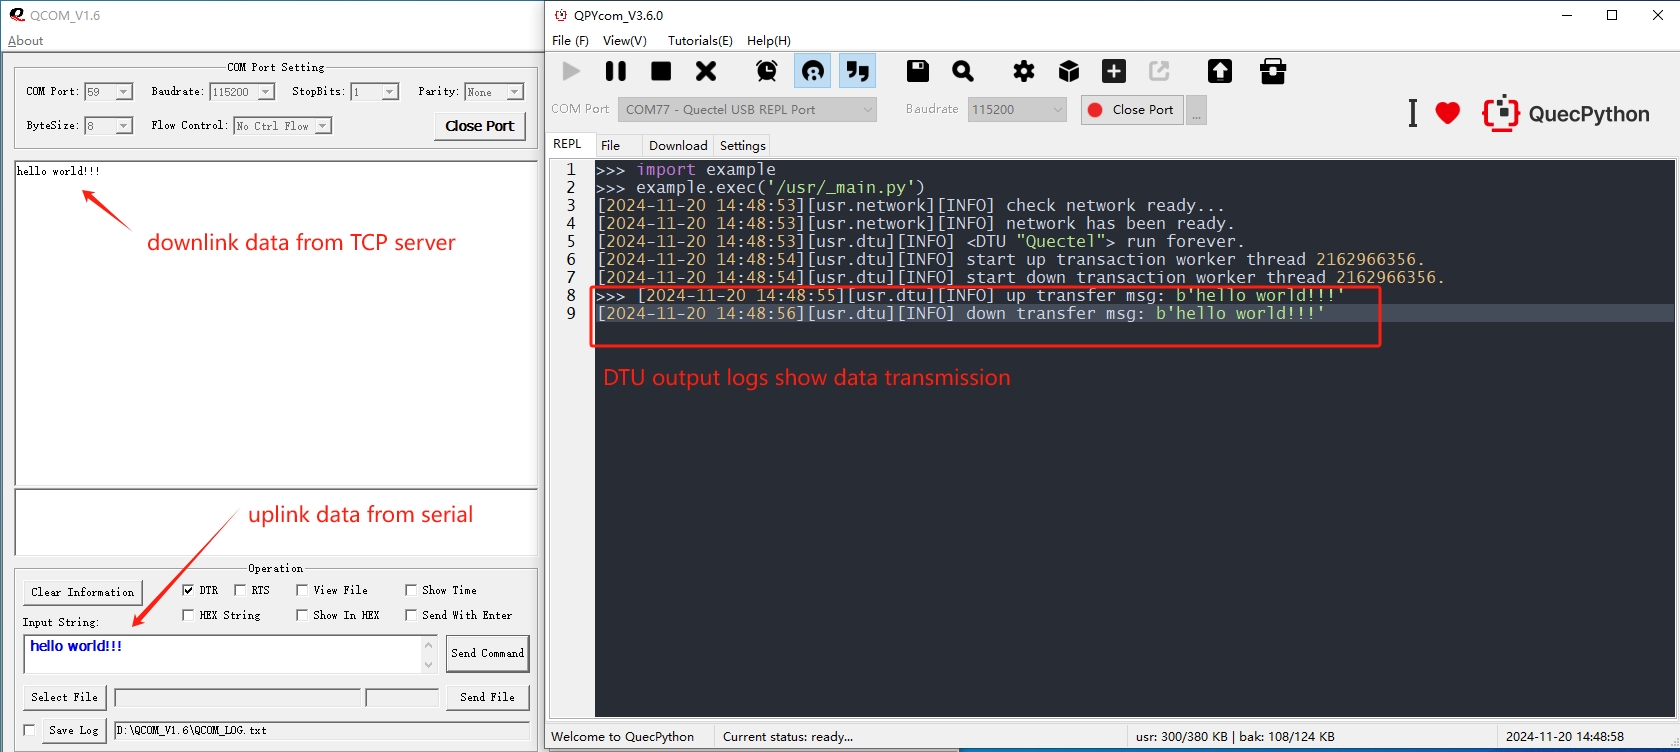
本案例中采用的是 TCP 回显服务器,所以 QCOM 上行数据,经过 DTU 透传至 TCP 服务器接收到之后会立即按原路径下行。