
Wi-Fi Module Development Quick Start
Overview
This article provides a quick guide to setting up the environment and establishing network connections for Wi-Fi module development based on the FCM360W module using QuecPython. The goal is to help developers quickly grasp the development mode of the Wi-Fi module.

Key features of the FCM360W module include:
- Single-core processor with a high clock frequency of up to 240MHz.
- Available memory of 100 KB SRAM and 1310 KB Flash.
- Single-frequency 2.4GHz Wi-Fi 6, supporting AP/STA modes and complying with WPA-PSK, WPA2-PSK, and WAP3-PSK security protocol standards. It also supports AES128-bit hardware encryption algorithm.
- Peripheral support for 16*GPIO, 16*ExtInt, 2*UART, 1*I2C, 1*SPI, 1*RTC, 4*Timer, 1*WDT, 6*PWM, 3*ADC.
- Network components supporting TCP/UDP socket, MQTT, HTTP.
- Support for Modem Sleep low-power sleep mode.
- Support for OTA differential upgrades.
- Support for RTOS and LittleFS2.
Setting Up the Development Environment
This section mainly covers the process of setting up the hardware and software environment for the FCM360W module.
Setting Up the Hardware Environment
The necessary list of components includes:
- FCM360W development board * 1
- USB Type-C data cable * 1
- Windows computer * 1
- Router with internet access capability * 1
- If the Wi-Fi module communicates with devices within the local network, there is no requirement for the router to have internet access.
- If there is no router, you can use a mobile phone hotspot. For iOS devices, please try to enable the hotspot's compatibility mode to avoid the Wi-Fi module from being unable to connect.
Connect the FCM360W development board to the computer using the USB Type-C data cable, and the development board will automatically power on and start running.
Click here to view the resources and usage documentation for the FCM360W development board.
Setting Up the Software Environment
The necessary list of software includes:
- USB to Serial driver - CH343SER.
- Integrated Development Tool - QPYcom.
- FCM360W Firmware Package.
USB to Serial Driver - CH343SER
The FCM360W module does not have a USB interface but has two serial ports. To communicate with the computer, including firmware burning, Python command interaction, system log output, etc., a circuit with a USB to serial chip is required.
The FCM360W development board already integrates a USB to serial chip with the CH342 model. Visit the chip's official website to download the driver for the USB to serial chip. Click the INSTALL button to complete the driver installation in one step.
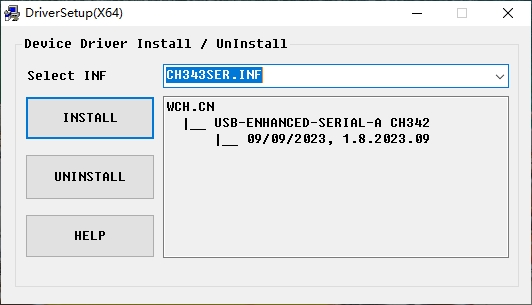
It's important to note that both CH342 and CH343 chips use the CH343SER driver to avoid unnecessary confusion between chip names and driver names.
The CH342 chip can convert one USB to two serial ports. After the driver is installed, we can see in the Device Manager of the Windows computer that there are two serial devices with names starting with USB-Enhanced-SERIAL, as shown in the following image:
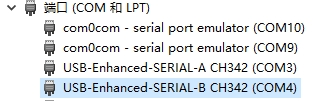
- Serial port
USB-Enhanced-SERIAL-A CH342is used for firmware burning and system log output. - Serial port
USB-Enhanced-SERIAL-B CH342is used for Python command interaction.
It is worth noting that, to achieve automatic firmware burning, the DTR pin of the USB-Enhanced-SERIAL-A CH342 port is connected to the reset pin of the FCM360W module. Moments before firmware burning, the burning tool will automatically pull down and release the DTR pin, resetting the module and enabling automatic burning.
Therefore, when using a serial debugging tool to view the module's system logs, before opening the USB-Enhanced-SERIAL-A CH342 port, please ensure that the DTR functionality is disabled, and then open the port to prevent the module from restarting during operation, unless that is your intention.
Integrated Development Tool - QPYcom
QPYcom is an integrated development environment designed specifically for QuecPython. It includes features such as Python command interaction, file transfer, firmware burning, and script execution.
Visit the download page on the QuecPython official website, and you can find QPYcom under the Tools tab for downloading. After extracting, double-click QPYcom.exe to open and use it directly.
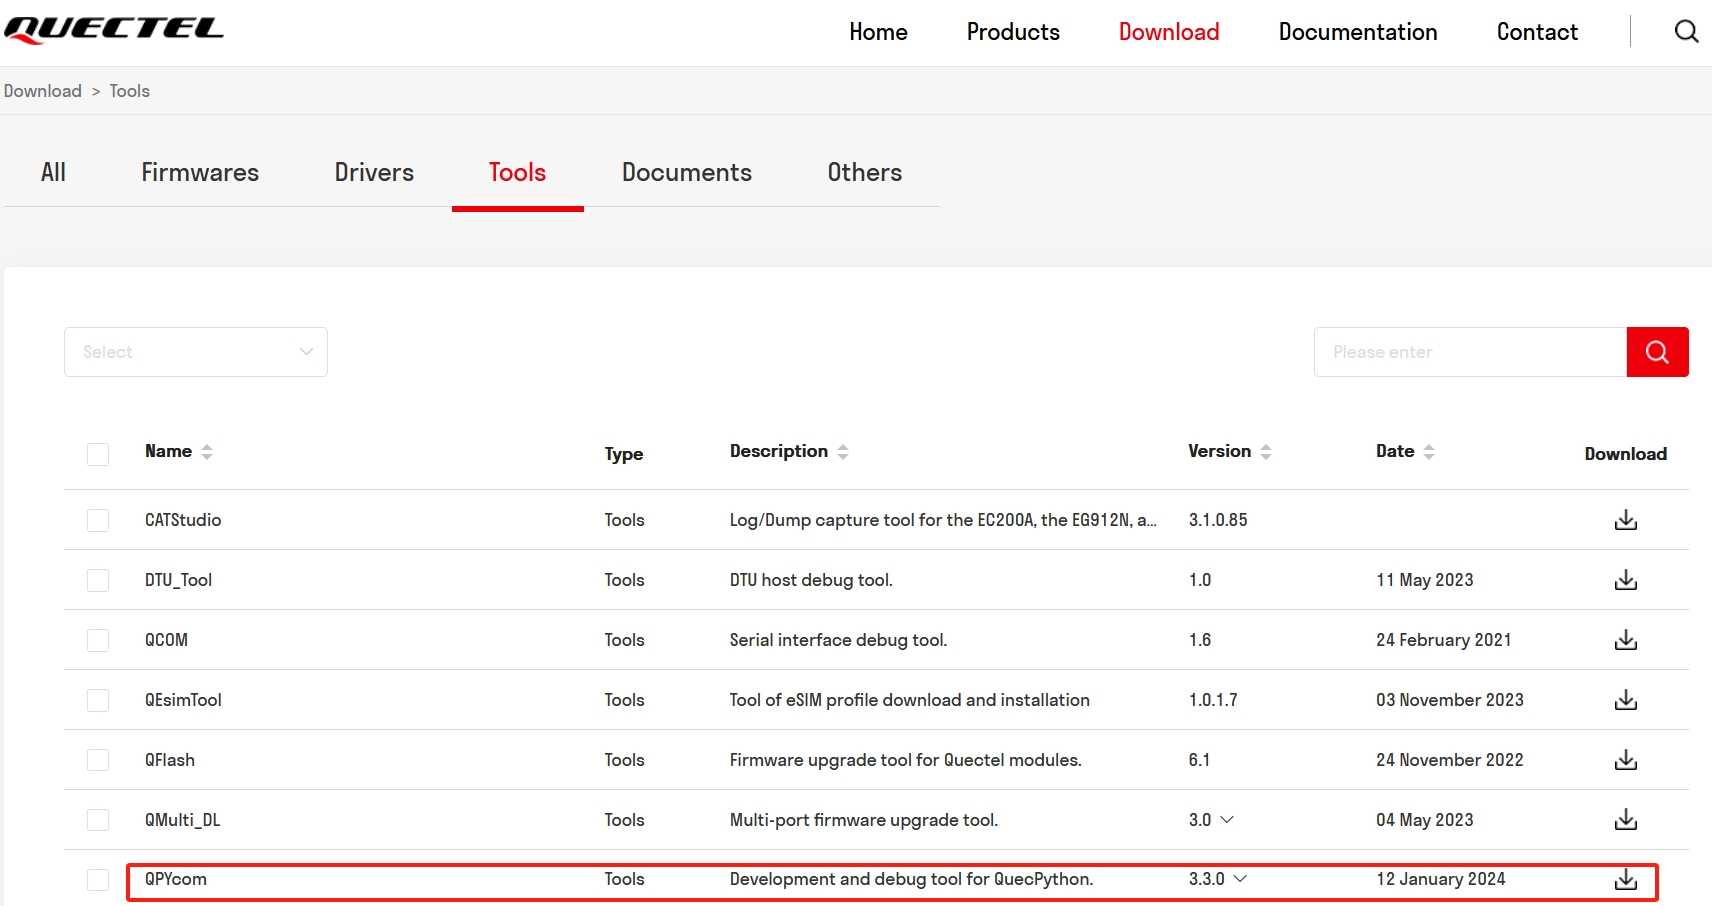
Click here to view the tutorial on how to use the QPYcom tool, with a focus on the Download Function.
Download FCM360W Firmware
It is necessary to burn the FCM360W firmware package, which includes the QuecPython runtime environment, to execute QuecPython scripts.
Visit the QuecPython official website, go to the details page of the FCM360W module, and navigate to the Download tab. Find the download item named QPY_OCPU_FCM360W_FW, click the download button on the right, and you can download the firmware package.

Burn FCM360W Firmware
Before starting the burning process, two things must be clarified:
- The firmware package downloaded directly from the QuecPython official website is in zip format. It must be extracted first, and the file
QPY_OCPU_BETA0002_FCM360W_FW.binunder theQPY_OCPU_BETA0002_FCM360W_FWfolder is the file to be burned. - The burning port is
USB-Enhanced-SERIAL-A CH342, with a baud rate of115200. The port must be opened before burning.
Then, follow the firmware burning process as shown in the image below.
Introduction to Software Interfaces
Before starting development, it is essential for developers to organize and understand the network-related interfaces of the Wi-Fi module.
Introduction to Network Connection APIs
The following table provides an overview of network connection APIs and their blocking characteristics:
| Function Description | Method (Click for Details) | Blocking |
|---|---|---|
| Create WLAN Interface | class network.WLAN(mode) | - |
| Mode Switching and Query | WLAN.mode([mode]) | - |
| Parameter Configuration and Query | WLAN.config('param' | param=value) | - |
| Activate and Query Interface | WLAN.active([enable]) | Default blocking mode, can be configured to non-blocking mode through the WLAN.config interface |
| Network Connection | WLAN.connect([ssid, password, bssid, timeout=15]) | Default blocking mode, can be configured to non-blocking mode through the WLAN.config interface |
| Disconnect Network Connection | WLAN.disconnect([interface, mac, ip]) | - |
| WLAN Status Query | WLAN.status('param') | - |
| Hotspot Scanning | WLAN.scan([ssid, bssid, channel, passive, max_item, scan_time]) | Default blocking mode, can be configured to non-blocking mode through the WLAN.config interface |
| Network Address Configuration and Query | WLAN.ifconfig([interface, config]) | - |
| Network Configuration | WLAN.netcfg([enable=True, type=nic.NETCFG_SMARTCONFIG, timeout=120]) | Default blocking mode, can be configured to non-blocking mode through the WLAN.config interface |
In the above methods' parameters:
[]indicates optional parameters, as inWLAN.mode([mode]).|indicates multiple parameter forms, as inWLAN.config('param' | param=value).'param'indicates that the parameter is of string type.param=valueindicates keyword parameters.
Regardless of whether it operates in blocking mode or not, all Wi-Fi-related events are notified to the user through callback functions.
After creating the WLAN interface, it is strongly recommended for users to configure the event callback function through the WLAN.config method; otherwise, Wi-Fi-related events may be lost.
Error Codes, Event Codes, and Status Codes During Wi-Fi Connection
- Error Codes: Refer to WLAN - Wireless Local Area Network - Error Codes。
- Event Codes: Refer to WLAN - Wireless Local Area Network - Event Codes。
- Status Codes: Refer to WLAN - Wireless Local Area Network - Status Codes。
Basic Flow of Network Connection
Wi-Fi applications in the embedded industry are generally divided into three categories: STATION mode, AP mode, and STATION-AP coexistence mode.
- STATION mode is used to connect to Wi-Fi hotspots.
- AP mode is used to generate Wi-Fi hotspots and connect to other Wi-Fi devices.
- STATION-AP coexistence mode can both connect to Wi-Fi networks and generate Wi-Fi hotspots, connecting to other Wi-Fi devices.
Since the current support for STATION-AP coexistence mode is not well-established, this section will separately explain the network connection process when the Wi-Fi module works in STATION mode and AP mode.
Connecting to Wi-Fi Hotspot
The overall process is as follows:
- Prepare a 2.4GHz Wi-Fi router.
- Set up the necessary software and hardware development environment following the Setting Up the Development Environment section.
- Connect to the Wi-Fi router's hotspot:
a. Create WLAN interface.
b. Connect to the router.
The code snippet is as follows:
import network

# Create a Wi-Fi interface and set it to STA mode
nic = network.WLAN(network.STA_MODE)
print('- Created a Wi-Fi NIC.')

# Define Wi-Fi event callback function
def wifi_event_cb(event):
    # Print event information
    print("- Event:\r\n   ", event)

    # When an IP address is obtained, print related IP address information
    if event['id'] == 3305:
        print("- Got IP:\r\n   ", nic.ifconfig())

# Set the event callback function
nic.config(event_callback = wifi_event_cb)

# Connect to the hotspot
SSID = "Quectel-Customer-2.4G"
PASSWD = "Customer-Quectel"
print('- Connecting to', SSID)
nic.connect(ssid = SSID, password = PASSWD)
The execution result of the code is as follows:
- Created a Wi-Fi NIC.
- Connecting to Quectel-Customer-2.4G
- Event:
    {'msg': None, 'type': 3300, 'id': 3301}
- Event:
    {'msg': {'password': 'Customer-Quectel', 'ssid': 'Quectel-Customer-2.4G', 'rssi': -62, 'channel': 1, 'bssid': 'a4:00:e2:ef:f7:80', 'auth': 4, 'cipher': 4}, 'type': 3300, 'id': 3302}
- Event:
    {'msg': ('10.66.117.73', '255.255.252.0', '10.66.116.1', '0.0.0.0', '0.0.0.0'), 'type': 3300, 'id': 3305}
- Got IP:
    ('10.66.117.73', '255.255.252.0', '10.66.116.1', '211.138.180.2', '114.114.114.114')
Generating a Wi-Fi Hotspot and Connecting Devices
The overall process is as follows:
- Prepare a smartphone that supports 2.4GHz Wi-Fi (almost all smartphones support this).
- Set up the necessary software and hardware development environment following the Setting Up the Development Environment section.
- Let the Wi-Fi module generate a hotspot:
a. Create WLAN interface.
b. Generate a hotspot.
The code snippet is as follows:
import network

# Create a Wi-Fi interface and set it to AP mode
nic = network.WLAN(network.AP_MODE)
print('- Created a Wi-Fi NIC.')

# Define Wi-Fi event callback function
def wifi_event_cb(event):
    if event['id'] == 3201: # Hotspot creation success
        print("- AP is created successfully.")
    elif event['id'] == 3202: # Hotspot creation failure
        print("- AP is created failed.")
    elif event['id'] == 3203: # A device joined the hotspot
        print("- AP accepted a device joining.")
    elif event['id'] == 3204: # Disconnected from a joined device
        print("- AP disconnected from a joined device.")
    elif event['id'] == 3205: # Assigned IP address to the joined device
        print("- AP assigned IP address to the joined device.")
    else:
        print("- Other event occured.")

    # Print event information
    print("    Event:", event)

# Set the event callback function
nic.config(event_callback = wifi_event_cb)

# Set the hotspot name and password
# If not set, the default hotspot name and password are both: quecpython
SSID = "QuecPython_SoftAP"
PASSWD = "12345678"
print("- Will create a AP:")
print("    SSID:", SSID)
print("    PASSWD:", PASSWD)
nic.config(ap_ssid = SSID, ap_password = PASSWD)

# Activate the interface to trigger the hotspot generation
nic.active(True)
Search for the hotspot named QuecPython_SoftAP with your phone, connect, and then disconnect. The execution results of the above code are as follows:
- Created a Wi-Fi NIC.
- Will create a AP:
    SSID: QuecPython_SoftAP
    PASSWD: 12345678
- AP is created successfully.
    Event: {'msg': None, 'type': 3200, 'id': 3201}
- AP accepted a device joining.
    Event: {'msg': {'mac': 'd6:d7:f0:b0:a3:bf', 'aid': 1}, 'type': 3200, 'id': 3203}
- AP assigned IP address to the joined device.
    Event: {'msg': {'ip': '10.10.10.2', 'aid': 1, 'mac': 'd6:d7:f0:b0:a3:bf'}, 'type': 3200, 'id': 3205}
- AP disconnected from a joined device.
    Event: {'msg': {'ip': '10.10.10.2', 'aid': 1, 'mac': 'd6:d7:f0:b0:a3:bf'}, 'type': 3200, 'id': 3204}
Network Application Development Process
Before we begin, it's important to note: when developing applications based on the TCP protocol in the Wi-Fi module, whether the module acts as a client or server, and whether it is in STATION or AP mode, is irrelevant.
For the convenience of case demonstration, this section demonstrates the implementation of two functions:
- Develop a TCP client in STATION mode, with the functionality to:
Connect to a TCP echo server, periodically send data to the server and receive its echoed data; repeat this process 10 times, disconnect from the server, and end the program.
- Develop a TCP server in AP mode, with the functionality to:
Accept connections from TCP clients and send back the data received from these clients.
Development of TCP Client in STATION Mode
Software Framework
Building on the foundation of connecting to a Wi-Fi hotspot in the previous code, for this example, we need to make some modifications:
- Set the API to non-blocking mode.
- Send Wi-Fi events to the message queue and process messages taken from the queue.
- Write a function named
tcp_echo_clientto implement the functionality of the TCP client.
The complete software framework is as follows:
import network
from queue import Queue

# Create a message queue
msg_q = Queue(8)

# Create a Wi-Fi NIC and set it to STATION mode
nic = network.WLAN(network.STA_MODE)
print('- Created a Wi-Fi NIC.')

# Set to non-blocking mode
nic.config(block = False)

# Define Wi-Fi event callback function
def wifi_event_cb(event):
    # Print event information
    print("- Event:", event)

    # Send the message to the queue
    msg_q.put(event)

# Set the event callback function
nic.config(event_callback = wifi_event_cb)

# Connect to the hotspot
SSID = "Quectel-Customer-2.4G"
PASSWD = "Customer-Quectel"
print('- Connecting to', SSID)
nic.connect(ssid = SSID, password = PASSWD)

# TCP client function
def tcp_echo_client(server_addr, server_port):
    pass

while True:
    # Wait for messages in the queue
    event = msg_q.get()

    if event['id'] == 3302: # Successfully connected to the hotspot
        print("- Connected to AP.")
    elif event['id'] == 3305: # When an IP address is obtained, print IP address information and start the TCP client
        print("- Got IP:", nic.ifconfig())
        print("- Start TCP client.")
        # The address and port of the TCP server are '112.31.84.164' and '8305' respectively
        tcp_echo_client('112.31.84.164', 8305)
TCP Client Code Implementation
The sample code is as follows:
def tcp_echo_client(server_addr, server_port):
    import usocket
    import utime

    # DNS resolution
    print('- DNS resolving for', server_addr, ":", server_port)
    addr = usocket.getaddrinfo(server_addr, server_port)[0][-1]

    # Create a socket object
    sock = usocket.socket(usocket.AF_INET, usocket.SOCK_STREAM, usocket.IPPROTO_TCP)
    print('- Socket object created.')

    # Connect to the server
    print('- Connecting to', addr)
    sock.connect(addr)
    print('- TCP link established.')

    # Data exchange
    for i in range(10):
        data = "Hello world!"
        sock.send(data)
        print("- - C --> S:", data)

        data = sock.recv(1024)
        print("- - S --> C:", data)

        utime.sleep(1)

    # Disconnect
    sock.close()
    print('- TCP link disconnected.')
Software Function Verification
The software function verification steps are as follows:
- Implement the
tcp_echo_clientfunction in the software framework according to the provided code. - Save the code as a Python script file and import it into the Wi-Fi module using QPYcom, then execute the script.
The logs for the operation of this function are as follows:
- Created a Wi-Fi NIC.
- Connecting to Quectel-Customer-2.4G
- Event: {'msg': None, 'type': 3300, 'id': 3301}
- Event: {'msg': {'password': 'Customer-Quectel', 'ssid': 'Quectel-Customer-2.4G', 'rssi': -61, 'channel': 1, 'bssid': 'a4:00:e2:ef:f7:80', 'auth': 4, 'cipher': 4}, 'type': 3300, 'id': 3302}
- Connected to AP.
- Event: {'msg': ('10.66.117.73', '255.255.252.0', '10.66.116.1', '0.0.0.0', '0.0.0.0'), 'type': 3300, 'id': 3305}
- Got IP: ('10.66.117.73', '255.255.252.0', '10.66.116.1', '211.138.180.2', '114.114.114.114')
- Start TCP client.
- DNS resolving for 112.31.84.164 : 8305
- Socket object created.
- Connecting to ('112.31.84.164', 8305)
- TCP link established.
- C --> S: Hello world!
- S --> C: b'Hello world!'
- C --> S: Hello world!
- S --> C: b'Hello world!'
- C --> S: Hello world!
- S --> C: b'Hello world!'
- C --> S: Hello world!
- S --> C: b'Hello world!'
- C --> S: Hello world!
- S --> C: b'Hello world!'
- C --> S: Hello world!
- S --> C: b'Hello world!'
- C --> S: Hello world!
- S --> C: b'Hello world!'
- C --> S: Hello world!
- S --> C: b'Hello world!'
- C --> S: Hello world!
- S --> C: b'Hello world!'
- C --> S: Hello world!
- S --> C: b'Hello world!'
- TCP link disconnected.
Development of TCP Server in AP Mode
Software Framework
Building on the foundation of creating a Wi-Fi hotspot and connecting devices in the previous code, for this example, we need to make some modifications:
- Set the API to non-blocking mode.
- Send Wi-Fi events to the message queue and process messages taken from the queue.
- Write a function named
tcp_echo_serverto implement the functionality of a TCP server.
The complete software framework is as follows:
import network
from queue import Queue

# Create a message queue
msg_q = Queue(8)

# Create Wi-Fi NIC and set it to AP mode
nic = network.WLAN(network.AP_MODE)
print('- Created a Wi-Fi NIC.')

# Set to non-blocking mode
nic.config(block = False)

# Define Wi-Fi event callback function
def wifi_event_cb(event):
    # Print event information
    print("- Event:", event)

    # Send message to the queue
    msg_q.put(event)

# Set event callback function
nic.config(event_callback = wifi_event_cb)

# Set hotspot name and password
# If not set, the default hotspot name and password are: quecpython
SSID = "QuecPython_SoftAP"
PASSWD = "12345678"
print("- Will create a AP:")
print("    SSID:", SSID)
print("    PASSWD:", PASSWD)
nic.config(ap_ssid = SSID, ap_password = PASSWD)

# Activate the interface to trigger the hotspot generation
nic.active(True)

# TCP server function
def tcp_echo_server(server_addr, server_port):
    pass

while True:
    # Wait for messages in the queue
    event = msg_q.get()

    if event['id'] == 3201: # Hotspot creation success
        print("- AP is created successfully.")
        print("- Start TCP server.")
        # Read the module's local IP address
        local_addr = nic.ifconfig()[0]
        # Start TCP server
        tcp_echo_server(local_addr, 8080)
    elif event['id'] == 3202: # Hotspot creation failure
        print("- AP is created failed.")
    elif event['id'] == 3203: # A device joined the hotspot
        print("- AP accepted a device joining.")
    elif event['id'] == 3204: # Disconnected from a joined device
        print("- AP disconnected from a joined device.")
    elif event['id'] == 3205: # Assigned IP address to the joined device
        print("- AP assigned IP address to the joined device.")
    else:
        print("- Other event occured.")
TCP Server Code Implementation
The sample code is as follows:
def tcp_echo_server(server_addr, server_port):
    import usocket
    import _thread

    # Thread to handle communication with each connected client
    def _client_conn_proc(conn, ip_addr, port):
        while True:
            try:
                # Receive data from the client
                data = conn.recv(1024)
                print('- Recv data: [client addr: %s, %s]:' % (ip_addr, port), data)

                # Send the received data back to the client
                conn.send(data)
            except:
                # Exception occurred, close the connection
                print('- Disconnected from client: %s, %s' % (ip_addr, port))
                conn.close()
                break

    # Create a socket object
    sock = usocket.socket(usocket.AF_INET, usocket.SOCK_STREAM, usocket.IPPROTO_TCP_SER)
    print('- Socket object created.')

    # Bind the server port and address
    sock.bind((server_addr, server_port))
    print('- Bind address: %s, %s' % (server_addr, server_port))

    # Listen for incoming client connection requests
    sock.listen(10)
    print('- Start listening ...')

    while True:
        # Wait for a client to connect
        cli_conn, cli_ip_addr, cli_port = sock.accept()
        print('- Accept a client: %s, %s' % (cli_ip_addr, cli_port))

        # Create a new thread for each client connection
        _thread.start_new_thread(_client_conn_proc, (cli_conn, cli_ip_addr, cli_port))
Software Function Verification
To verify this functionality, you need to prepare a computer capable of connecting to the Wi-Fi hotspot and running a TCP client.
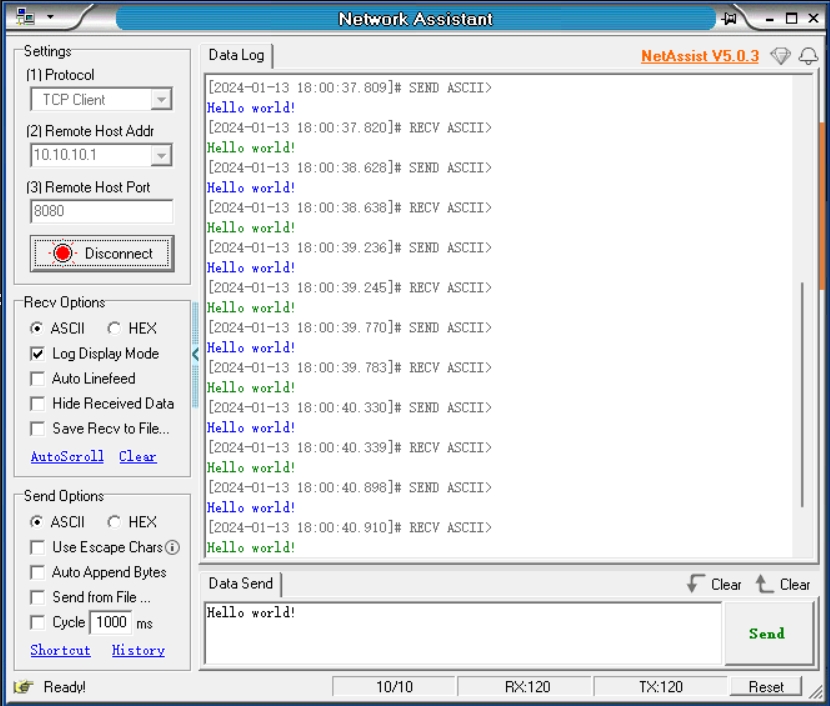
In this scenario, a network debugging assistant named NetAssist.exe is run on the computer.
The verification steps are as follows:
Implement the
tcp_echo_serverfunction in the software framework according to the provided code, creating a complete application.Save the code as a Python script file and import it into the Wi-Fi module using QPYcom, then execute the script.
At this point, the Wi-Fi module will create a hotspot and start the TCP server. The log will look like this:
- Created a Wi-Fi NIC.
- Will create a AP:
    SSID: QuecPython_SoftAP
    PASSWD: 12345678
- Event: {'msg': None, 'type': 3200, 'id': 3201}
- AP is created successfully.
- Start TCP server.
- Socket object created.
- Bind address: 10.10.10.1, 8080
- Start listening ...
Connect the computer to the Wi-Fi hotspot generated by the Wi-Fi module:
QuecPython_SoftAP.At this point, the module's output log will be as follows:
- Event: {'msg': {'mac': 'c4:75:ab:bc:a5:ac', 'aid': 1}, 'type': 3200, 'id': 3203}
- Event: {'msg': {'ip': '10.10.10.2', 'aid': 1, 'mac': 'c4:75:ab:bc:a5:ac'}, 'type': 3200, 'id': 3205}
Start the network debugging assistant NetAssist.exe and connect to the server started in the module:
10.10.10.1, 8080.At this point, the module's output log will be as follows:
- Accept a client: 10.10.10.2, 51434In the data sending area of NetAssist, enter the string
Hello world!and continuously click theSendbutton to send data to the server.At this point, the module's output log will be as follows:
- Recv data: [client addr: 10.10.10.2, 51434]: b'Hello world!'
- Recv data: [client addr: 10.10.10.2, 51434]: b'Hello world!'
- Recv data: [client addr: 10.10.10.2, 51434]: b'Hello world!'
- Recv data: [client addr: 10.10.10.2, 51434]: b'Hello world!'
- Recv data: [client addr: 10.10.10.2, 51434]: b'Hello world!'
- Recv data: [client addr: 10.10.10.2, 51434]: b'Hello world!'
- Recv data: [client addr: 10.10.10.2, 51434]: b'Hello world!'
- Recv data: [client addr: 10.10.10.2, 51434]: b'Hello world!'
- Recv data: [client addr: 10.10.10.2, 51434]: b'Hello world!'
- Recv data: [client addr: 10.10.10.2, 51434]: b'Hello world!'
Simultaneously, after each data transmission, the data reception area of the Network Debugging Assistant will display the sent data (in blue font) and show the data received from the server (in green font).
The running effect of the Network Debugging Assistant is shown in the following image:
If you have two FCM360W Wi-Fi modules, you can perform the following test steps without relying on a computer.
- Run a TCP server in AP mode on one of the modules.
- After the TCP server in the first module has started, use the other module as a STATION, connect to the hotspot created by the first module, and start the TCP client.
For the TCP client code in STATION mode, there are two points to note:
- The
SSIDandPASSWDof the hotspot to be connected should be consistent with those created by the first module. This can be easily ensured by prearrangement.- The IP address and port of the server to be connected should be consistent with those of the TCP server started by the first module.
- By default, the IP address of the AP mode is
10.10.10.1.- If the module in AP mode has modified its IP address and server port, you can see it in the logs, and the client should make corresponding modifications.